All about crochet cardigans: 6 ways to crochet a cardigan
I love a cardigan. Crocheted or off-the-peg, they are probably the most versatile garments one can own.
So in this issue of my ‘all about crochet’ series, I am going to look at some of the different ways you can crochet a cardigan, along with highlighting some example crochet patterns for each style.
If you never thought you could or wanted to crochet a cardigan before, I hope this article might just change your mind…
Whether you are using a pattern or crocheting your own design, based on your measurements, understanding some of the cardigan construction options that are available will help make the process easier for you.


In the name of transparency, this is not an exhaustive list of options. There are endless ways one could crochet a cardigan, but these are the most common approaches used in crochet patterns.
Although I have included a short section discussing the crochet cocoon cardigan at the start (made with just one rectangle), the majority of the post will be dedicated to the more traditional garment with sleeves and an optional button band. To differing degrees, they all offer the ability to add shaping to the neckline, body, armhole and sleeve length and shape.
Below is a list of the crochet cardigan construction styles I will be discussing. You can browse through them all or click to jump to any one that you have specific interest in.
Note that the styles don’t all have formal names (that I could determine anyway…) so I have been as descriptive as I can.
Before you get stuck in, it will probably help, though it’s not essential, if you understand these 6 basic ways to construct a crochet a sweater. These relate more to sleeve styles and overall shapes, but they can also be overlaid onto the approaches to crochet cardigan construction.
I do refer to some of the terminology like ‘raglan’ and yoke’s etc, so you will get more from this tutorial if you are familiar with those. You can always check out my jargon buster or type a term in the search bar if you’re not familiar with it.
I have created a schematic for each cardigan style, illustrating how they are put together. To help you explore further, I have included some suggested paid and / or free crochet cardigan patterns which use each method.
The intention is for you to think of each cardigan style as a basic template, ready to be adjusted to fit your body, your personal preference and needs.
I haven’t put measurements on any of the schematics as this will depend on the size you’re making. If you’re looking to crochet a cardigan based off any of these schematics, you could use your own body measurements or use some of the standard body size measurements that are widely available.
You can also calculate your stitch and row counts for a made to measure peace.
Without further ado, let’s get started so you can feel all the crochet cardigan love.

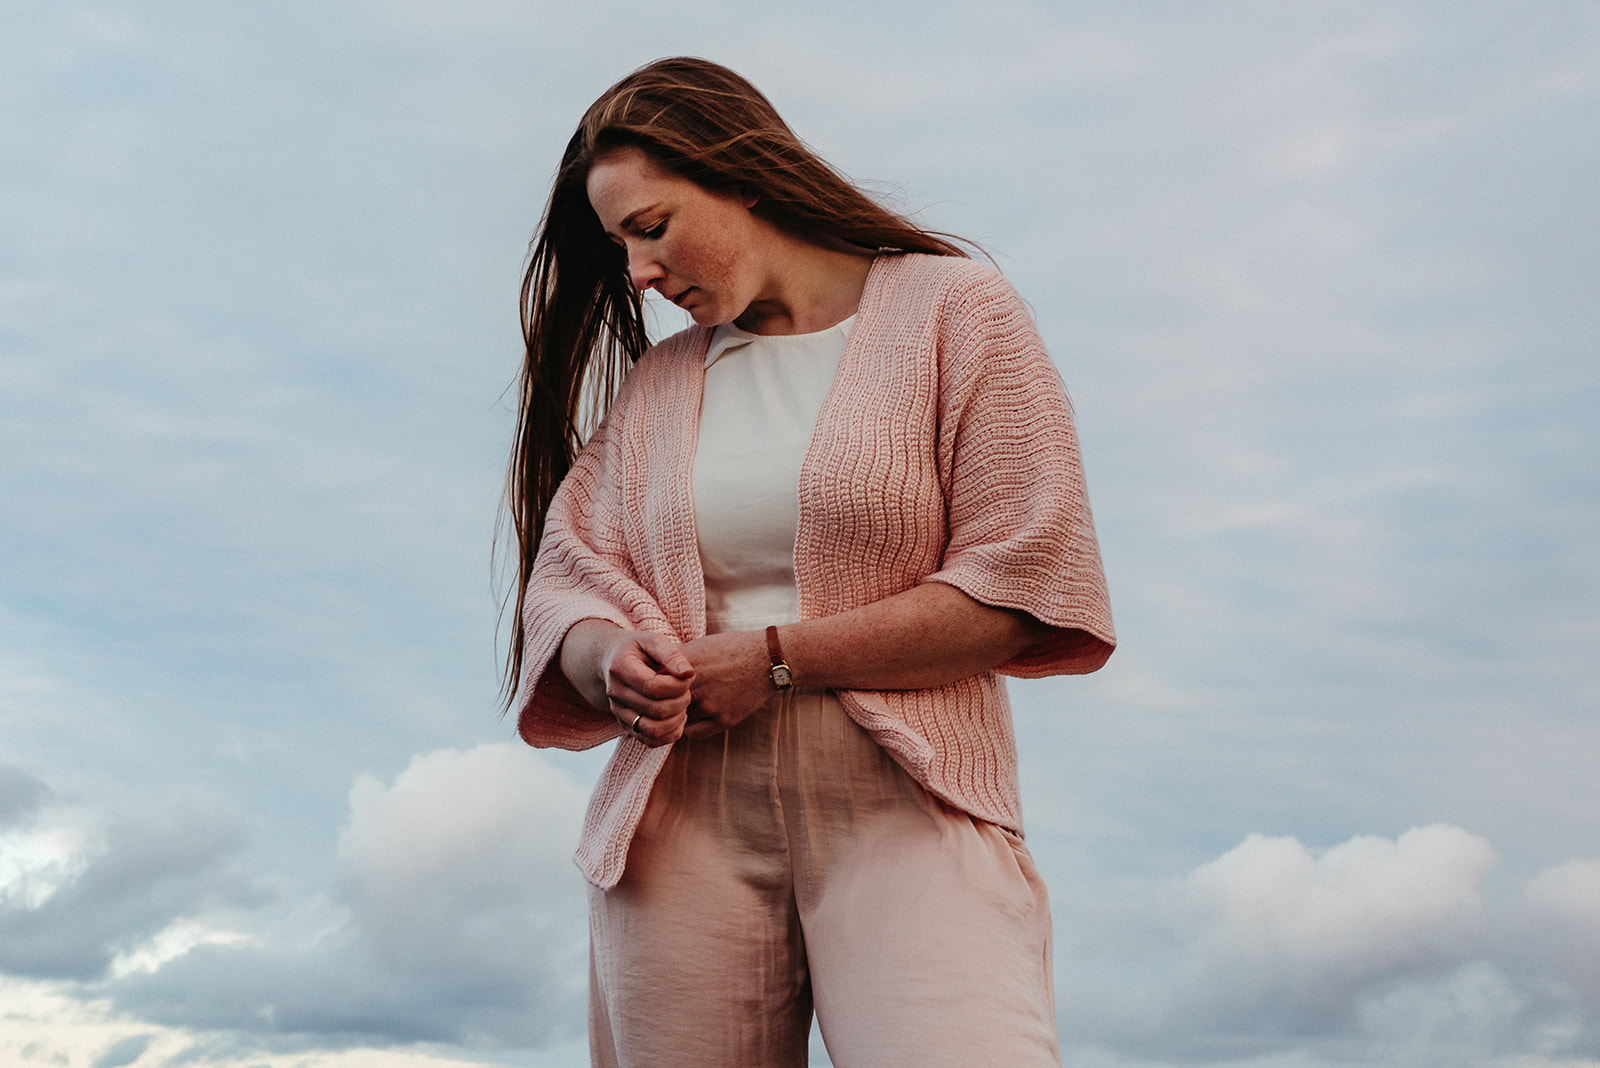
1. The crochet cocoon cardigan
I see a lot of crochet patterns for cardigan style sweaters out there in the crochetverse which are made from one or two simple rectangles folded and seamed in a couple of places to throw over the shoulders in a kind of cardigan shape.
These can be a great first step into crocheting garments – I call them gateway crochet patterns because the hope is that they make you want to try crocheting more fitted garments with shaping.
So for cocoon cardigans, I use the term cardigan lightly – I think crochet shrug is a better term or maybe a crochet slipover. B ut it would be remiss of me to exclude them as they are super popular.
It may help you to think of a cocoon cardi as essentially a wrap with sleeves or a wearable blanket. They have no shaping and you can be flexible with sizing (and therefore gauge to some extent). This makes them an easy project to start with start if you’ve always been a bit scared of wearables.
You can add sleeves, cuffs and a button band / hem / collar to this type of crochet shrug once the main piece is made. However, you won’t get much control over shaping or adjusting fit in specific areas with this type of crochet design.
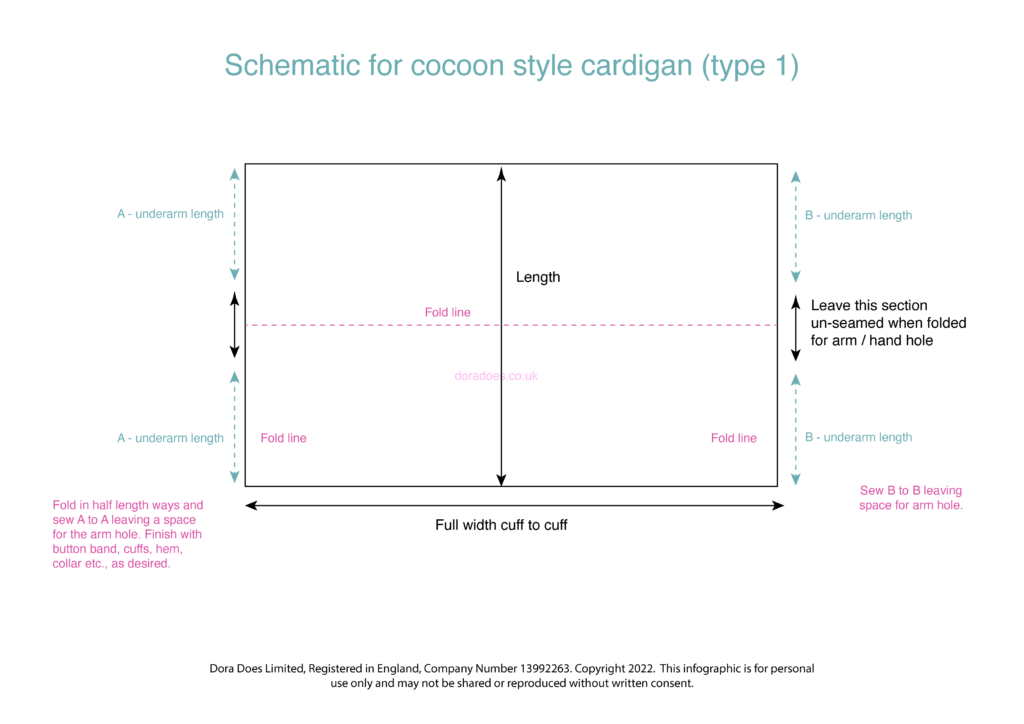
There are two very similar ways to construct a crochet cocoon cardigan. And both start with a rectangle, the width of which approximates the cuff to cuff measurement and the length of which dictates the overall length of the cardigan from neck to waist / hips.
The first type of cocoon cardigan is made by folding your rectangle in half along the long side (the pink line in the schematic) and seaming the two short sides, leaving a gap for the armhole.
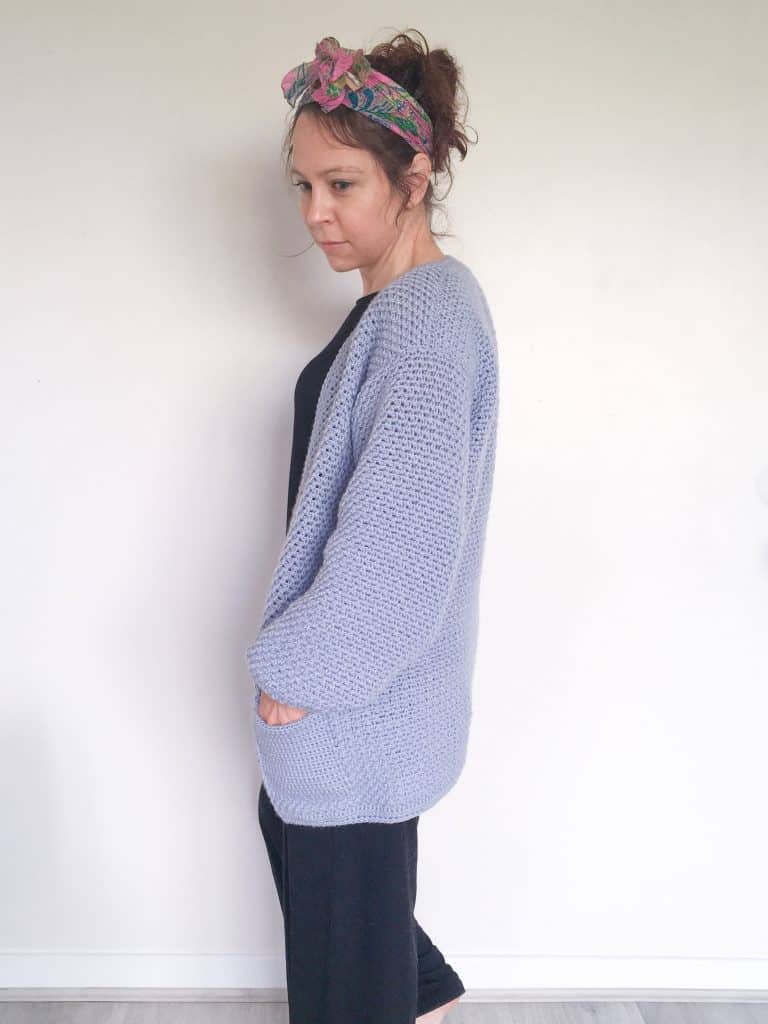
The picture below shows a wip shot of a cocoon cardigan being made using this first approach. This is the wrong side of the garment – the seams will be hidden inside when finished.
You can see that there is the front opening in the centre where I have added the button band/ neck/ hem, which wraps you in a crochet cocoon. I have also added a cuff to the left arm hole. This creates a mini sleeve which helps add some shaping and improves the fit and wearability.

After the main piece is seamed, you can use these finishing features to customise the shaping a little, or add a collar etc.
The second approach to creating a cocoon cardigan is very similar. Once again you create a rectangle – I have used the same shape in the schematic below, but you could adjust to your own measurements.
You fold over the corner edges and seam ad shown in the diagram (it reminds me of origami). The main difference here is that you will have a wider back neck line and hem, and the arm holes will be positioned differently.

The Heart lines cocoon cardi is a free pattern for a cocoon shrug. It’s an oversized crochet cardigan and is a simple introduction to this style of construction. It’s a great beginners crochet project for lounging and getting cosy.

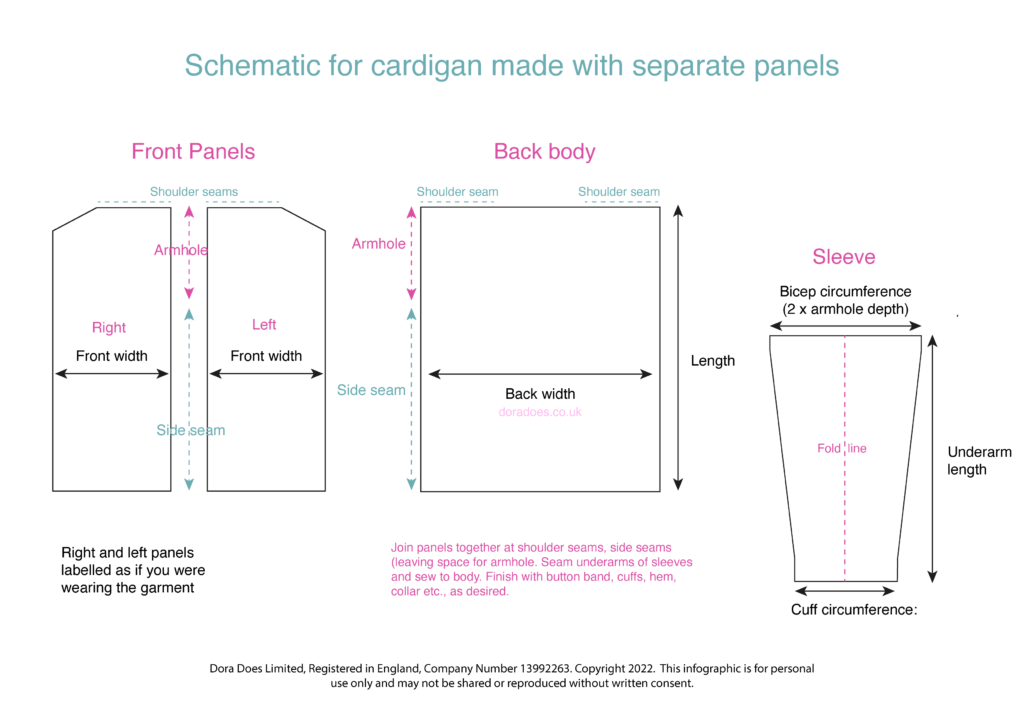
2. Crochet cardigans made from separate panels
The cut and sew style method creating a crochet cardigan is to construct it from separate panel pieces. In this approach, you crochet a back panel, one panel for each of the front sides (which are typically a mirror image of one another) and one piece for each of the sleeves.
The blocked crochet panels are sewn together, seaming across the shoulders, up the sides and along the under arm.
The schematic illustrates a drop shoulder style cardigan. The front panels have a little shaping at the top neckline to create space, like a very shallow v-neck.
You seam the shoulder edges of the fronts to the backs (the slants go in the centre), seam up the sides, leaving space for the arm holes, then fold and insert the sleeves.
This post shows one way (though there are several) to construct a simple drop shoulder sweater, which uses the same principle as a cardigan but with less pieces.
A button band, collar, pockets, sleeve cuffs and a hem may be added to the final cardigan. With this kind of construction, you can either add a hem and cuffs to the panel pieces whilst you crochet them or once they have been seamed together.
Each panel can be shaped to change the neckline, sleeve shape and length. They can be crocheted from side to side, top down or bottom up (or even a mixture if you’re feeling adventurous).
One of the great things about this approach is that you can easily block the panels separately ensuring you have even sized pieces to make the seaming process straight forward.
My other tip for working with panel style cardigans is to leave a long tail on the panels as this yarn can be used to sew the pieces together, reducing the number of ends. In some cases you could also use your crochet hook to slip stitch the fabric together if you’re averse to sewing, but this would depend on the specific design.
Below you see the Lucie cardigan from Knitting with Chopsticks. It’s an easy drop shoulder cardigan which uses this construction method.

The Staycation cardigan from Make and Do Crew is another free simple crochet cardigan pattern that uses this seamed panel method and has a lovely texture. And look how cosy those pockets are (for me, pockets are one of the best things about crochet cardigans).
I love the asymmetric front and back panels which create interest around the hem too.

These examples are both fairly simple designs and a great way for an adventurous beginner crocheter to approach making their first cardigan.
This construction style is really flexible and allows you to introduce a lot of shaping and detail where other forms of construction make that more of a challenge – underarm shaping is one of the key ones.
My new pattern, the Short Stories cardigan, is a bit of a blended construction; the body pieces, which include this underarm shaping, are made separately and seamed together.

In this crochet design, the sleeves are worked directly from the armholes, using short row shaping to create a sleeve cap, giving more tailored look and feel.
This technique makes this an intermediate crochet cardigan pattern.
If you want a more simple crochet garment which introduces you to underarm shaping, check out the summer side tank top.
If seaming is something you’re intimidated by, you might want to check out my mattress stitch tutorial which simplifies the process of sewing together crochet panels – including how to manage row ends. I used to hate seaming until I learned this method and now I’m a fan.
Seaming creates stable and lasting structure and the longer I design crochet garments, the more I am inclined to create seamed styles, but I do appreciate this approach isn’t for everyone. If that’s you then don’t fret, there’s lots more options to choose from…
3. One piece cardigan body with shoulder seams and separate sleeves
This style of crochet cardigan construction is great for those less fond of seaming.
You create one main piece for the body which includes the back and front panels with dips for the arm holes. Then you file along the underarm, join the tops to create a shoulder seam and insert the sleeves (which you will sew together at the under arms).

Typically this design uses a drop shoulder or modified drop sleeves design, though you can shape the underarm gaps / slots to create a set in sleeve construction.
The latter was the approach I took with the Underdog cardigan which uses simple stitches and has a small sleeve cap designed for the shaped armscye.
As I’ve mentioned, when I first started designing crochet garments, I resisted seaming a LOT! So in a fair few of my designs I work the sleeves directly into the body. I combine this with this one body panel approach in the Everyday Hugs Cardigan, the Got your six cardi and the Happy days cardi.
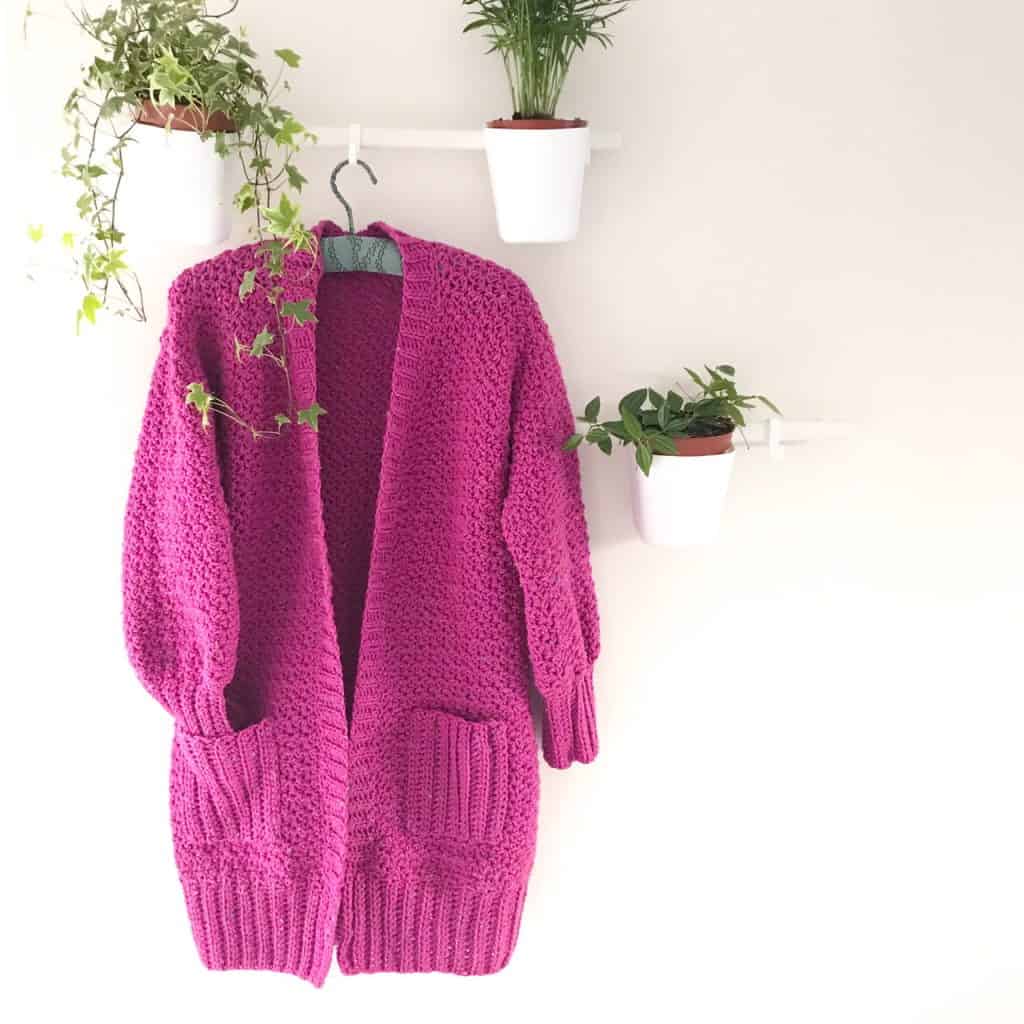
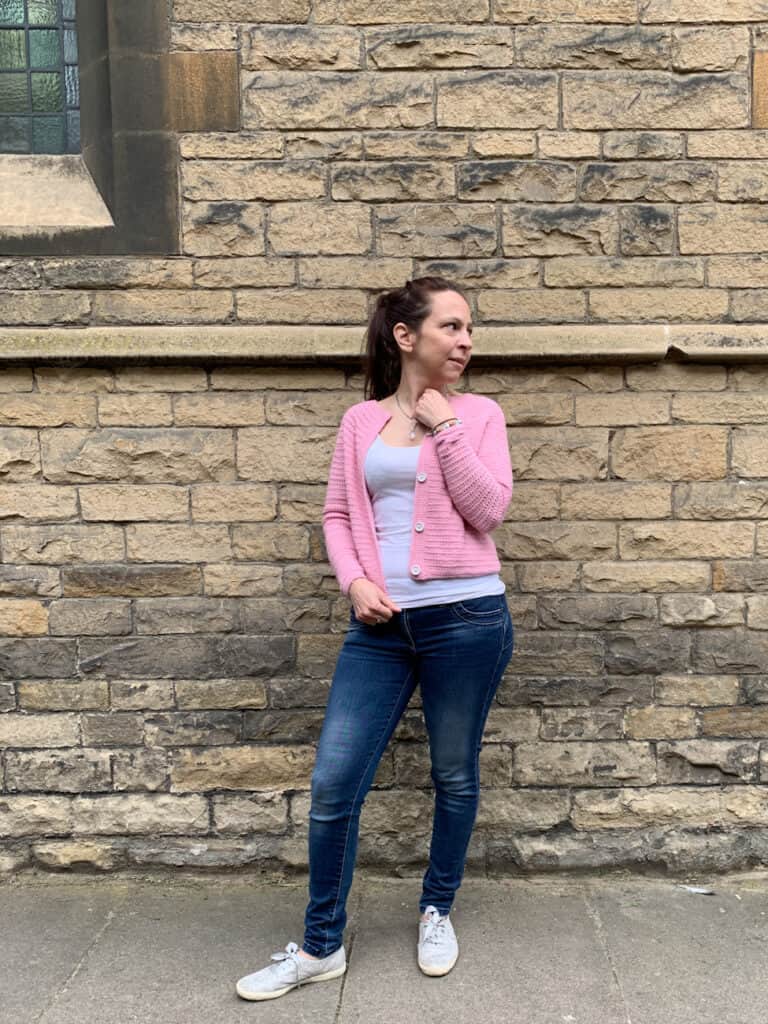
The Everyday hugs cardigan (almost a coatigan) is one of my most popular crochet cardigan patterns which uses mostly single crochet throughout. It’s made from single crochet v-stitch, also known a spider stitch, and a ribbed hem, cuff, button band and patch pocket. Together these create a super comfy cardigan that feels like wearing a hug.
It’s worked top down so you can easily change the length by crocheting fewer rows and it has optional shaping around the hips. I’ve also made a cropped version of this cardigan which is seen on the pattern page.
The Got your six cardigan (seen below) also uses this simple method, but is worked from the bottom-up rather than top down like Everyday Hugs. The body piece for this construction style can be worked from side to side, top down or bottom up. It is fairly easy to adjust the length and chest sizes of the body too.

In my experience, the main issue to be aware of with cardigans without stitched side seams, and this goes for raglan and round yoke designers too (described below), is that they are prone to more stretch with wear; especially if you like to add pockets and use them for your phone like I do…
If you’re making a long cardigan, over time gravity will go to work on it and it will get longer.
The type and weight of yarn as well as the stitch pattern will impact this too. If you’re thinking of making a cardigan in any of these styles then make and experiment with your swatch once it’s washed and blocked.
Once you’ve checked your gauge, see how easily the fabric stretches out of shape (and whether a re-wash will help it bounce back). That will help you determine which style goes best with that fabric.
This stretch is more likely to happen in garments worked top down or bottom up in rows / rounds versus side to side because crochet tends to stretch more between the rows than the stitches (though there are exceptions).
The good news is that there are ways to mitigate this stretch.
One is to add structure throughout the button band to reduce stretch. A row of vertical slip stitches up the front openings will provide stability as slip stitches have minimal stretch. You could also add faux side seams by running a row of slip stitches up the sides to the underarms, to similar effect to slip stitching up the front button band.
If your swatching has suggested the crochet fabric you’re working with is prone to stretch, you could reduce the number of rows you crochet in the body to accommodate future stretch.
Lastly, think about how the shoulder seams are constructed as the rest of the cardigan usually hangs from the shoulder seams. If you have a lot of weight hanging off those seams, they need to be able to bear it.

Of course cardigans with sewn side seams may well stretch a bit too, but I believe that a seam will help a longer cardigan retain its structure better in the longer term.
4. One piece crochet cardigan with side seams
When I started crocheting cardigans, I had no idea that you would be able to crochet one in one single piece of crocheted fabric. If you don’t like working with separate panels, this one is definitely for you!
The schematic below shows you a typical one piece cardigan design. Once made you simply fold it along the long side and sew the sides and under arms to create the necessary seams. Again, a button band, collar, cuffs, hem and pockets may be added to finish.

This style of crochet cardigan is worked flat. It can be crocheted from cuff-to-cuff /side to side in rows, or hem-to-hem if you’re making it – as I call it – up and over.
This design is generally made with a drop shoulder sleeve because of the simplicity of the shaping. However, it is possible to add neckline and under arm shaping by changing the angle of the sides – though this is where things might start to get complicated.
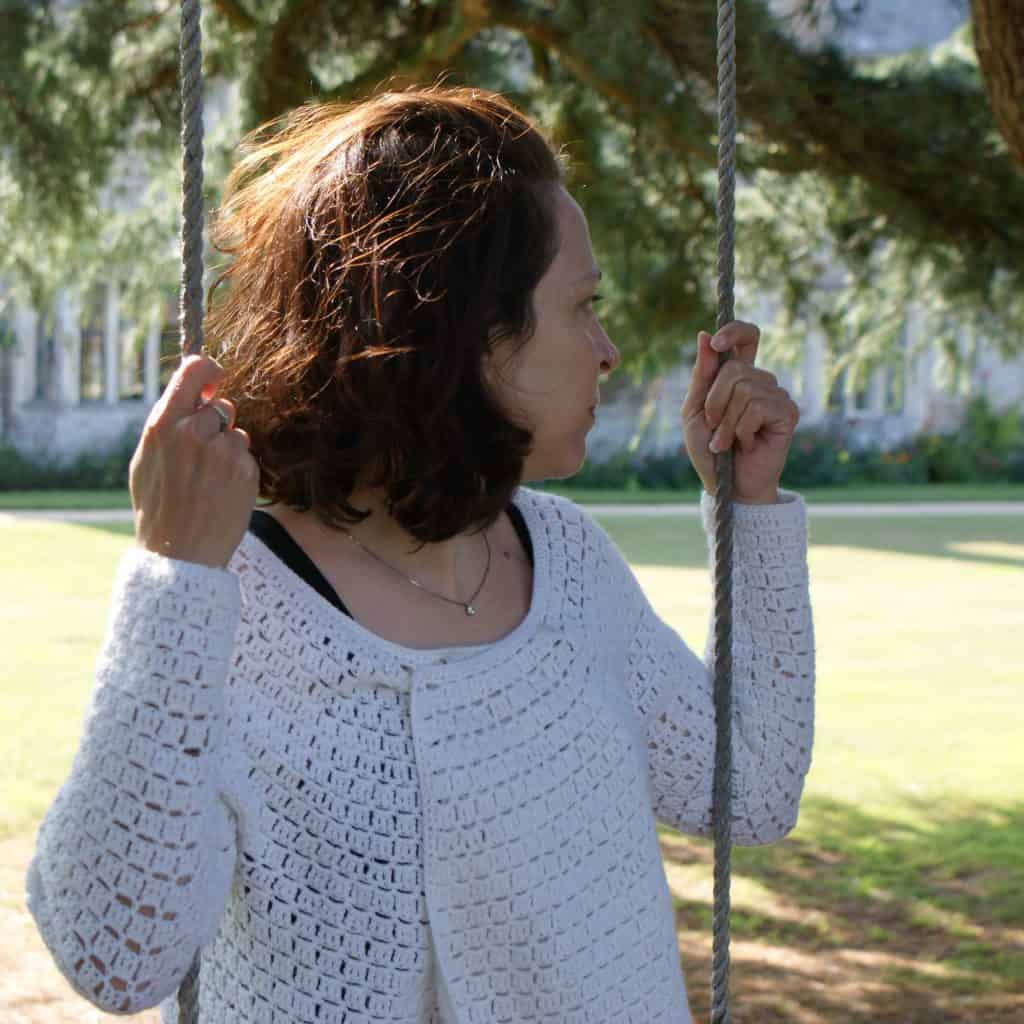
Coventina (seen below) is a relaxed fit crochet cardigan pattern which uses this one piece construction method. It is worked from side to side / cuff to cuff in one single piece, folded and seamed at the sides and underarms.
It’s a simple construction method, but uses a rippled stitch pattern which adds enough complexity to make the crochet pattern suitable for an intermediate skill level or more experienced crocheter.
This pattern was originally designed for Issue 2 of Moorit Magazine (who provided and own the images) and is now available to purchase as a stand alone pdf pattern.

P.S. I love how the photographer has rolled up a part of the front of the cardigan in this picture so you can get a glimpse of the ‘wrong side’ of the fabric – I think I like it just as much as the ‘right’ side!
5. Top-down ralgan cardigan
Crochet top-down yoke garments are another great construction method if you’re not a fan of seaming – because there are none!
This post goes into detail discussing top down garment construction so. I won’t repeat myself here.
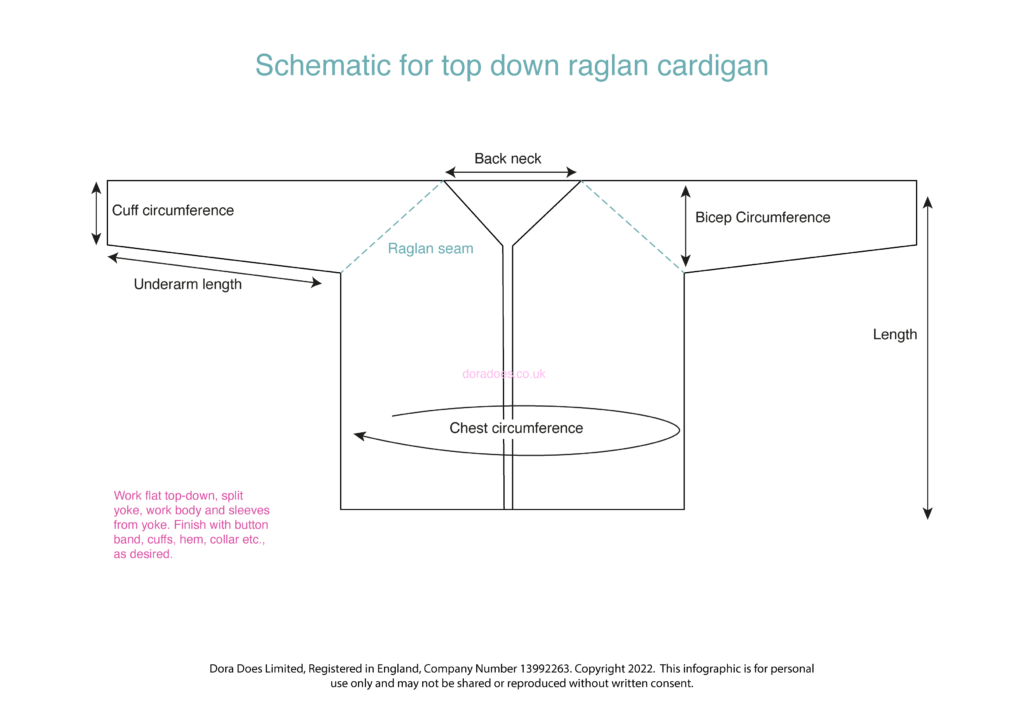
Let’s take a look at a schematic for a classic top-down crochet raglan cardigan. The yoke is crocheted from the neck outwards flat. It is split at the corners, adding underarm chains to create sections for the body and sleeves. The body is then worked and sleeves added directly to the arm holes.
With a top down garment like this, the yoke is the part which creates the structure. It is the piece of fabric which sites over the shoulders and around the back neck from which the rest of the garment hangs. This is why it’s important to get the yoke part right.
You may find that some crochet cardigan patterns (and indeed sweater patterns) add short rows on the back of the garment, either at the beginning of the yoke or where it is split to from the body in order to create a higher neck and a more tailored fit at the back. The same goes for round yoke cardigans and top-down pullovers.
‘Raglan’ is the seam from the underarm to the neckline and in a top down garment it is traditionally crocheted by making increases at the four ‘corners’ of your yoke. The yoke is typically a rectangle and, with a cardigan, is open at the front. The front openings may be parallel to each other or they may have shaping.
The example pictured below is the yoke of the chunky version of the Any yarn will do cardigan. This is a gentle v-neck shape where the front shaping starts at the neckline and increases to the full chest width at the bust. Tapered long sleeves are added directly from the yoke.

The yellow scraps of yarn weaved through the corners are ‘running stitch markers’ which help me to easily see that all the corner increases are aligned. I go into detail about this in my ‘tips for top down garments’ post.
‘Any yarn’ uses a simple stitch pattern throughout and is probably my most popular crochet cardigan pattern because of its versatility (it is written for 5 different yarn weights / gauge measurements).
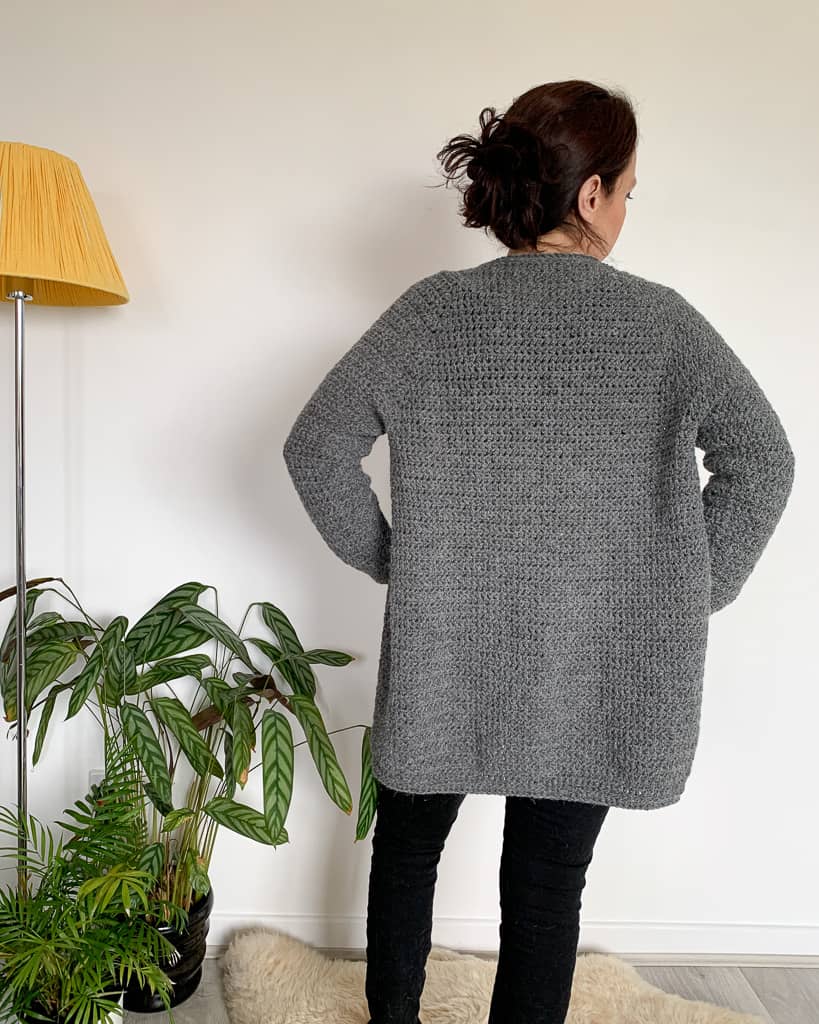
With v-neck style raglan cardigans, it’s not always easy to tell that it’s a raglan design as the ‘seams’ (increases) may hard to see from the front, though the back may be more of a giveaway.
In the grey aran weight version of the any yarn cardigan below, you can just about make out the seams, whereas in the 4ply version (second picture down), the seams are made clear by the stripes, colour changes and the fibre used – a bamboo cotton blend in the latter vs a wool mix with a halo in the former.

The Comfort and joy cardigan is also a v-neck raglan design and because of the crochet stitch combination and super bulky yarn, it’s pretty hard to see the increase line. If you always seem to feel the cold, like me, this one will definitley bring you joy. (Mine is very very well worn!)

6. Top-down round yoke
A round yoke crochet cardigan is constructed using a similar principle to a top-down raglan cardigan, but with the increases being more evenly distributed around the yoke ,earning you start with a circular flat shape, not a rectangle.
The split circle or oval yoke is worked flat to the underarms, split to form the body and armholes by adding underarm chains. You continue crocheting to make the body then add the sleeves onto the arm holes on the yoke.

Because the increases are distributed around the circle (rather than at the corners in a raglan) a round yoke crochet sweater has a softer shape and no visible seams. (Sometimes you can see a subtle increase line but you can often hide this by staggering your increases on different rows)

With top down garments, you can make tweaks and adjustments to the sizing and fit as you work. This tends to be easier with round yokes than raglan designs. I look at different ways to adjust top down sweaters to fit in this article. The same adjustments apply to crochet cardigans as to crochet pullovers and jumpers.
The Abundance cardigan is a fitted crochet cardigan pattern which uses a round yoke design with the fronts extended to overlap one another, creating a double breast effect when buttoned and a waterfall cardigan style front when left open.
The any time cardigan is a more traditional round yoke design. This free crochet pattern is a close fitting cardigan, perfect for layering.
The pattern includes a step-by-step tutorial for adding buttons to a crochet cardigan which you might find useful if buttons and button holes intimidate you (they needn’t!).
Further reading for the curious crocheter
So there we have an overview of 6 ways to construct a crochet cardigan. I would love to know which one you’re going to tackle first??
I mentioned at the start of the article that this is not an exhaustive list of construction methods. I’ve seen a fun clever way to make a cardigan by creating two hexagons, folding them in half and seaming them to make a crochet jacket. But until I’ve tired it, I cant elaborate further!
I hope I’ve covered all the useful information you’ll need to start (or take the next step on) your crochet cardigan journey. Please do feel free to drop any questions in the comments section below.
If you want to know some more techniques related to crochet cardigans or you’re interested in garment construction in general, you might want to look at the following articles too:
More all about crochet articles
If you’ve found this post useful you may also find some of my other ‘all about crochet’ articles interesting;
- All about crochet scarves
- All about crochet cowls
- All about crochet shawls and wraps
- All about crochet hats
- Crochet garment construction
- Crochet sock construction
And if you’re still looking for crochet cardigan or sweater patterns, check some of these out…
Happy Hooking
Dx


This is such a helpful post! Thank you for putting this together and explaining as you did. I saved this so I can confidently make cardigans for the whole family🫶🏻
You’re welcome. I’m so glad you find it helpful!! (And imagine your family will be too!!)
Thank you for the deep dive informative blogs! I found your newsletter and blog through a New Year’s giveaway offer in which I ended up being subscribed to way more newsletters than I ever wanted to have to wade through. Over time, I’m unsubscribing to the ones that don’t align with my interests. Yours is a keeper! With these construction deep dive blogs, I will be able to make the designs that have been swimming in my brain for years. I’m so excited!
Thank you so much for sharing – this is music to my ears, and a wonderful message to start to my week with! I love helping crocheters learn the tools and confidence to try those ideas – I’m so glad you are finding the deep dives useful and it’s great to hear you’re sticking around!! 🙂
This post is a bloody EPIC. It needs to be on YouTube. It needs to be bloody everywhere, that’s what it needs !
I am convinced that Dora is the most constructive, helpful and generous crocheting person on the Web: there is simply no-one else who offers anywhere near as much free AND TOTALLY INFORMATIVE material.
How I wish I had a website where I could trumpet abroad your work ..
Thank you M-R – you are the best cheerleader and I’m very glad it checks the informative box – that’a always the aim! 🙂