Tips for crocheting top down yoke garments

I love working top-down crochet sweaters, whether they are round yokes or made in the raglan style.
I love that you can try them on as you go and adjust them for a custom fit.
I love that there is no sewing together of crocheted pattern.
During the development of the Any Yarn Will Do Sweater, and more recently, the Any Yarn Will Do Cardigan patterns, I have found a few techniques which I have adopted to improve the finished look of garments constructed with a top down yoke.
In this post, I share these with you.
If you are new to yoke based construction styles, then I recommend you read this post which explains what a yoke is and how it’s used to create a garment.
In the meantime, lets have a quick reminder of the basics.
What is a yoke in crochet?
In the context of a crochet sweater (or cardigan or dress), a yoke is the piece of fabric which sits around the neck, over the shoulders and upper chest and the top of the arms, from which the rest of the garment hangs.
For a sweater, a yoke is typically a closed loop with a hole for the head. For a cardigan it is open, with the edges creating the front of the cardigan.
There are lots of pictures which illustrate this below, so keep reading for the visuals.
What is the difference between a raglan and round crochet yoke?
Round yoke
A round yoke garment is created by making a circular or oval piece with a hole in the centre for the head.
This is usually created as a flat(ish) circle, with the increases evenly distributed around. The style and cadence of increases used will depend on the stitch pattern and style of the specific sweater.
A typical round yoke for a sweater looks something like this:

You can just about see the ‘seam’ where the rounds are joined here. This is often hidden in the underarm of the sweater once the yoke is split.
Raglan yoke
‘Raglan’ refers to a type of seam which runs from the underarm of a garment up to the neckline.
You can have a raglan garment which is made top down using a yoke, or bottom up without a yoke.
A raglan yoke is typically rectangular(ish) in shape and the 4 ’corners’ where the increases are made are what creates this seam.
The angle of this raglan seam can change depending on the style of the specific garment.
Below is an image of the raglan yoke from the any yarn will do cardigan.
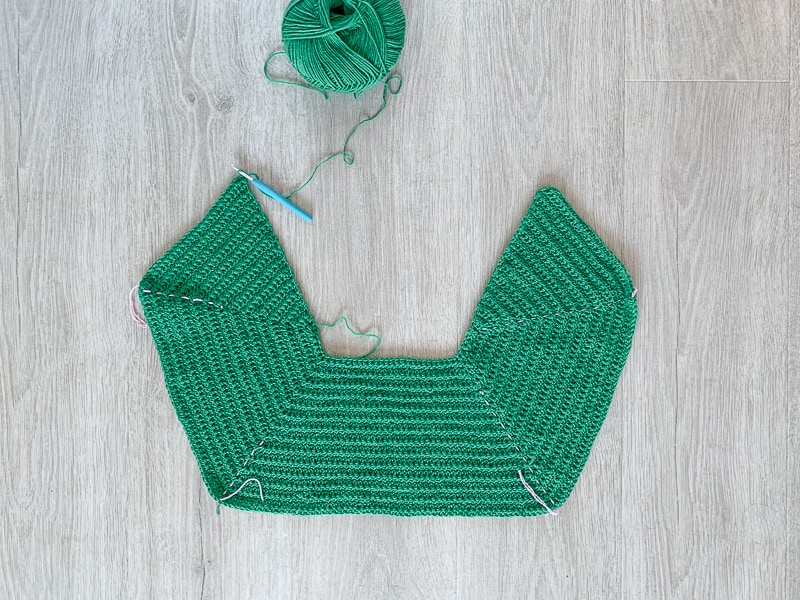
This is a v-neck design so you can see that the front sections, on the top of the picture increase as the yoke grows. I shared this to demonstrate that raglan yokes are not all regular rectangles or squares.
With a raglan yoke, all the increases are typically placed at the corners / raglan seams, whereas with a round yoke, the stitches are usually distributed evenly around the piece.
From a designer’s perspective, this means that you are much more restricted in how you place your increases with a raglan construction compared to how you place them in a round yoke. Though there is obviously variation depending on the stitch pattern you’re using too.
In view of this, and in my experience, raglan garments are way harder to design for multiple sizes than a round yoke garment.
Note that I say for multiple sizes here. Designing a custom one-off raglan design can be great fun and a really useful way to play with the technique. Grading them for multiple sizes is a whole other ball game though.
7 essential tips for crocheting top-down garments
Okay now you are reminded of the fundamentals, let’s get into the nitty gritty of making.
Some of these tips are more suited to raglan designs, some round yokes, but mostly they apply to both styles.
It’s also worth noting that these are general tips for yoke based garments. Not all designs will use the same techniques you see here, especially those with more complex stitch patterns. However, these are the most common styles in my experience.
1. Keep checking your stitch count
It is so easy to loose track of stitch count when you’re making.
I can’t emphasises enough that you should keep an eye on your stitch count. It’s so obvious, but such an easy step to skip
(If you learn to heed this lesson, please tell me how!!)
If you are more interested in crocheting than counting, note that it’s easier to make up a couple of stitches here or there on a round yoke than a raglan design.
With a raglan yoke, your shoulder sections – generally shorter, opposite edges of the yoke – should have the same number of stitches. If they are different then you are going to end up with different size sleeves.
The front and back may or may not have the same stitch count, depending on the design.
When counting your stitches on a raglan yoke, you may find it easier to count in sections rather than the whole row at once.
Be sure to take note whether or not you should (according to the pattern) include the corner stitches in that count. You can then add all the sections up to check you have the same number of total stitches as given in the pattern you’re working from.
If your corner increases include chain spaces (for example), make sure you’re familiar with whether the pattern includes these in the stitch count. I’ve seen this small detail cause a lot of confusion with some patterns.
With round yokes, you may want to place stitch markers every 10 or 20 stitches so you can count in sections.
Often by the time you get to split the yoke, you may have 100 to 300 stitches, so it’s easy to miss one here or there as you work.
You’ll soon find out when it comes to splitting the yoke if things don’t add up!
2. Use stitch markers
Stitch markers are your friend when it comes to crocheting yokes.
For some reason, I stubbornly resisted using them for years, but finally learned the value they give, and wondered at my contrary nature.
There are many ways to use them, including, as mentioned above, to make counting stitches easier.
I find them particularly helpful when crocheting raglan designs. I place them in the corners so I don’t blissfully keep crocheting all the way round without increasing.
Of course, this will depend on the design you’re working, but placing stitch markers in the stitch where the next increase will go is a good way to avoid missing the spot.
How to use running stitch markers
I confess, I am not a fan of locking stitch markers for this kind of project. As useful as they are, I find them fiddly and cumbersome.
Bobby pins can be a useful alternative, though my preference is to use scraps of contrasting yarn which I hook into the stitch as I work.
When working a raglan yoke, using a longer piece of contrasting yarn can have an added bonus when used as a ‘running stitch marker.’
Take a piece of contrasting yarn around the length of your armhole depth and then each time you work an increase, thread the yarn through the stitch where the increase on the next row will be placed, leaving it threaded through the previous row.
The picture below, shows a close up of the last stitch before the corner increase. You can see where the mustard yarn has been inserted into the centre of the increase from the previous row. In this example, the increase involves working 3 stitches into one.

The increase is made and the yarn is threaded through, using your crochet hook, into the centre stitch of the 3 stitches which make up the increase. This now marks where the increase will be made on the next round.

Using this method, you will end up with a line of yarn running through the yoke seam. The running stitch marker.
If you zoom out to look at the finished yoke, you’ll see the running stitch marker highlight the increases.

It’s also a good way to eyeball if your seams are straight!
If you run out of yarn, you can just gently pull it through as you work (as on the bottom right corner of the image above).
I personally find this approach very satisfying and way easier than removing and replacing four stitch markers each round…
It also means that if you do have to rip back for any reason, you keep track of where the old increases were.
It’s win win win for me!
3. Tips for neatly ‘splitting’ a crochet yoke
Once you have crocheted to the end of the yoke, you will split it to create the body and armhole sections.
Splitting the yoke involves folding it longways along the shoulders, so the armholes are folded in half and the front and back meet.
You then crochet along the front or back, skipping a set number of stitches which will form the arm holes, make an ‘underarm chain’ and then crochet along the other front / back.
The picture below marks what each section of a typical raglan cardigan yoke relates to. The principle is the same for round yokes, though the sections are less defined before it is split and rely on accurately counting your stitches.

This yoke split row creates the first round of the body. The image below shows what it will look like once complete. You can see where the underarm chains are like little worms at the bottom .

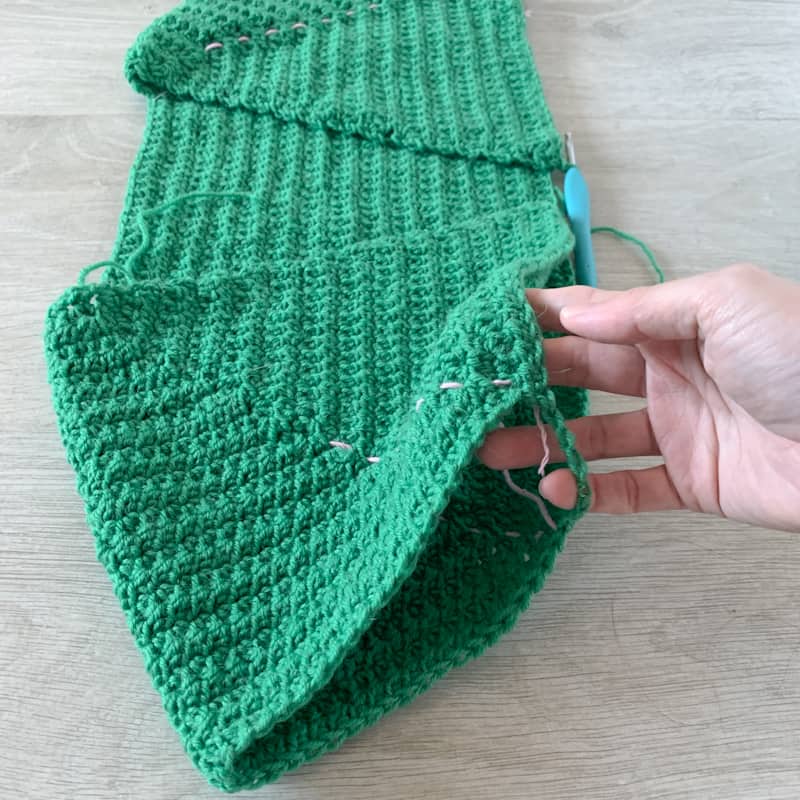
This yoke split round serves to separate the armholes from the body of the cardigan at the underarm chain (held in my hand in the image below).
Next you will work the first round of the body, working in the relevant stitch pattern into each stitch and underarm chain of the yoke split row. The next two pictures show what it looks like after row 1 and then a few rows into the body.

You will come back later once the body is complete and works the sleeves from the last row of the yoke and back of the underarm chains.
(If you struggle to neatly crochet into chains, this post will help you)
The process is the same for round yoke garments.
Here are some equivalent images for a round yoke sweater:


And here it is after a few rounds of the body have been crocheted. You can see how it is taking shape as a sweater.

4. How to work into underarm chains neatly
After you split the yoke, the first ‘proper’ row of the body will involve working into the yoke split row and into the underarm chains you made.
I confess that it took me a really long way to work out how to crochet into the underarm chains in a neat and consistent way.
Add to that, I sometimes found it a struggle to work out which were the chains and which were the stitches. This lead to me missing or adding a stitch at the underarm (I refer to the tip about counting). If you get in a mess here, then when you come to work the back of the underarm chain when you start the sleeve, then you’re going to get in a muddle there too.
So like anything, it’s important to get this foundational aspect right.
First off, if you know that counting chains isn’t your strong point, add a stitch marker to the first and last underarm chain when you make them.
This way when you come back, you’ll easily be able top see what’s what. Leave these in place until you have made the sleeves too.
Secondly, I want to take a moment to talk more generally about working into chains.
Normally if I start a project with a chain, I will work into the ‘hump’ on the chain when crocheting into it. That is, I will insert my hook under that one loop in the chain that sticks up. This is working into the top of the chain.
This is what I tried to do when I started crocheting yoke sweaters. However, I always ended up getting the chain twisted and making a mess.
It took me a while to work out why. And then felt super obvious once it clicked…
When you work into a typical foundation chain, you are working back on yourself without turning or flipping, so you can easily work into the top of the chain. You’re essentially working bottom upwards.
However, when you work into an underarm chain, you are working it as part of a larger row or round. So when you come back to work it, you are going to be working top down. So you need to work into the bottom of the chain, not those top humps.
In the image below, you can see the underarm chain with those ‘humps’ at the bottom of it.

(Note I’m a leftie so am working from left to right in these pictures – you will be working right to left if you’re right handed, but the principle is the same.)
So, instead of working into the top hump, you insert your hook through the other side of the chain, the two bottom loops that form the typical v shape you’re used to seeing with a crochet stitch.

Just look how nice and neat that is!

When you come back to work the sleeve, that’s when you work into the top hump. When you look at the image below, you can see those humps at the base of the stitches.

Getting this right was a bit of a game changer for me. So instead of disliking the look of the underarms, I could put my hands up in the air and wave them round like I just don’t care!
I’ve now written a separate tutorial explaining these two ways of crocheting into chains in more detail. It’s a super useful foundational technique to understand.
5. Avoid picking up stitches on the first round of a top-down yoke garment’s sleeve
On the first round of the sleeves, you will typically join your yarn at the centre of the underarm chain.
You’ll crochet a stitch into the hump of each underarm chain (per the previous tip), work around the last row of the armhole section of the yoke and then into each of the remaining underarm chains made when you split the yoke.
It is easy to pick up stitches here for a number of reasons.
Firstly, it can be tricky to see the difference between the underarm chain (especially if you’ve twisted it), the stitches on the armhole section of the yoke and the stitches on the body section of the yoke that you have already worked into.
This is why leaving those stitch markers in can be useful!
The other reason you may pick up stitches is because the edges of the stitches made just before and after the underarm chain in the yoke split Row can look like additional stitches.
When you skip these (which you should), it can create a gap at the underarm, so the natural tendency is to work into them, increasing your stitch count.
The image below shows how easy these stitches are to confuse, and points out which is which.

In this case, the marked stitch is from the running stitch marker (discussed above) which indicates that last stitch of the body, rather than a marker made into the underarm chain.
The key takeaway from this image is being able to identify that row end.
Also: COUNT. YOUR. STITCHES!
6. How to avoid gaps at the underarm when crocheting sleeves into a yoke
When crocheting the first round of the sleeve, it is easy to create small holes or gaps at the underarm where you skip the depth of the first body round, as discussed above.
The size of these gaps will depend on the specific design and types of stitches used, but it can be a common problem.
The good news is that there is a simple technique to avoid them, which I’ll outline below.
Remember I’m left handed so your work may be a mirror image of what you see here.
Let’s say you’re working your yoke and sleeve in single crochet.
On the first round of the sleeve, when working into the last of the underarm chains, instead of skipping the row-end of the yoke split row, make a single crochet 2 together (sc2tog), working both into the last underarm chain and the side of that stitch / row-end on the first round of the body.
(Check out the previous image if you need help identifying which part is which).
When you have worked round the sleeve, you will repeat this on the other side of the underarm chain, working the sc2tog into the side of the stitch and the first underarm chain.
The pictures below illustrate this on the any yarn will do cardigan.


The type of ‘2 together’ stitch will depend on the actual stitch used in the specific pattern you’re working.
If you are making an item using taller stitches, then you may want to think about working a 3 together / 3tog type stitch to completely close the gap.
This technique can be a bit fiddly to work the first time, but once you have a good visual on which stitches are which, it becomes a lot simpler.
As I mentioned at the start, some yoke patterns use a different method to split the yoke, so you may not get this issue with gaps at the underarm.
What I have outlined here is one way to split a yoke, but there are other approaches.
7. Getting a good fit in the body
I go into quite a lot of detail about how to adjust yoke sweaters for a custom fit in this post, but for my final tip, I want to touch on one aspect of that here and that is the fit around the body.
I often hear feedback that on a yoke sweater there may be an excess of fabric at the back after the yoke has been split. This can be true and I want to take a moment to explain why and what can be done.
Generally with crochet garment design, the front and the back of the body measure the same. This is not unique to crochet. If you go pull a basic t-shirt out of your closet, I am almost certain that the front and back will be the same width.
For a women’s body however, this isn’t always appropriate as the front fabric needs to cover the bust. So you may and up with a top that is too stretched across the front or has too much fabric across the back. Sometimes the bust pulls the front down, leaving a poor fit on the back.
The most common consequence if this is that people complain of excess fabric around their back. I do tend to find that as you add length to the garment this will kind of drop out and fall into place. However, I absolutely appreciate that many would rather not have extra built there and want something more fitted.
Given the incredible variation in bust and shoulder sizes of humans, it is not feasible to create a pattern which offers one size fits all, or even one size fits one size for that matter, because there is no such thing. We are all different.
I can’t produce a pattern that will fit everyone perfectly, but I can help educate you on how you can make it work for you. This is why most of my patterns offer guidance on how to adjust a standard pattern to fit you, or the recipient.
This education piece is a big part of my mission. It’s why I write so many blog posts, like breaking down how these things are put together. Because once you understand that, you can bend those crochet stitches to your will!
As I mentioned, I wrote this post explaining some of the ways you can adjust yoke sweaters to fit, but below, I give you two suggestions for altering body fit, just to get you started thinking about custom adjustments.
Redistribute your stitches at yoke split
If you have a larger bust, you may want to redistribute the proportions when the yoke is split so that you have more stitches at the front than the back.
This can take care of both giving more boob space at the front and reducing potential extra bulk at the back.
This will only work easily with round yoke garments.
For a raglan design, you’ll need to think about altering the size of the front / back sections whilst you’re making the yoke. This is a very pattern specific adjustment and takes a lot more thought and consideration to implement.
Add shaping after the yoke split
If you have excess fabric at the back, then you can add some decrease stitches, either at the back sides (underarm) or in a kind of dart style at the back. Don’t make too many decreases too fast and use stitch markers to make sure you are distributing your decreases appropriately.
Conversely, you can add increases in the same way, if you want more space, perhaps to create a more a-line shape or to accommodate hips.
Remember that one of the great things about making top down garments is that you can adjust them as you go.
It’s a fun challenge and incredibly satisfying when you complete a garment that fits like a dream!
I encourage you to experiment with this kind of alteration if fit has been a trouble for you.
Remember, there isn’t a right or wrong. There is just what works for you.
You are in charge of your hook, so enjoy going off piste a little. The worst that can happen is that you have to frog it back! (So maybe experiment with froggable yarn!)
Short rows
Full disclosure, this is not a technique I have experience of in this context but I know it is commonly used in knitting and some crochet designers use in yoke sweaters too. So I would be remiss to ignore it (even if I can only give you generic guidance).
In yoke sweaters, short rows are typically used in two areas to improve the fit.
Firstly, they are used at the back-neck of the yoke. This allows the back neckline to be higher and avoid any draftyness at the nape of the neck. It helps the fold of the yoke sit on the tops of the shoulders as it should.
This can have a knock on effect so that the sweater fits better around the back chest area.
Secondly, you can add short rows at the back around the yoke split. As counter-intuitive as this may be, it creates a better fit around the chest as a whole.
The short-row technique is something I will aim to explore in future deigns and will gladly come back and update you once I have experience and specific examples to share.
And with that we come to the end of my top-down crochet yoke tips.
I hope you have found them useful and are keen to get stuck into those yokes. Do feel free to share your (constructive) thoughts or questions in the comments below.
If you want to learn more about crocheting clothes and garment construction, you might also find the following posts helpful:
- 6 common ways to construct a crochet garment
- Top down sweaters explained
- How to adjust a yoke based garment to fit
- Sleeve shaping and styles
- 10 tips for making crochet clothes that fit
- More posts from the ‘my crochet wardrobe’ series
If you’re interested in crocheting your own wardrobe, you can also check out my ebook, how to crochet clothes that fit (and you actually want to wear)

Happy Hooking!
Dx


Thank you, Dora! I’m having a go at my first top-down sweater… I’ve already had two false starts. Understanding how top-down sweaters are constructed is really important, and your blog is the first place I have found where someone has actually explained the things I’ve been wanting to learn. I feel I have more tools to be sucessful this time. They say the third time is a charm. Thanks again!
I’m so glad you found this helpful. And the third time is great – I can’t tell you how many restarts I had with these tings!! 🙂 Good luck with your project.
Dora
Hello Dora, I am making a ” Julia Top” from Lionbrand. After crocheting the neckline, you close/join it in front with a continuous spiral. In doing this, it leaves one of the neck flaps – which hang open – bigger then the other. I don’t think it is too noticeable, but was wondering if there is a way to avoid this. Please let me know when you have a moment. Thank you and God’s blessings, Judy
I’m not familiar with the pattern you mention so I’m not quite sure what you mean. Is it that that first stitched the spiral pokes up where the second round starts? I’d so you could probably use the starting tail to add a few shorter stitches to sill in the gap. A neckline trip or collar may also help smooth it out. I hope that helps. Dora.
I knitted and crocheted a few top down sweaters and dont understand why are the underarm stitches so important. The chains you add under each arm are being swallowed into the sleeves and the body and no one is checking under the arms. Even if I look, I cant see any irregularities.
I’m not quire sure what you mean about irregularities but I can explain why the underarm chains are important. They essentially serve to create a better fitting garment around the underarms. If you think about a torso, it’s not a 2d structure but a 3d one. You could think about it as a cereal box instead of a flat piece of card. The underarm chains effectively create the sides. This means the garment is shaped around your body rather than pulled into shape as it would be if you were working with flat pieces of fabric. If you didn’t have the underarm chains you would be likely to get either extra bulk at the underarm or a tight, pulled tension, depending on the body size. This is part of the benefits of top-down construction. I hope that answers your question. Dora
I’ve crocheted for 20 years and still had no clue how to approach a sweater. this has helped immensely! thank you
This is such a great run down with practical tips that I can apply immediately! I have been playing with designing my own sweater patterns and love the top down process so this was exactly what I needed to get a better understanding. About counting…I admit I am not always the best at it but it is so worth it. I determined the number of stitches I am willing to count back if I lose myself in the hooking (20) and have been pretty pleased with the reduction in frogging I find myself doing 🙂 Wishing you well!
I have made knitted and crochet top down sweaters and cardigans and find your information and tips in this blog will improve my technique for my next project. Thank you very much
You’re welcome. I’m delighted I could help 😊
Thank you so much for this very educational information, thank you for putting your time and effort.
I am fairly new to crochet and never made a garment yet. Just because all the fixed patterns are made for way different bodies than mine.
So instead of crocheting step by step by following a pattern, I got more into understanding how to shape the fabric.
Your blog is everything I ask for!
Thank you very much
I’m so glad that you find it useful and am cheering you on to create your first crochet garment. Whether you follow crochet patterns or not, it’s super useful to be able to adjust your design to fit you. Enjoy!
so much great knowledge in this article! Thank you so much for your clear explanations.
you’re welcome. I’m so glad you found it useful 😊
Hele fijne uitleg hier heb ik wat aan. Dank je.
I purchased your Light Fandango pattern and have made it twice. LOVE IT!!! These are great tips as well. Thank you!
Thank you so much for the great feedback. I’m glad you found these yoke tips useful too 😊