Crochet Short Rows: What they are, when and how to use them

There are certain crochet terms and techniques which have an aura of mystery and confusion around them. Crochet ‘short rows’ used to fall into this category for me.
I thought working short rows was a super advanced crochet skill, not to be trifled with. That was until I started to learn about what working short rows in crochet actually involved.
Spoiler, it’s easier than you might think…
Once you pull off the mask and look the crochet monster in the eye, you realise that the short row technique is not that scary. It’s actually an incredibly useful tool that will help you to achieve all kinds of crochet magic.
In this article my goal is to dispel this confusion, explain what short rows are and demonstrate some of the different ways you can use them in your crochet projects.
I’ll also link to some crochet patterns which use short rows, so if you want to give them a try you have somewhere to start.

What are Crochet Short Rows?
Crochet short rows are exactly what the name suggests. They are rows of crochet stitches which are shorter than other rows surrounding them.
The short rows are arranged, stacked or staggered, to create curves, shaping and 3d forms within your crochet fabric.
You might find it helpful to think about short rows as placing additional partial rows in specific areas where you want to create more fabric.
Typically you start with crocheting shorter rows in a specific area of the fabric, then subsequent rows get longer and longer, increasing at the end of each row, until the desired shaping is achieved. I go into this in a lot more detail in the tutorials, so don’t worry if that seems abstract at the moment.
I’ll start by outlining some examples of crochet projects that use short rows. Following that, I have made a photo tutorial which demonstrates two of the ways you can crochet them. I’ll finish with an FAQ on crochet short rows to mop up any remaining questions you might have.
I’ve introduced short rows in this way because I think it’s useful to see how they are used first, then you have some practical context in mind when you learn how to crochet them.
When do you use crochet short rows?
Short rows can be used in pretty much any crochet project where shaping is required. Below I list some of the common types of shaping challenges which can be solved with short rows.
Extending or filling in specific areas of crochet fabric
Because short rows can be worked in small areas of a crochet project, they are great for shaping specific areas and ‘filling in the gaps.’
Short rows can often be found in semi-oval or crescent shaped crochet shawls, where they are used to create the elongated curved shape. In such cases, you want more rows in certain parts of the shawl than others.
Using the Lunar Ripples, a free shawl pattern (below) as an example, short rows are added at the outer edges to change a semi-circle shape into a semi-oval.

There are plenty of crochet projects that use short rows in this ‘localised’ way.
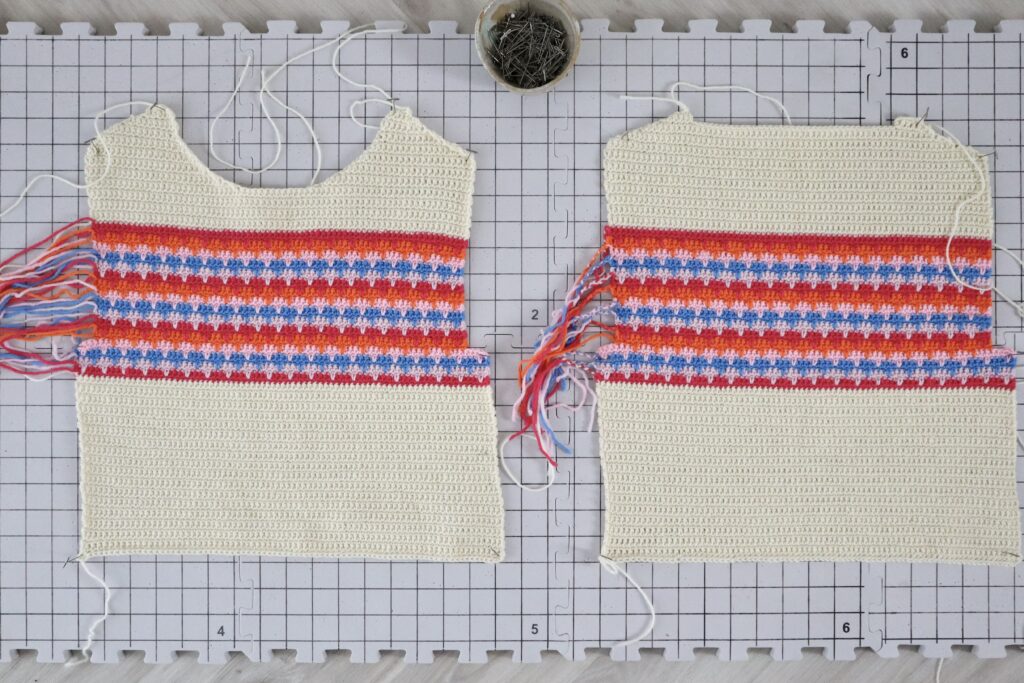
Another common example of this is to use short rows at the back neck of top-down crochet yoke garments. This allows the back of the sweater rise up to sit straight across the back neck and shoulders (and avoid the potential for a crafty neck).
During the recent Any Yarn Will Do Crochet Along, I experimented with adding short rows to the back neck of a new sample of the Any Yarn Will do Sweater. I then added a big funnel neck because I was feeling extra!
You can see the outcome below:

It’s not the clearest picture of the short rows, so if you want to dig in deeper to the method I used here, check out the CAL page which has links to the lives where I discuss this approach – Week 7 is where I got into short rows.
Shoulder Slopes
Short rows can be used to create slopes at the shoulders of garments for a more tailored fit.
As you can see in the blocking panels of the Lark sweater below simple slopes can be added to the tops of body panels for a better fit. You can learn more about shoulder shaping here.
Body Shaping
Short row shaping is incredibly useful for adding body shaping to garments below the shoulders too. Most commonly in the bust or hip area, including bust darts on the vertical and horizontal.
I used short rows to shape the hips in the Winter Solstice Crochet Sweater Dress pattern which you can see if you look closely at the picture below.

I also used short rows to create the shaping on the sleeves as they were worked side to side rather than top down or bottom up.
Below is the sleeve panel from this design which is a fairy typical example of how to use short rows in side to side sleeve shaping.

Learn more about sleeve shaping here.
When working any garment side to side, short rows are often the key to getting shaping in the desired places.
This applies to accessories like hats too. The Fisherman’s Winter Beanie Hat is worked from side to side and uses a simplistic version of short rows to create the crown shaping – only in this case, they are sewn together to form the crown.
Below you can see how the pattern piece is created from varying length rows right across.

Creating 3d shaping with crochet short rows
You can use short rows to create sculptural and dimensional shapes which allow for a more tailored fit in crochet garments.
The Short Stories Cardigan uses short rows to create a join-as-you-go style set-in sleeve cap. (It was this design that sent me deep into this short row rabbit hole!). The sleeve cap curves around the shoulder to create a fitted look, removing bulk at the underarm.
Below you see a progress picture of the short rows being worked directly into the shaped armhole.

I have a separate video tutorial demonstrating how to crochet these sleeve caps:
Crochet sleeve cap tutorial right handed
Crochet sleeve cap tutorial left handed
Another place where you want a tailored and close fit is the heel of a sock.
One of the common ways to construct a crochet sock is to use the short row heel flap method, as I did in the Step On Sock Pattern.
This technique creates a 3d bowl shape to closely contain your heel. Below you will see an in-progress picture of how the heel starts to curve up when the short rows are worked.

So now you have a few common examples of where crochet short rows can be used, I’ll explain how to make them.
You may already be working a project using short rows, so might find it useful to bear that in mind when following the tutorial.
Crochet Short Row Step by Step Photo Tutorial
The tutorial below is split into two separate parts, so that I can show you two of the most common approaches to short rows.
The first tutorial demonstrates ‘single ended’ decreasing short rows, where the row length only varies (decreases in this case) on one end of the row (the top of the two swatches in the picture below).
This is followed by a picture tutorial showing how to crochet double ended / double sided short rows. This where the length of each row changes (in this case increases) on both ends of the row (the bottom of the two swatches in the picture below).
This technique leads to more 3d shaping and will not remain flat.
Note that these two tutorials demonstrate the principle of short rows and that the styles can be combined and worked in many different contexts.

For both tutorials, I have started with 3 rows of 15 single crochet worked in blue aran weight yarn. The short row section is crocheted in cream yarn for contrast.
In some of the pictures, you will see my fingers, I am not pointing at anything, I’m just holding the swatches in place as when they are this small they tend to curl, so ignore my digits!
In this tutorial, there is no wrong side or right side as the back of your work is the same as the front of your work.
The photos are right handed and the descriptions use US crochet terms.
How to crochet short rows – single ended
Row 1: Chain 1 (which does not count as a stitch in this row), then work 7 single crochet across, leaving 8 stitches unworked, turn. 7 sts in this row.

This first row (the foundation row or set-up row) is always a shorter row than the main piece you’re working on.
Row 2: Chain 1 (which does count as a stitch here), skip the first sc and work 6 single crochet to the end of the row, turn. 7 sts in this row.
Place a stitch marker in the chain 1 / first stitch of the row as this will help you see it when you come back on the next, and subsequent rows.

(Note that stitch markers are always useful when crocheting short rows so you can see the stitches on previous rows more easily)
Row 3: Chain 1 (does not count as a stitch here as it’s the side of the row-ends which will remain the same length), work 1 single crochet in each stitch up to the stitch before the marked stitch, leaving the last (marked) stitch unworked, turn. 6 sts in this row.

Row 4: Chain 1 (does count as a stitch here), skip the first sc and work 1 single crochet in each st to the end of the row, turn, place a marker in the first stitch (i.e. the ch1) of the row. 5 stitches in this row.

Turn your crochet work

Up to now, e have been creating shorter and shorter rows. Now the short row decrease section is done, we’ve ‘filled in the gap’ so to speak. In the next step we’ll work over the short rows and row ends to ‘seal’ the shaping. The goal is to end up with the same number of stitches we started with.
Row 5: Chain 1 (not counted as a stitch here), 1 single crochet in each stitch across up to and including the marked stitch, remover marker… 5 stitches so far.

Next you will work 1 single crochet into the unworked stitch from Row 3… 6 stitches so far.

Then you’ll work 1 single crochet into the chain 1 / first stitch at the start of row 2… 7 stitches so far.

Next you will work 1 single crochet into each of the unworked stitches from the original part of the (blue) swatch. 15 stitches in this row.

This is the end of the short row shaping, meaning your next row can be worked as ‘normal.’
I have switched back to blue yarn for the final row of the swatch (below) so you can see where the shaped piece is.
Row 6: Chain 1 (does not count as a stitch), work 1 single crochet in each stitch to end, fasten off.

You can see how extra fabric has been created in just that cream section of the swatch by using this short row method.
If you want a larger short row area, you can add extra rows into the short row section, either starting with longer foundtion row and making more short rows, or decreasing each subsequent short row until you have fewer stitches left. The principle remains the same now matter how many rows you crochet.
How to crochet short rows – double ended
Row 1: Chain 1 (does not count as a stitch here), work 10 single crochet across, leaving 5 stitches unworked. 10 stitches in this row.
This first row is sometimes called the set up row

Row 2: Chain 1 (counts as 1 single crochet here), skip first stitch, 1 single crochet in the next 5 stitches, leaving 4 stitches unworked, place a marker in the first stitch (the ch1) of the row, turn. 6 stitches sin this row.

Row 2 is the shortest row. the first ‘short row proper’ if you like. In the next few rows, you extend the end of each subsequent row by one stitch, reaching towards the edges of the swatch to create the shaping.
Row 3: Chain 1 (counts as a stitch) skip first stitch, 1 single crochet each stitch up to the marked stitch, place a marker in the first stitch of the row. 5 stitches so far…

When working double ended short rows, use a stitch marker in the first stitch of each row so that you can see where to work when you come back to crochet into it later.
Work 1 single crochet into the marked stitch, removing the marker, and 1 single crochet into the next stitch, that is, the next unworked stitch on the set-up (blue) row, turn. 7 stitches in this row (you have increased by one stitch).

Row 4: Chain 1 (counts as a stitch), skip first stitch, 1 single crochet in each stitch up to marked stitch, place marker in the first stitch of the row (the ch1), 1 single crochet in the marked stitch, remove this marker, 1 single crochet in next unworked stitch on Row 1, turn. 8 stitches in this row.

I want to pause here to offer a slight variation (which I use moving forward). When you move from working a single crochet into the marked at the end of the row, and then a single crochet into the next underworked stitch, there is a bit of a ‘step’ between the row heights.
If you want to smooth out the curve a little more, you can replace the single crochet worked into the marked stitch with working a single crochet 2 together into the last marked stitch and the row end of the same row.
This just helps neaten out the transition … and will definitely make more sense when you have your project in front of you. It’s not essential so don’t get stuck in the weeds with it, but it would be remiss of me not to offer it as an opportunity!
Okay, back to the tutorial!
Rows 5 and 6 / Next Row: Repeat Rows 3 and 4; this will be the pattern repeat for larger projects using this method.


Row 7: Chain 1 (counts as a stitch), skip first stitch, 1 single crochet in each stitch up to marked stitch, place marker in the first stitch of the row (the ch1), 1 single crochet in the marked stitch, remove this marker, 1 single crochet in the next unworked stitch on the set up row (blue row). 11 stitches so far…
Then continue to work 1 single crochet into each of the remaining 2 unworked stitches on the original row to finish, turn. 13 stitches

To finish the swatch and ‘seal’ the final row ends, I’ve switched back to blue yarn.
Row 8: Chain 1, does not count as a stitch, 1 single crochet in each stitch to marked stitch, 1 single crochet in marked stitch, remove marker, 1 single crochet in each of the last 2 unworked stitches from Row 1. 15 stitches in this final row.

So there we have two approaches to using short rows. The first, using rows of decreasing length, the second, setting up with the shortest rows and then using short rows of increasing length.
Crochet short row sock heel tutorial
You can use crochet short rows by combining decreasing short rows with increasing short rows. This is a common way short row sock heels work.
This method uses double ended short rows (as in the second example above). In this case, you work a series of short row decreases before making the increases, working into the unworked stitches on the previous decreases as you increase (Sorry if that sounds wordy – it’s not as complex as it sounds written down).
This approach to short-row shaping creates the fitted bowl shaped heel. You can find a full step-by-step photo tutorial on short row heels here.
The step on sock pictured is a free pattern in the adult small size (with six sizes available in the premium pdf pattern.
Crochet short row video tutorial
To go with the release of the Short Stories Cardigan Pattern, which uses double ended short rows to create a set-in sleeve cap, I created a video tutorial (the pattern also includes photo guides) to demonstrate how to crochet the short rows.
If you like a moving demo, I think you will find this useful, whether you’re making a sleeve cap or learning about short rows in general.
Right Handed Short Row Sleeve Cap Tutorial
Left Handed Short Row Sleeve Cap Tutorial
Crochet Short Rows FAQs
Below I have answered a couple of commonly asked questions about crocheting in short rows. If you have any questions left, please do drop them in the comments and I will add them to the list.
Can you crochet short rows in any stitch?
Yes, you can use any crochet stitch to make short rows, with some forward planning. The issue you need to consider, is how to minimise the ‘step’ at the end of previous short rows. This is directly related to the different stitch heights you’re working with.
With the examples above which use single crochet, this isn’t too much of an issue because single crochets are short stitches, so working into the row end, then dropping down to work into the previously unworked stitch can be fairly easily hidden; especially if you’re using a chain 1 as a stitch and using a single crochet 2 together to navigate the transition, as discussed the tutorials.
However, if you’re working with a taller stitch, like double crochet or even taller stitches, then the ‘step’ is going to be more obvious. To get around this, you could graduate the stitches in height.
You might start the row with shorter stitches, like a single crochet, followed by a half double crochet, then go into working your double crochets. You would finish the row the same way but in reverse; dc, hdc, sc, with the last and shortest stitch being made into the ‘unworked stitch.
This way, when you come to work the end of the row and into the unworked stitches, the transition will be much smoother.
I find working slip stitches (which count as sts) and single crochets at the start and end of short rows a nice way to smooth this curve,
I use this approach in crochet designs like the Short Stories Cardigan pattern and the Winter Solstice Dress.
Can you crochet short rows in the round?
As the name suggest, short rows are made in rows.
If you’re working on a project that is worked in turned rounds, short rows can work quite well, adding shaping to a top down round yoke sweater for example.
However, if you are crocheting a project in continuous or unturned rounds, then the short rows will stick out a bit like a sore thumb! This is because crochet stitches look different when worked in rows vs continuous un-turned rounds.
One way around this would be to work each short row without turning; i.e. join new yarn at the start and fasten off at the end of each row.
Some projects, mosaic crochet for example, can use a new strand of yarn each row, so it’s not unimaginable to do this. But be prepared to sew in the ends – or use the method on a project where you can hide them inside!
Got more questions about short rows? Drop them in the comments 🙂
I hope you’ve found this foray into crochet short rows useful and are more confident about using them in future projects or working with crochet patterns which do use them.
Happy Hooking
Dx
If you want to learn more about crocheting garments using any pattern, why not check out my ebook ‘how to crochet clothes that fit (and you actually want to wear)’? You can learn more here, or get your copy now!
Copyright Dora Does Limited, Registered in England, Company Number 13992263. This pattern is for personal use only and may not be shared or reproduced in written, photo, video or any other form without prior written consent. All rights reserved. Terms of service.


This is a great sharing, thanks so much! In the example of the sleeves, how do I know how many stitches to start the short rows with?
The video linked talks about the cap sleeve construction in more detail which might help you further if you haven’t watched it yet. The stitch count will depend on the size and yarn weight used but starting with about a third of the total stitches around the arm hole is the rule of thumb I work with. Though this will also vary depending on the shape of the cap (shallow or deep) that you want to make. Hope that helps!
Can I make short rows with double crochet as well? Anything special I need to think about in that case?
Hi there, yes this is possible too. The thing you need to bear in mind is the ‘step’ at the end of the short row with a double crochet, because of its height. You may wish to taper off the end / beginning of the short row with perhaps a half double, single crochet and slip stitch (this is the approach I take with many of my patterns which use short rows).
I hope that helps
Dora
I’d like to crochet a flat circle that has a circle of a different colour offset inside it. Normally you just crochet a circle in one colour, then continue in the new colour, and the first circle is centred in the work. But what if you don’t want it centred, you want it off-centre? Can you do that by short-rowing an increasingly long crescent shape around the circle until the ends of the crescent meet, then continuing as rounds? I can visualise how to do this, but I’m not sure how to keep the shape circular when I start doing rounds again. (No, I am not interested in using the technique where you increase and decrease the *height* of the stitches in the row!) Thanks 🙂
Hi, I think short rows would work for this yes, but it would require some brain work and trial and error for me to work out how to put it into practice! The how to stop it turning into an oval is a bit of a brain teaser. I think you’d need to start and create the oval then turn the oval back into a circle – I think elongating the crescent shapes short rows should do it (you would need to continue with the increase cadence to keep it flat), but honestly I couldn’t say with certainty without actually trying it! Great question though!
I’m trying to wrap my mind around the 3D geometry here. Can you achieve the same result with increases and decreases ? Like in a sock heel, if I increase all on the same side, I’ll get a bulge on that side, right ?
Great question. Yes you will get a bulge of you make increases at the sides, but you will also increase your stitch count, so the ‘bulge’ is unlikely to serve the function you’re looking for. You could think about short rows as making increases and decreases over a longer distance if it’s helpful.
If you have a look at the post about sock anatomy (linked in this post) this discusses 3 ways to crochet a sock heel which all use slightly different methods. Have a look at the afterthought heel method which uses decreases at the sides (and is worked after the rest of the sock – hence the name afterthought. I hope that helpsQ
Can I use increases and decreases to achieve the same result as short rows ? For example, to make the bulge of a sock heel ? I’m trying to wrap my mind around the 3D geometry of this…
Looks like this question was duplicated – I’ve replied to the other version 🙂