How to work out Sleeve Shaping for crochet garments
Increasingly often, crocheters ask me how to go about shaping sleeves so they can customise patterns or create their own designs.
This article attempts to answer that question, providing a simple guide as well as offering a broader grounding in sleeve construction and shapes.
Sleeve shaping can be broadly broken down into two distinct parts:
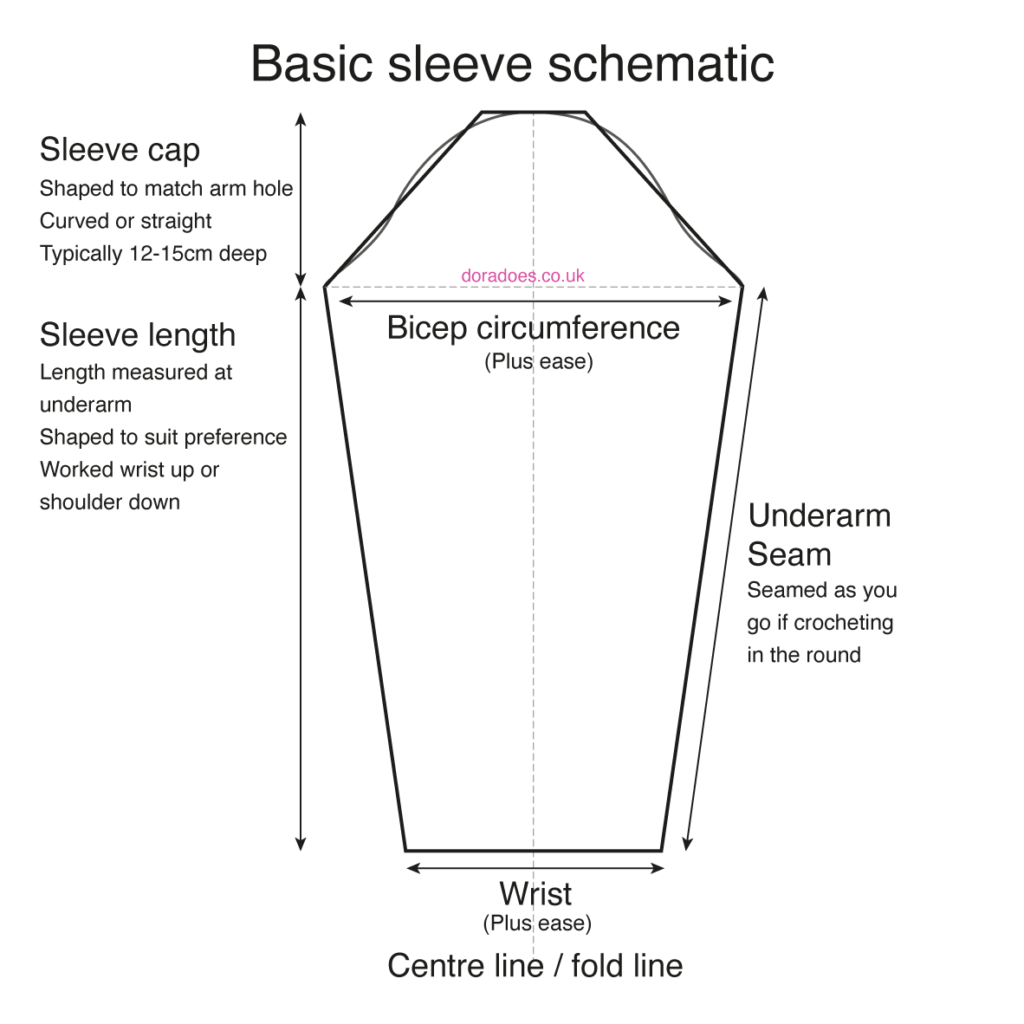
First is the shaping around the top of the sleeve where it meets the shoulder, known commonly as the sleeve cap.
This shaping is dependent on the shape of the armscye (arm hole), which is a factor of the construction style of the garment. This post talks in more detail about that the most common crochet construction styles.
Second is the shaping of the sleeve from the upper arm to the wrist, i.e., the part that covers the arm.
In this post, I am just covering this second part – how to shape sleeves from the upper arm / bicep to the wrist.
Below is a typical sleeve schematic which shows these two sections as well as illustrating how the sleeve is folded at the centre line and seamed at the underarm (if worked flat).
This post contains affiliate links. This means if you click a link to a product and go on to make a purchase, I receive a small percentage of the sale at no extra cost to you. You can read my full affiliate disclosure here. As an Amazon Associate I earn from qualifying purchases.
I do not address the shaping of sleeve caps or designing set in sleeves here for a couple of reasons. It would require an in depth blog post of it’s own (this one from interweave is useful – it uses knitting but the principle is the same for crochet).
To add to that, I have yet to design enough garments with sleeve caps to talk from experience on the matter so I’m happy to default to those like Interweave who know much more about the topic than I do.
I will however give an overview of the types of shoulder shaping commonly used so you have some background if you wish to investigate further. There is also a list of sources and additional reading at the end of the post.
There is a lot of information in this post, so to give you an overview of what will be discussed, below is kind of paraphrased table of contents:
- Sleeve construction – an overview
- Choosing your sleeve shapes
- What you need to know to calculate shaping (gauge and arm measurements)
- How to calculate the sleeve increases / decreases needed (includes worked example)
- Increase / decrease row distribution
- Seaming sleeves
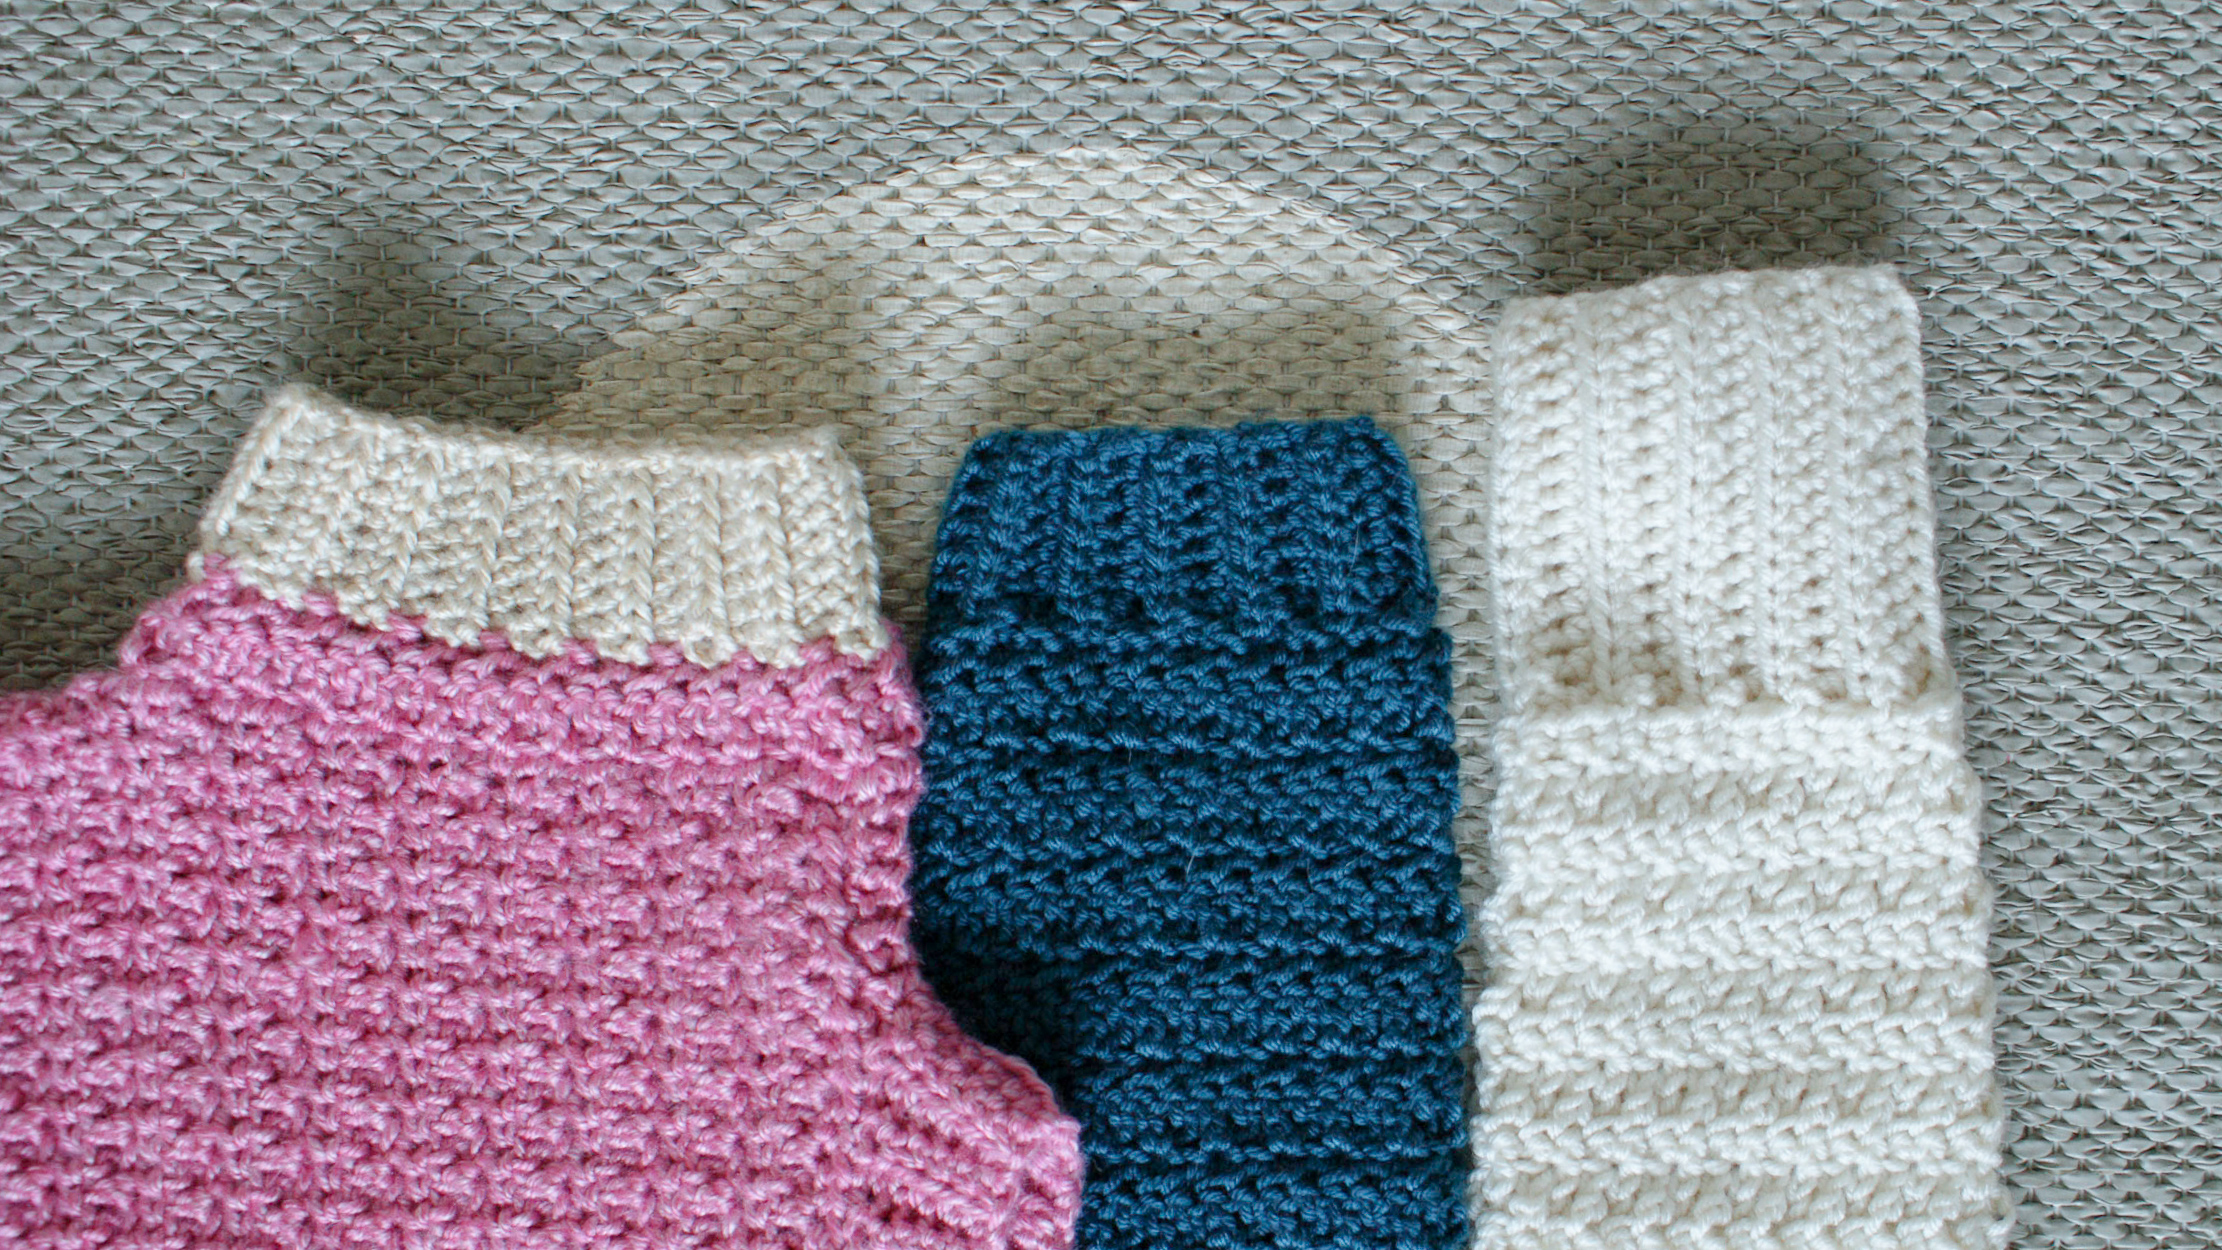
- Cuffs
- Other sleeve shaping related FAQs
Understand your sleeve construction
The first thing to think about with sleeve shaping is how the sleeves are attached to the body.
This will inform your decision on how you might construct them (flat, in the round, shoulder to cuff or cuff to shoulder etc.).
The image below demonstrates some of the most common sleeve construction styles seen in crochet. (This post goes into more detail).

For the guide to shaping we will be working with the drop shoulder construction.
The construction examples above exclude top down yoke constructions (raglan or round). For the purposes of shaping, these can be treated as a drop shoulder sleeve because the shoulder shaping part of the sleeve is already included in the yoke.
The schematics here are shown as flat pieces for simplicity, but you can also work these in the round when you’re actually crocheting.
Decide your your sleeve style and shape
Once you know what construction you’re using, you need to decide what shape you want your sleeve to be and if you want any features such as cuffs.
Below are some examples of some very simple sleeve shapes.

If you haven’t done so already, you’ll need to decide if you want to work your from wrist to shoulder (bottom up) or from shoulder to wrist (top down). If in doubt, you may want to just echo the approach you took with the body (bottom up / top down) so that the stitch patterns match.
If you’re working a garment from side to side, you can also work sleeves from side to side, but there are some additional complexities involved, so I won’t cover side to side shaping in this post
If you’re working a traditional sleeve shape which is tapered towards the wrist (which is the example I’m going to walk you through), then working top down will require decreases and working bottom up will require increases.
With this in mind, it’s important that you understand how to make simple increases / decreases in your stitch pattern. This will be simple if you’re using a single stitch, but if you’re working with a stitch multiple it will require a little more consideration.
Dora Ohrenstein’s Crochet Every Way Stitch Directory is a great resource to learn how to increase and decrease in common stitch patterns. It’s the most helpful stitch directory I own!

If you’re adjusting your sleeve from a pattern, the chances are that you’ve already done a bit of shaping in the body and some of these style decisions will most likely have already been made for you by the designer.
Once you have decided on the construction, shape and style of the sleeve you want to make, sketch it out so you can add notes as you calculate, then grab a tape measure because now we’re going to get to the shaping process.
Information needed to calculate sleeve shaping
Before you get the calculator out, there’s a few pieces of essential information you need to gather first.
It is helpful to have all these to hand before you start doing the sums. Make a note of each of them on your sleeve scetch.
Your gauge
You will need to know your stitch and row gauge in the format of stitches and rows per cm (or inch if you work in inches).
If you’re new to it, this post will help you understand the concept of gauge / tension and you can learn how to make and measure a gauge swatch here.
I will work through the maths in the example below, but I have written a separate tutorial which explains in detail how to calculate stitch and row counts from measurements using gauge, so I won’t repeat that here, but if you get a bit lost with the calculations, you may want to refer back to it.
The desired size of the sleeve at your upper arm
This measurement should be the circumference of your upper arm at its widest point plus any ease you want to add. It can be useful to have about 5cm or more ease around the bicep to allow the upper arm to easily move around in the garment. But you’re the boss so it’s your call!
It’s important to note here that the measurement at the top of the sleeve for a drop shoulder construction should be the same as the circumference at the arm hole. I go into detail about how to cross check this in the FAQ section at the end.
The desired size at your wrist
Again, this is the circumference of your wrist plus any ease you want to add.
If you’re working a tapered sleeve then this measurement will be smaller than your bicep. If you’re working a flared sleeve as the example given in the sleeve shape diagram above, then the number at the wrist will be larger than the measurement at the top of the sleeve.
Remember that the circumference of the sleeve at the wrist must be large enough to fit over the widest point of your hand so you can get your sleeve on.
How long to make your sleeve
You will need to know how long you want your sleeve to be at the underarm, from where it joins the side of the body to where it finishes.
When determining sleeve length, there are a couple of things to take into account which can catch you out.
Let’s say you want your sleeve to finish just before your wrist, you can measure from your underarm to your wrist to get the underarm length measurement. However, this will not account for any ease in the body of the garment you’re joining your sleeve to.
If it’s a fitted sweater with zero ease then this underarm measurement will probably be quite accurate, however, if you’re joining your sleeve to an over sized sweater with 40cm of ease and you use this measurement then you will probably find your sleeve is too long.
Understanding where the shoulder seam ends in comparison to the top of the arm is important here.
You could use the shoulder width, and neckline width or the wrist to back-neck measurements to help you work this out. It’s very design and constriction specific, but if you have already made the body of your garment, try it on and ask someone else to measure the length of your exposed underarm for you.
If you’re planning to add a cuff to your sleeve, you’ll also need to know how deep it is so you can subtract that amount from the underarm length.
The other thing I encourage you to consider with sleeve length is stretch. Sleeves, just like all else, are susceptible to gravity and I do find that they stretch over time.
I’ve seen lots of beautiful crochet garments with loads of bobbles or cables on balloon shaped sleeves which look amazing, but I do wonder how they fare with wear. (If you’ve made one of these, please do let me know!)
You can play with stretching your swatch to get an idea of how the fabric moves and stretches when dry and when washed. Although this is not an exact science, it will help inform your subjective design choices.
I also add this here as a reminder to do your maths with a blocked gauge, or at least from a swatch you have washed and dried in the same way you will treat garment. (Yes, this is a mistake I have made in the past…)
A Note about body measurements
The Craft Yarn Council offer a useful guide on measuring body parts which may help you here.
If you don’t have access to the body you are making for, you can also look at their standard measurements. This post gives some further resources for standard measurements.
Elizabeth Zimmerman’s percentage system offers the guide that the bicep of a sleeve should be between 33-50% of the bust measurement and that the wrist is around 20% of the bust measurement.
These are, of course, a guide, but I’ve found it difficult to find consistent wrist measurements in the available standards, so it is a useful starting point.
How to calculate sleeve shaping increases / decreases
Once you have the required information, calculating your shaping is essentially a two part process
Step 1: Convert your upper arm and wrist measurements into stitch counts and your sleeve length into row counts.
You’ll then deduct the wrist stitch count from the upper arm stitch count to find out by how many stitches you need to increase / decrease.
By factoring in the number of increases / decreases you make per row, you will be able to determine how many increase / decrease rows you need. (You thought about this when you were thinking about sleeve shapes earlier but you can adjust it after doing the maths if needed)
At the end of this step you’ll know the number of increase / decrease rows you need to work and how many rows are available to work them over.
Step 2: Decide how to distribute your increase / decrease rows over the length of the sleeve
Next, you will use your designers prerogative and a little maths to decide how to distribute the calculated number of increase / decrease rows over the total number of sleeve rows to create your desired sleeve shape.
That’s the theory, so lets look at a worked example:
Sleeve shaping calculation – example
Let’s say you want to crochet an evenly tapered sleeve working from the shoulder towards the cuff made from simple US half double crochets.
Here’s some sample numbers of the information you need to gather:
- Gauge: 18 stitches and 12 rows of half double crochet in 10cm (dividing each figure by 10 gives you 1.8 stitches per cm and 1.2 rows per cm)
- Upper arm measurement: 36cm (this is the craft yarn council measurement for a size L with 5.5cm of positive ease)
- Wrist measurement: 24cm (this is 20% of the chest measurement for a craft yarn council size L with 3cm positive ease)
- Sleeve length: 38cm (Craft yarn council underarm length less 6.5cm to allow for ease in the body of the imaginary garment and a small cuff)
Now it’s time for the maths…
(A reminder that I go over the method used to convert measurements to stitch and row counts here)
Step 1: Work out the number of decrease rows and total sleeve rows
Upper Arm Circumference: 36cm multiplied byt 1.8 sts per cm (16/10) = 64.8 sts
Wrist Circumference: 24cm multiplied by 1.8 sts per cm = 43.2 sts
Sleeve Length: 38cm multiplied by 1.6 rows per cm = 60.8
Now clearly you can’t make part stitches, so we’re going to round off these results. I’m going to round down so I have 64 stitches at the upper arm, 43 stitches at the wrist and 60 rows for the length.
The next step is to work out how many stitches we need to decrease over the length of the sleeve
Upper arm stitches (64) minus Wrist stitches (43) = 21 stitches to decrease.
Now we need to work out how many decrease rows those 21 stitches equate to
Let’s say that we decided that we were going to make 2 decrease on each decrease row, one at the start and one at the end (this is a relatively easy way to make sure your decreases are even either side of the underarm seam). 21 stitches isn’t going to be very helpful for that.
So using designer’s prerogative, I can take another look at how I rounded those stitch counts and change that 43 stitch count at the wrist to 44 instead. Your numbers will not always fit neatly first time.
If we do the sum again; 64-44 then we are left with 20 stitches to decrease over the course of the sleeve.
With a 2 stitch decrease on each decrease row, this will give us 10 decrease rows (20 divided by 2).
So now we know we need to work 10 decrease rows over the entire course of the sleeve which is made up of 60 rows, we can move on to the second part: How to distribute the decreases.
Step 2: How to distribute the increase / decrease rows
In this example, we want to distribute our decreases evenly down the length of the sleeve.
To work out how to spread the decrease rows, divide the number of sleeve rows by the number of decrease rows and you get 6
60 / 10 = 6
This means that you will work one decrease row every 6 rows – i.e. 5 rows with no decrease and one decrease row. You will do this 10 times in total (as you have 10 decrease rows).
Now in this case the numbers fit pretty neatly – which was pure luck because I pulled the gauge measurements out of my head!
However, lets say you wanted to ditch the cuff idea and increase the sleeve length to 64 rows.
64 / 10 = 6.4
You can’t work part rows so again you need to look at rounding. This is where you, as the designer, get to decide how to make the numbers fit.
You may decide to add those 4 extra rows at the cuff end. So the sleeve pattern would look like this:
[5 non decreases rows, 1 decrease row] 10 times, then 4 non decrease rows
Personally I like to start decreases close to the armhole so I think I would split the difference and start the decreases first. So it would loo more like this:
2 non decrease rows, [1 decrease row, 5 non decrease rows] 10 times, 2 non decrease rows
Similarly, if you wanted to go back to the original numbers which dictated your decrease by 21 stitches, you could work 7 decrease rows each with 3 decreases in (21/3), or 7 decrease rows with 2 decreases and 7 decrease rows with 1 decrease which would require 14 decrease rows (which might work well if you’re using a stitch pattern that decreases over more than one row repeat for example), or, given you have 60 rows, you could work 21 decrease rows with 1 decrease per row… and so on and so forth…
Each time tweak the way you want to decrease, you divide the row count by the number of decrease rows to re-evaluate how you want to distribute the shaping rows.
As you can see, you can play with the numbers here to suit your preference and to sculpt the shaping you’re looking for. It really is up to you.
That is essentially how to calculate your sleeve shaping. It’s a mix of maths and your own decision making on how to apply those numbers.
You can use this process to create your own sleeve pattern or when adjusting existing patterns.
If you’re working with an existing pattern and want to change the sleeve length but keep the circumference of the upper arm and wrist the same, you just use your gauge to recalculate the number of rows you want to work and plug the numbers back into Step 2.
Thoughts on increase / decrease row cadence
As I hope you are starting to appreciate, there are many different ways to approach the distribution of increase / decrease rows including varying the number of decreases each decrease row.
This little sea-saw of numbers is where the art of shaping really lies, and is why it’s difficult to be completely prescriptive in how to go about it.
It’s important to keep the decrease placement in mind in terms of the underarm sleeve. If you’re working in rounds and all your decreases are all at the same side of the underarm seam, than that seam is going to wander and you’ll end up with some ‘interesting’ asymmetry.
I often work decreases at the start of a turned round, so that the decrease always falls at the start of the row. I will then work my decrease rows two at a time (one row after the other so my decreases stay on either side of the seam) with non decrease rows between the pairs of decrease rows.
This is just my preference and others prefer to work fewer decrease rounds with one decrease at either end.
Lets say you want more room in the upper arm, you can work fewer decreases in the first part of the sleeve and more in the lower part of the arm, so that the top of your sleeve is wider.
Conversely, if you have a deep armhole and want the circumference to decrease quickly at the top of the sleeve, you can make more shaping rows in that area.
It may help you to plot out your intended sleeve shaping on graph or squared paper so that you can visualise the it before you spend those hours hooking it up.
Graph paper is more accurate than sketching because you can draw it out to scale and get a clearer idea of how the proportions work together.
If you’re not sure where to start with experimenting with sleeve shapes and styles, this post from Mood Sewciety is great for offering examples of sleeve schematics for different shapes – it’s by far the most useful and clear post I have found on the topic.
It takes time to understand how the distribution of your increase / decrease rows will change the shape of the sleeve overall.
The more you practice, the more you will get a feel for it, so don’t worry if your first experiments don’t turn out quote how you expect. Mine certainly didn’t.
How to sew up and attach your sleeves
If you’re crocheting your sleeves as separate flat pieces then you will need to seam them and attach them to the body of your garment.
There are different ways to approach this, so I will just share a couple of my personal thoughts on the matter (in the context of drop shoulder construction only). You may already have your preferred method, in which case, go for it.
The way you attach your sleeve will depend on the construction style of your garment. This post demonstrates one way to add sleeves to a drop shoulder garment.
If you are adding a sleeve to an armhole that is already constructed, you could also try turning the sleeve (with underarm already seamed together)the right way round and tucking it inside the body of the garment with the body wrong side facing you – this means that the right side of the sleeve is facing the right side of the garment on the inside.
Pin the top of the sleeve to the armhole. You then have clear access to the shoulder seam to sew from the wrong side.
Whatever method you use, I want to reiterate how important it is to pin the sleeve securely in place all the way around and check the top of the sleeve is evenly distributed (unless you’re trying some clever gathering or pleat design) before you start sewing.
As you sew the pieces together (I like to use mattress stitch), make sure you check it’s not moving about.
The truth is, sewing is a big weak spot for me so I’m not going to go into great detail on seaming techniques as it’s way out of my wheel house!
Interweave have a two part tutorial demonstrating how to seam a sleeve cap if you want to dig into this further. You can find part one here.
What I will mention, because it’s another mistake I’ve made, is to make sure that your seaming method and tension matches that of the fabric and function of the garment. The seam should not be so tight it causes puckering and should not restrict movement of the body within the garment (unless either of those are intentional features of the design).
Also… don’t forget to, block your sleeve before seaming.
Cuffs
I want to share a few thoughts about cuffs before I finish up.
You can create cuffs at the start of the sleeve (we have already factored in their depth in the sleeve length measurement), or you can add them at the end.
It’s probably not the most professional of me to admit this but adding cuffs at the end is a great way to mitigate sleeve length issues – if your sleeve is a bit short, increase the length of your cuff and vice versa – it’s a fudge yes, but a tasty one!
What is important to get right however, is to ensure that your cuff circumference is large enough, or has sufficient stretch to easily fit the widest part of your hand through, otherwise you’re going to struggle to get your sleeve on.
If ribbing is your preferred style of cuff, you might find this directory of ribbing stitches useful to look at how different styles of rib stitches stretch and bounce back.
Sleeve shaping questions
When I was putting this post together, I asked readers of the WiP Tip and members of the My Crochet Wardrobe facebook group what their sleeve niggles were.
There were some great questions and comments, many of which have been addressed in the body of the post.
Some of them don’t fit in easily to any section however, so I’ve added this little FAQ section below to answer the outliers. If you have another question, drop it in the comments and I will add an answer here (if I have one!).
How closely to the underarm should I start decreasing?
This is another case of a personal style choice. I have heard designers advocate for working the top couple of inches of the bicep section with no shaping but personally I generally like to start the shaping pretty close to the shoulder (dependent on ease and construction style).
Whilst a longer unshaped section at the top of a sleeve might work for some shapes, I have come a cropper doing this.
I ended up with a weird kind of bingo wing shaping just below my bicep… which I only realised when trying on the sewn together and completed sweater… there were tears, tantrums and frogging… but a lesson learned (relearned and probably forgotten again) about checking your work as you go and not sewing everything up until you’re sure you’re happy with it.
How do I make sure that the top of the sleeve matches the circumference of the armhole?
This is another case of using gauge to make your calculations. It’s easy to stray into cap sleeve calculations here which I’m not going to address but I’ll share a quick example for a drop shoulder sleeve.
If you’re making a drop shoulder garment, and you want to make sure you leave the appropriate armhole depth so that the sleeve neatly fits, then you need to calculate the armhole depth first and then calculate the width of the top of the sleeve (based on double the armhole depth measurement).
The way I approach it, the calculation of the top of the sleeve is dictated by the armhole depth, not vice versa – it’s the cart not the horse.
Using your row gauge, calculate how many rows you need to leave unjoined to create the armhole depth. Here’s a basic example:
Lets say you want a 20cm arm hole depth with a row gauge of 15 rows per 10 cm. Your armhole depth will work out as 30 rows deep (20cm multiplied by 15/10).
The top of your sleeve should be double your armhole depth, in this case that would be 40cm wide.
If your stitch gauge is 20 sts per 10 cm this means you’re going to need 80 sts (40cm multiplied by 20/10) at the top of your sleeve to cover the armhole.
Basically you just need to do the maths for each part one step at a time.
How do I keep my sleeve seam straight when working in rounds?
The straight seam challenge is something I see more commonly discussed when making hats but the same principle really applies here.
I should probably write a separate post about it, but here are my basic thoughts.
- Turning at the end of the row and ensuring to start each row in the same way should keep your seam straight – I prefer to chain and not include the chain as a stitch, slip stitch into the first stitch to join the row and start each new row in the top of the last stitch of the previous row (ignoring both the slip stitch and the chain)
- If you are working rows in the same direction, I find that not using the starting chain as a stitch, working the first stitch into the top of the first stitch of the previous round, tightly slip stitching to the top of the first stitch to join tends to keep the seam straight – however, this doesn’t always work and seems to depend on what stitch you’re working (and how slanted that stitch is) – honestly, this is a riddle I’ve yet to find a reliable solution to and one of the reasons I like turning
- If you find that even with turning you get a very noticeable seam, or it still seems to go wonky (often because the slip stitch gets mistaken for a stitch), then work your sleeves flat and seam them together at the end
Keeping your seam straight in the context of increasing or decreasing, is more a matter of making sure your shaping stitches are distributed evenly either side of the seam. I touched on this in the earlier discussion of shaping cadence.
For shorter sleeves, how to I stop the upper part of the sleeve being shorter than the lower part?
This is largely a function of the shoulder construction style discussed at the beginning.
Say you have a drop shoulder then you essentially need to create a sleeve cap to bring the top of the sleeve level with the underarm. (Hence this kind of sleeve is called a cap sleeve).
Without going into detail, you might be able to achieve this by working short rows into the upper part of the armhole to create the cap. (Short rows are one way of creating a sleeve cap whilst working directly into the armhole)
You may also find this issue with some longer sleeves. Because of the way our elbow bends the outside of our arm is slightly longer than the inside. Normally this tends to level out an not be so noticeable on a full length sleeve, but if it’s something that bothers you, well placed short rows could help here too.
I hope that you have found this post useful and are feeling more confident about tackling your own sleeve modifications.
Happy Hooking!
Dx
Sources and additional reading
Below you can find a list of some of the sources I have learned about sleeve shaping from. Some directly referenced in this post and others that have contributed to my learning over the years.
- Elizabeth Zimmerman – Knitting Workshop (for sizing proportions)
- Sleeve shapes blog from Mood Sewciety
- How to make sewing patterns – Don McCunn (for general sewing pattern making guidance)
- Interweave article discussing how to design set in sleeves (examples given for knitting)
- Shirley Padden – Knitwear Design Workshop (also available as a class on Craftsy at time of writing)


Thank you for your post. I am creating a made to measure cardi, but the sleeves are straight and I want them tapered. I learned a lot from that pattern and had some idea as to how to do this, and your post confirmed and added to my knowledge. Much appreciated!
Hi Dori, so glad the post helped you out 🙂
Dora
Thank you this post was very informative! I’m working on a crochet side-to-side sleeve where the foundation chain represents the sleeve length. I’m wondering if you have any tips on shaping/tapering the sleeve to be wider at the shoulder and narrower at the wrist?
Hi there, For shaping in side to side sleeves I use short rows. My Winter Solstice sweater dress uses this technique. This post on short rows may give you some more ideas: https://doradoes.co.uk/2023/09/20/crochet-short-rows-what-they-are-when-and-how-to-use-them/
I can not believe the wealth of information that is on your blog. Many bloggers trick you into thinking they have wrote the ultimate guide to really construct a sweater but then they only give very superficial information, making their post, info, completely useless. Many people also think that if you give away how you do things, then you will loose in customers that now, knowing how to do something, will not buy from you anymore….. This is just fantasy. There are people that prefer ONLY to follow patterns and have no way, will or interest of “studying” how to construct a sweater or whatever the item. Other people, like me, prefer to know why and how things are done. I don’t just like to follow a pattern….I want to understand why things are done in the way they are, and I can only reward the designer/creator for all the time she/he spent thinking up, writing, actually working the item and taking pictures to explain to other people how to REALLY construct a sweater. And then there are those people that just take, take and take without ever giving back something. Fortunately this is the minority.
So I do really appreciate you giving out this info. I found only yourself and another Dutch person that really shared info that could allow you to construct the sweater yourself. And even if I don’t really like any pattern that I can buy to “reward” to say my “thanks” to the creator, I will donate, even something small, to say “thank you”!
I’m really, really grateful for what you do and the info you decide to share with us. And anyway, even for those people that don’t give back, Karma will take care of you. The more good you do, the more good will come back to you. I absolutely believe in that and I can say that for me, this is how it is.
Thank you for the lovely feedback. As someone who learned to crochet largely from online resources (as well as books and trial an error), it’s important for me to share what I have learned to make it more accessible to others. I am glad what I share resonates with your crochet style so strongly and am grateful for your support.
All the best, Dora