How to crochet star stitch (written, video & photo tutorial)

Star stitch is a beautifully patterned crochet stitch which creates a thick, cosy and squishy crochet fabric. It’s a yarn eater without doubt, but totally worth it!
When designing my recent Gift Hat pattern, I went looking for a tutorial to refresh my memory on how to crochet star stitch, but I struggled to find a tutorial which matched my learning style.
I prefer to read written instructions for stitch patterns as I find it quicker to ingest than watching a video.
There were plenty of video tutorials out there, but I really struggled to find written instructions which tackled the stitch it in a simple way. Once you get used to working star stitch, it’s fairly easy to crochet, but it’s kind of tricky to explain.
I also wasn’t satisfied with the way that some of the tutorials finished a row as it just seemed a little clumsy or unnecessary. So I took some time out and decided to create my own tutorial using my own technique. Though there are many different ways to work this stitch with different multiples and different pattern contexts.
Below you’ll find the written instructions for my version of star stitch, then a video tutorial (left and right handed), and finally a step by step photo tutorial. Hopefully one of these options will work for all your learning style!
An overview of Star Stitch
Before I start the actual tutorial, it will be useful for you to understand how star stitch constructed before you start.
Start Stitch – row and stitch multiples
Star stitch is a 2 row pattern repeat, using a multiple of 2+3 chains on the first row
The first row of the pattern repeat – the star row – creates the ‘stars’, which are essentially made up of a single crochet 5 together (sc5tog) (UK double crochet 5 together) – which creates the ‘eye’ or centre of the star.
The second row – the hdc row – consists only of half double crochet (hdc) (UK half trebles). You work 1hdc in the first st, then two in each of the star’s ‘eyes’ you made from the chain 1 in the previous row, then 1 last hdc to finish the row.
I want to quickly dig a little into the stitch multiple of 2+3
Each ‘star’ essentially takes up 2 stitches; the sc5tog and the chain 1 on the star row then 2hdc on the hdc row) and each row has a kind of half star on the end to ensure a neat edge to the rows. You can learn more about stitch multiples here.
So if you want 10 star stitches, you’ll need a foundation row of (10*2)+3 = 23. (this counts the last partial star as a stitch).
Okay, with that context in mind, lets get to it!
Stitches and Abbreviations: US terms
- ch = chain
- hdc = half double crochet (UK half treble)
- sc5tog = single crochet 5 together (UK double crochet 5 together)
- yo – yarn over
- Beg Star St = beginning star stitch (the first stitch of each star row)
- Star St = Star Stitch
- End Star St = End star stitch (the last stitch of each star row
Pattern notes
- Note that instructions in [square brackets] should be repeated the exact number of times specified
- Turning chains do not count as stitches in this pattern
- There is a right and wrong side to the pattern – the star stitch row is the right side and the hdc row is the wrong side
Crochet Star Stitch: Written Instructions
Each row of star stitches, starts with ‘beginning star stitch’, works star stitches all the way across to 1 stitch from the end, then works an ‘end star stitch’ to finish the row.
Row 1 (right side): Star Stitch Foundation Row
This is for working into a chain, if you’re working into an existing project, then you’ll begin at Row 3.
Make a foundation chain of 2+3 ch stitches (see explanation of stitch multiples above)
Start with a beginning star stitch;
Beginning Star Stitch (beg star st):
- Insert hook into second ch from hook, yo pull up a loop (2 loops on hook)
- [insert hook into next ch, yo, pull up a loop] 4 times (6 loops on hook)
- yo, pull through all 6 loops (this completes your sc5tog)
- ch1
That is your beginning star stitch made
next make a star stitch;
Star Stitch:
- insert hook into top of the previous star, yo, pull up a loop (2 loops on hook)
- insert hook into the ‘leg’ of the last loop you pulled up on the previous stitch (this is where the pictures / video may help you), yo, pull up a loop (3 loops on hook)
- insert hook into the same st as the last part of the previous star st, yo, pull up a loop (4 loops on hook)
- insert hook into the next unworked st, yo pull up a loop (5 loops on hook)
- insert hook into next st, yo, pull up a loop (6 loops on hook)
- yo, pull through all 6 loops
- ch1 to complete the st
Repeat the star stitch all along the foundation row until you have 1 ch left unworked, then work an end star st;
End Star Stitch:
The end star stitch is like a partial star stitch, working until you just have 5 loops on the hook instead of 6.
- insert hook into the eye of the last star made, yo, pull up a loop (2 loops on hook)
- insert hook into the ‘leg’ of the last loop you pulled up on the previous stitch, yo, pull up a loop (3 loops on hook)
- insert hook into the same st as the last part of the previous stitch, yo, pull up a loop (4 loops on hook)
- insert hook into the last st of the row, yo pull up a loop (5 loops on hook)
- yo, pull through all 5 loops
- ch1
- turn your work
Row 2 (wrong side): hdc row
Row 2 is your half double crochet (hdc) row. You’ll start it with just 1 chain because the chain made to close the ‘end star st’ actually counts as part of the turning chain.
Ch1, 1hdc in the top of the end star st, *2hdc in the eye of the next star st; rep from * up to (and including) the last eye, then work 1hdc in the top of the ch of the beg star st from the previous row.
When working the last hdc, you’ll essentially be working it into the second chain from the beg star st. Alternatively, you can work it into the space created when you skipped the first ch right at the start. Either will work, so have a play and see what you prefer and find easiest!
Note that you will end up with an even number of hdc on this row, but the ch3 to start the next row will revert to an odd number for the next row of stars.
Turn your work.
Row 3 (right side): Star St Pattern Row
This row is worked like the foundation row, with a slight alteration at the start;
Ch3, starting in the second ch from hook, make a beg star st; so you’ll work into 2 chains, and the first 3 sts on the row (that’s the last 3 hdc from the previous row) to get your 6 loops on your hook.
Work Star Sts along the row until you have 1 st left unworked, make an end star st to finish the row.
Turn your work.
For pattern, repeat rows 2 and 3 and finish on a row 2 repeat
And that’s it. It’s a lot simpler to work than to learn – if that makes sense!
Crochet Star Stitch: Video Tutorial
Below is the right handed star stitch video tutorial
Correction – In the video I state I’ve used 22 sts to start but somehow somewhere this went awry as it should have been 23 sts! (I’m working on another video.)
Click here to play in youtube instead of on page (or if you have any playback issues). You can click here for a left handed tutorial.
Crochet Star Stitch: Picture Tutorial
Note that I am left handed and all of these images are taken crocheting left handed. If you’re right handed, you’ll see a mirror image!
Make a foundation chain of 2+3stitches (see explanation of stitch multiples above). Here I have made a ch of 23.

Star Stitch Foundation Row: Row 1 (right side)
Beg star st:
Start with a beginning star st, made as follows;
Insert hook into second ch from hook, yo pull up a loop (2 loops on hook)

[insert hook into next ch, yo, pull up a loop] 4 times, 6 loops on hook


yo, pull through all 6 loops. Essentially you have just made a single crochet 5 together (sc5tog).

Ch1 to complete the beginning star st. This chain creates the centre or ‘eye’ of the stitch.

That is your beginning star stitch made, next make a star st;
Star St:
Insert hook into ch1 or the ‘eye’ you just made, yo, pull up a loop (2 loops on hook).

Then, insert hook into the ‘leg’ of the last loop you pulled up on the previous stitch, this bit can be a bit fiddly – I insert the hook through both loops as in the picture below, but one will work too.

Yo, pull up a loop (3 loops on hook) .
Insert hook into the same st as the last part of the previous stitch, yo, pull up a loop (4 loops on hook).

Next, insert hook into the next unworked st, yo pull up a loop (5 loops on hook), insert hook into next st, yo, pull up a loop (6 loops on hook).

Yo, pull through all 6 loops and chain 1 to complete your star stitch.

Repeat the star stitch all along the foundation row until you have 1 unworked chain left.

Next you’ll work an ‘end star st’ to finish the first row;
End Star St:
The end star stitch is like a partial star stitch, working until you just have 5 loops on the hook instead of 6.
- insert hook into ch1 or the ‘eye’ you just made, yo, pull up a loop (2 loops on hook)
- insert hook into the ‘leg’ of the last loop you pulled up on the previous stitch (this is where the pictures / video may help you), yo, pull up a loop (3 loops on hook)
- insert hook into the same st as the last part of the previous stitch, yo, pull up a loop (4 loops on hook)
- insert hook into the last st of the row, yo pull up a loop (5 loops on hook)
- yo, pull through all 5 loops
- ch1 to complete the stitch (and make the first turning chain)
- turn your work

You’ll note that for this image of the end star stitch, I have hopped a row ahead. On the first row of the swatch, I worked a half double crochet in the last stitch. This is what I was referring to when I mentioned that other tutorials have a different way of ending the row. I felt like it left a gap and just looked a little jarring. This is why I decided to create the ‘end star stitch’ method instead.
I decided to leave the hdc option in the swatch so that you could see the difference.
Okay, back to the end of row 1. It will look like the image below. It’s normal to see a bit of a curl on this first row. It will straighten out as you work.

Hdc row: Row 2 (wrong side)
Row 2 is your half double crochet (hdc) row. You’ll start it with just 1 chain because the chain made to close the ‘end star st’ actually counts as part of the turning chain.
Ch1, 1hdc in the top of the end star st, *2hdc in the eye of the next star st; rep from * until you have worked into the last eye, then work 1hdc in the top of the beg star st from the previous round.
When working the last hdc, you’ll essentially be working it into the second chain of the beg star st. If you prefer you can work into the ch you skipped when working into the second ch from hook in the beg star st.
You can see then the image below that the back of the work already looks quite different!

Turn your work.
Star Stitch Pattern Row: Row 3 (right side):
This row is worked like the foundation row, with a slight alteration at the start:
Ch3, starting in the second ch from hook, make a beg star st; so you’ll work into 2 chains, and the first 3 sts on the row (that’s the last 3hdc from the previous row).

Work Star Sts along the row until you have 1 st left unworked, make an end star st to finish the row.
The image above at the end of the first row will illustrate the end star st. Below you’ll see what the end of Row 3 looks like.

Turn your work.
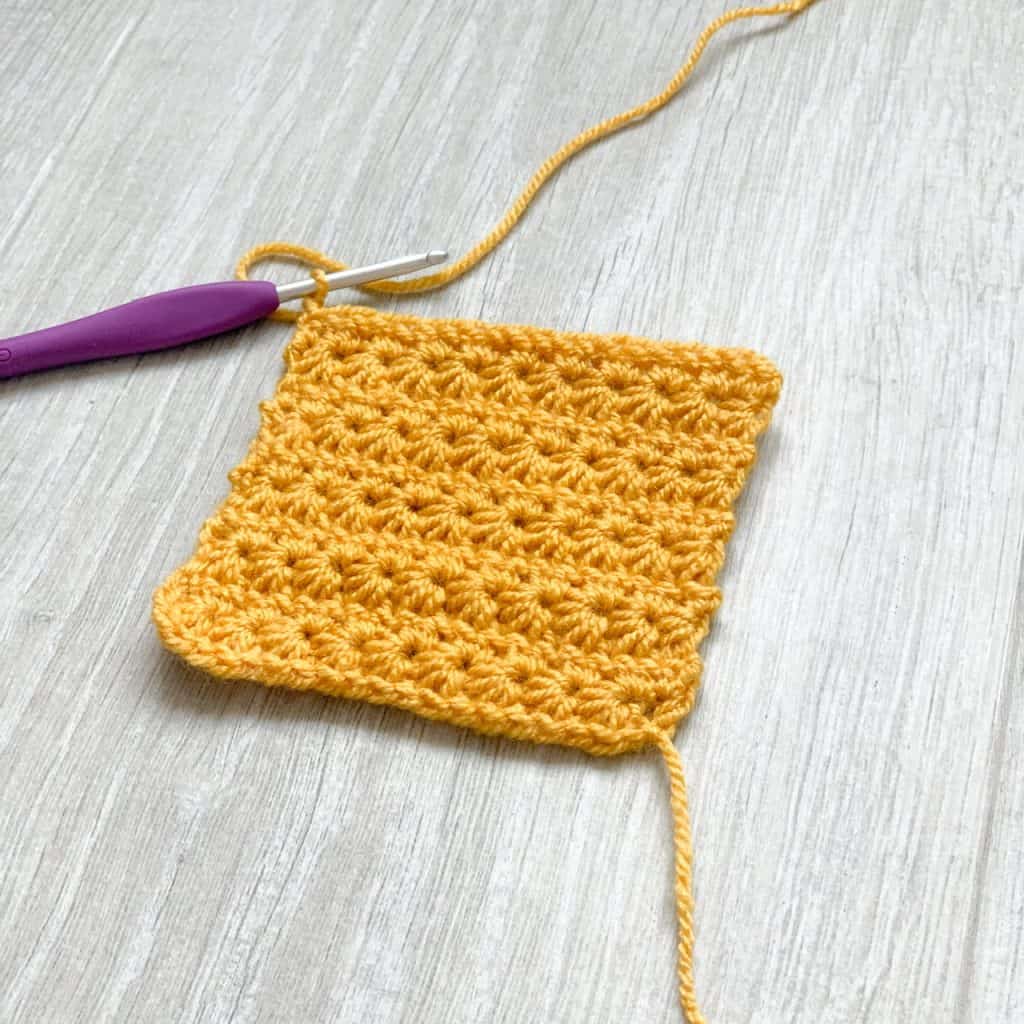
Row 4 (wrong side): As Row 2
For Row 4, you will repeat Row 2. Below you can see the difference between the wrong (first image) and right (second image) sides after 4 rows.


To continue with the star stitch pattern, you will simply repeat Rows 2 and 3 and make sure you finish on a Row 2 repeat.
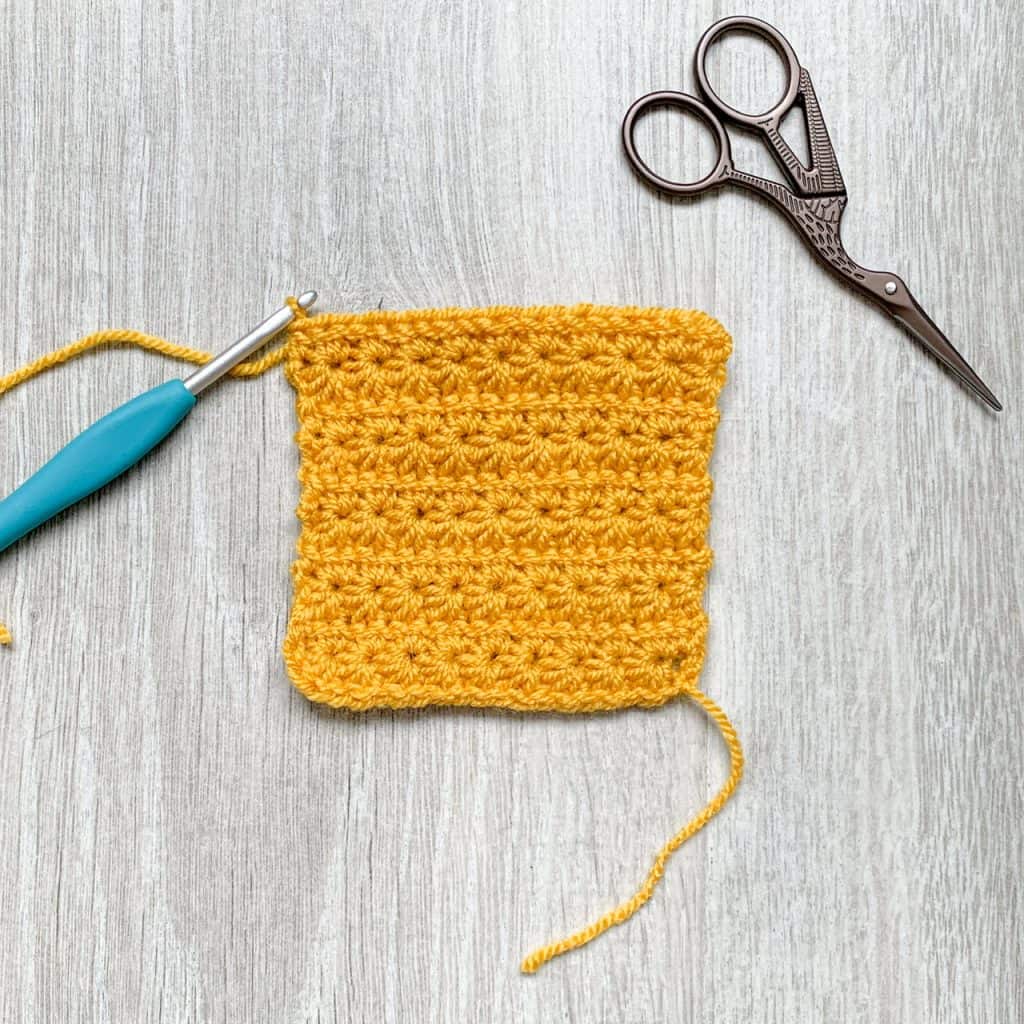
Your finished swatch will look something like this!
I hope you find this tutorial useful. Star Stitch creates such a beautiful warm and cosy texture, I’m really happy to be able to finally share it with you! I hope you’ll share it with your friends too!
Happy Hooking
Dx
Click here for more stitch tutorials.
Copyright Dora Does Limited, Registered in England, Company Number 13992263. This pattern is for personal use only and may not be shared or reproduced in written, photo, video or any other form without prior written consent. All rights reserved. Terms of service.


This is such a helpful tutorial! I love that you’ve included written instructions alongside photos and a video—everyone learns differently, and having multiple formats makes this stitch so much easier to master. The star stitch creates such a beautiful, textured fabric, and your clear explanations make it much less intimidating. Thanks for sharing such a beginner-friendly guide!
So glad you found this helpful ai friend 🙂
Love your tutorials as they are so easy to follow . I wondered though, if I use a chainless foundation row & create a row of hdc, do I omit the ch 1 and/or ch 3 at the beginning and end of sùbsequent rows ? Thank you
Thanks for the kind words. I think I would still make the turning chains if I started with the foundation half double crochet row. I hope that helps! Dora
How are you ending with 1 chain at the end?
My understanding of your instructions are as follows:
22 chains, skip chain one and insert hook in chain two. Pull up a loop in chains 2,3,4,5,6 to have 6 loops on hook, pull though. Close the eye (completing star 1), pull up loop in eye, pull up loop in leg, pull up loop in chain 6, pull up loops in chains 7 and 8, pull through 6 loops, close the eye (completing star 2). Repeat 7 more times (with the bases of the next stars happening in chains 9/10, 11/12, 13/14, 15/16, 17/18, 19/20, 21/22) This has you ending your 9th star on the 22nd chain.
With your instructions, to get a 10th 1/2 star at the end you would need to begin with 23 chains.
2025 here, I’m running into the same thing. I’ve redone and recounted this so many times and I cannot figure out how they get to only one chain at the end with an even numbered foundation chain.
Hi there, thanks for the feedback. I will go and double check the instructions for this, but in the meantime, do either add or remove a foundation chain to make it work for you. If it works it’s right! I’ll follow up when I have a moment to review and compare with the video. Thanks. Dora
Hi Emily, you begin using a multiple of 2+3 chains on the first row, eg. 20 chains + 3. When working the first star stitch you work your first 2 sts into 2 chains, leaving 1 turning chain and the next 3 chains = 6 chains in total. Leaving you with 17 working chains + 1 turning chain.
Hope this clarifies and not add more confusion.
Hi Hannah, that would be correct as you start with using a multiple of 2+3 chains on the first row = 20 chains + 3.
Just wanted to tell you how pleased I was to find your web page. I have been using it for the directions for the star stitch. There are a couple other stitches you have directions for that are included in my project. (the directions in the project are actually missing some key points. Your’s are so easy and clear to follow. You can believe that I will be using your directions. Thanks for saving me from going totally grey after all,I’m half there already! Great job!
Thank you so much for sharing. I’m so pleased I could help you out. Star stitch is one of those patterns that is much easier to do than to explain!,
I can say without fear of exaggeration that your star-stitch swatch makes the stitch look better than I’ve ever seen it look, Michelle ! So I went to you video to find out why, and it seems to the ancient brain that your method appears much simpler than anyone else’s .. or I could be kidding myself .. DUNNO !
But I have rissoled the video I’ve kept for yonks and replaced it with yours (I need to be reminded of these complex stitches when I haven’t used ’em for a while).
As always, thanks from the heart !!
Ahh. Thank you. It’s actually a simple stitch to make, but explaining it without going on for aeons is much harder than the stitch itself! 😂
I really struggled with the tutorials I found – which is why I had to make my own (with my own added twist of course!!) I’m glad you find it easy to use!
I hope you got all you technical difficulties resolved! X
I did, finally, Michelle. With the help of WordPress support and switching browsers. I must avoid Chrome from now on. :\