Crochet Garment Making: 6 common ways to construct a crochet sweater
Continuing my mission to simplify crochet garment design, today I want to share some common approaches to constructing crochet sweaters.
Understanding the differences in these styles was a big lightbulb moment for me as a designer and a maker and I hope it gives you that “ahhhhhh… I get it now” moment too!
Whether you are working from a pattern or designing your own, my aim is to give you an overview of 6 types of crochet garment construction, what they have to offer, what challenges they pose and when you might use them.

I’ve included some examples of my own designs for each category for illustration purposes, as well as some basic schematics to give you a visual guide to the clothing construction. Also, get ready for more of my special doodles! (I’m still working on my ipencil skills!)
Note that each of these styles focuses on the way the sleeve and body work together. Other than the top down yokes, they can be worked top down, bottom up or side to side. The focus here is on the shapes you need to make to create a garment.
This is far from a comprehensive list of all the approaches to construction, but it outlines the most common ones I have encountered in crochet.
Many modifications can be made to each version, including to the necklines, body and sleeve shaping. The styles also all work for cardigans.
These 6 styles however are a foundational place to start, from which you ban build more complexity with experience, if you wish.
So lets get stuck in!
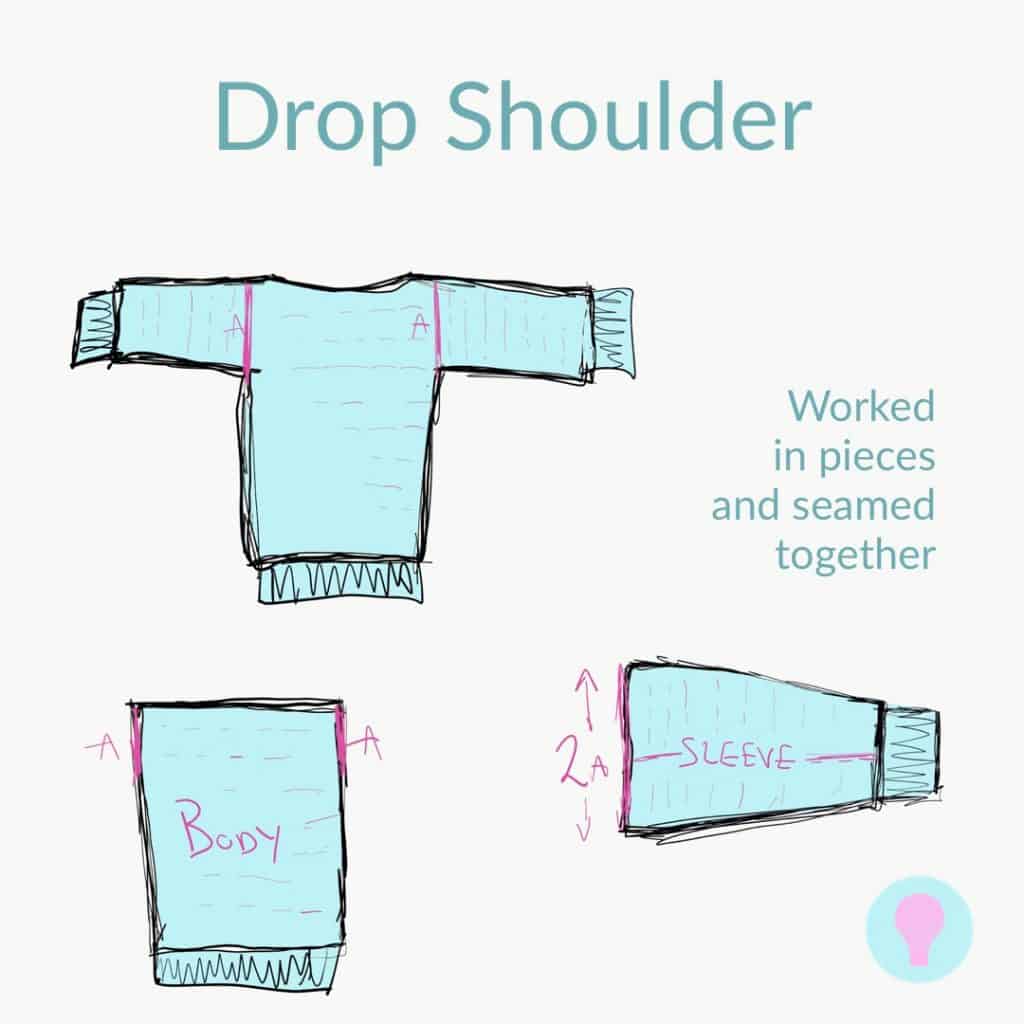
1. The Drop Shoulder
The drop shoulder sweater is probably the simplest construction method. Effectively, you just make a panel for the front, one for the back then two identical pieces for the sleeves and seam the lot together at the sides, shoulders and underarms.
Of course there are many modifications which can be made to add shape. Neck shaping for example as used in The Upsidedown Sweater.

Benifits of the Drop Shoulder construction
- Simple shapes make this an achievable project for newer crocheters
- Easy to adjust to fit (just change the width or length of any of the panels to suit) when made with simple stitches / stitch patterns
- Works well with any yarn
- Can be worked top down, bottom up, side to side, even corner to corner if you’re feeling adventurous!
- Sleeves can be worked flat or – and this is my favourite bit – in the round directly from the armhole! (No sewing!)
- This post will teach you how to join the panels in a drop shoulder sweater
Issues to consider with drop shoulder construction
- Can be bulky around the arms so better suited to loose fitting sweaters
- The standard drop shoulder is quite shapeless – there is no tailoring around the shoulders or body. Of course you can add this in relatively easily but that adds complexity to the design

If you want to start with this kind of garment, you may also want to check out the ‘So What’ Sweater, which is a free, chunky, oversized drop shoulder sweater pattern with some fun post stitch texturing.
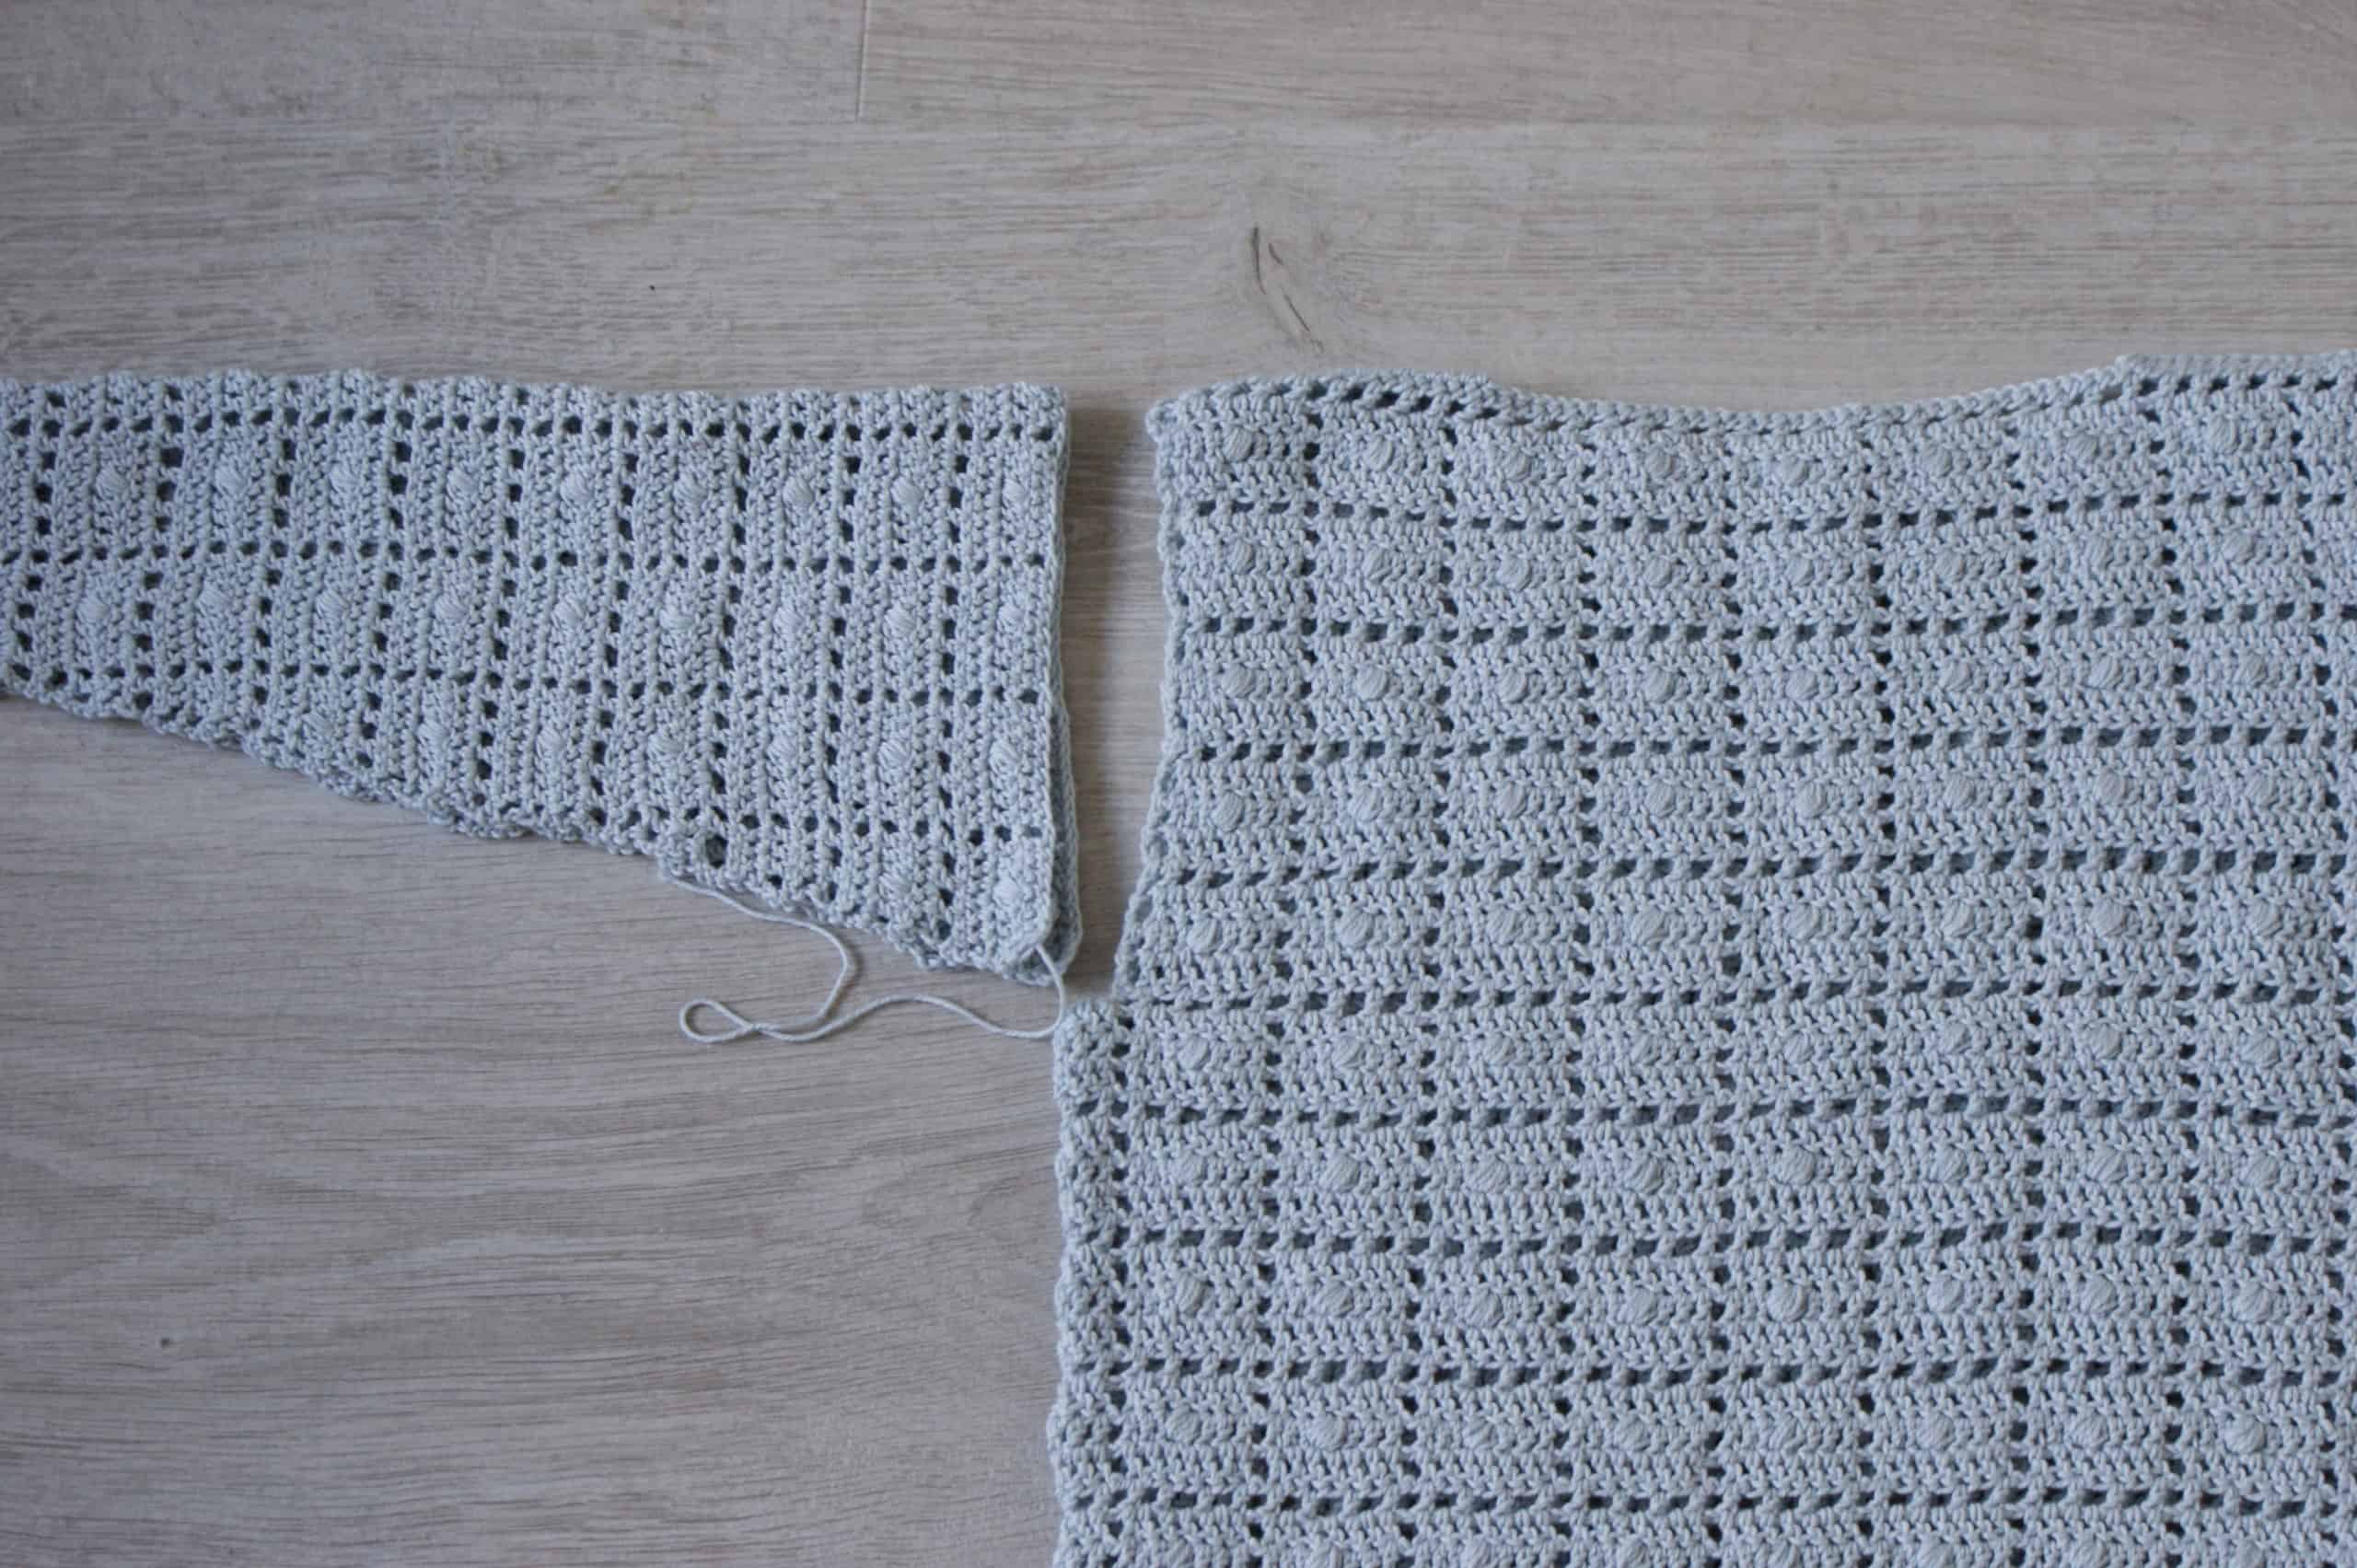
2. Modified Drop
The Modified Drop involves adding some square shaping to the body panel to set the sleeves in a little.
This helps to address the issues with the bulk at the under arm you get with the traditional drop shoulder, by pulling the sleeves in and creating an underarm space. This is kind of a transition construction to the full set in sleeve which doesn’t over complicate the design.


Benifits of the Modified Drop Sweater design
- The sleeve adjustment helps reduce extra bulk around the under arms as compared to the Drop Shoulder
- The shaping is still relatively simple and easy to make to measure
- The body panels can be worked top down bottom up or side to side
Issues to consider with the Modified Drop construction
- Shaping around the shoulders is still relatively basic

Whilst shaping around the underarm is still fairly rudimentary, there are various ways you can tweak the panels to create a more fitted look. Adding shoulder slopes is one such avenue.
The Lark Sweater, pictured below, highlights that drop shoulder ‘cut in’ really well because of how the colour work contrasts with the top of the sleeve.

This crochet pattern uses shoulder and sleeve shaping to reduce the excess fabric around the shoulders and upper arms making it a much more fitted looking garment than you’d ever get with a drop shoulder design.
And it does this without the complexity of the set in sleeve cap shaping (up next!)
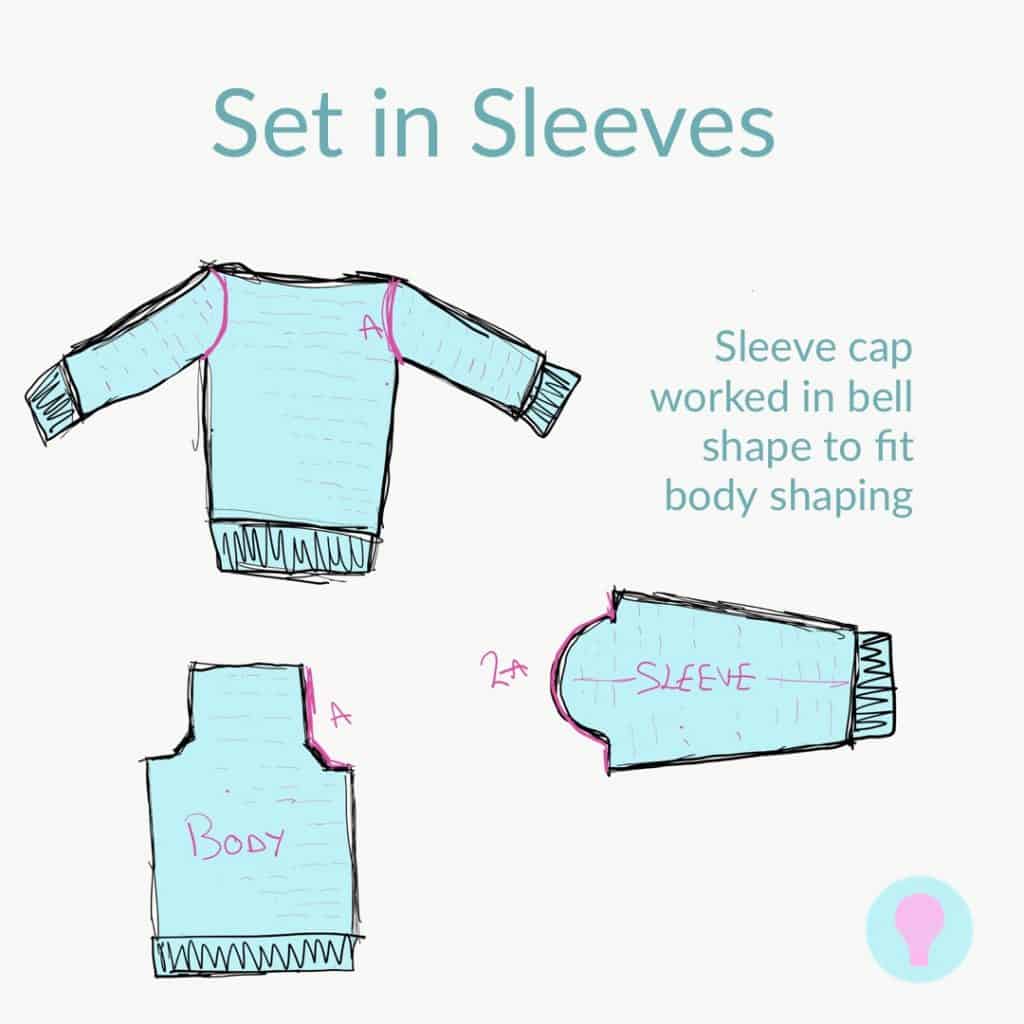
3. Set In Sleeves
In this type of construction, you add more shaping to the sides of the body panel to accommodate the sleeves in a more tailored way, and you create a corresponding curved end to the sleeve (the sleeve cap). The length of the curve should fit into the underarm hole created in the body panel.
There are a huge number of ways to approach this type of design from a very shallow set in with a shallow sleeve cap (almost overlapping with the modified drop) to a much longer sleeve cap which brings the shoulder seam much closer to the neck.

Benifits of using the Set-in Sleeve method
- Great for tailored garments – you can attain beautiful close fit around the shoulders with set in sleeves
- This design will remove any unsightly bulk at the under arms
- It is a great way to achieve structure to the garment
- Can be worked top down, bottom up or side to side
Issues to consider when using Set-in sleeves
- This is my opinion only, but this type of shaping is probably one of the more complex ones to make (and to get those sleeve caps right if you’re designing it!!).
- You’ll need to be happy with seaming around corners with this type of design as neat seaming is critical to the look of the finished garment
The Underdog Cardigan is loose fitting but uses a shallow set in sleeve design.

If you want a kind of cheating version of the set in sleeve, you can also look at the short row sleeve cap option, where the sleeve cap is created as you go by using short rows. This is a more intermediate level technique I use in the Short Stories Cardigan, the Sequel Sweater, and the Spin off Tee (once I started using this technique, I couldn’t stop!).
4. Dolman
The Dolman sweater uses a single piece for the front and back, building the sleeves and body into a single piece of fabric. It can be worked on the diagonal (batwing) or in a T shape.


Benifits of the Dolman Design
- The Dolman is a super simple construction
- Can be worked top down, bottom up or side to side
- No seams at the arm holes / around the upper arm
- Perfect for batwing sweaters
Issues to consider with Dolman sweaters
- Tailoring around the arms is limited (which is part of the design for Batwing sweater so no issue there!)
- You will, typically (though not always) have seams along the tops of the shoulders
- This is not a design style I would recommend if you’re looking for something close fitting
The Stash to Treasure sweater is a batwing shape dolman design that’s crocheted bottom up and was made for stashbusting.

The Free Flow Sweater uses the T-Shaped Dolman design, as does the Clarity Sweater, both free patterns in 7 sizes. Unlike stash to treasure, these are worked top down, so you start with the sleeves.
5. Top-Down Raglan Sleeve
It’s important to start by distinguishing between a Raglan seam and a top-down Raglan yoke sweater before we get into the detail.
A raglan sleeve or raglan seam is where the seam that connects the sleeve to the body reaches from the under arm up to the neckline on the diagonal. Raglan seams give a distinct shaping, commonly seen in sporty garments.
The Raglan sleeve can be made top down using a yoke, bottom up, or in pieces and seamed. You can read more about top down sweater design (and yokes!) here.
There is a whole other world of raglan styles available, but here I focus on the top-down raglan yoke method.


Benefits of Raglan Yoke Shaping
- When worked top-down, they are seamless (no sewing) and incredibly simple to make.
- Top down raglan designs can be adjusted to fit as you work
- There is a huge variety to how raglan sleeves can be applied (shallow/ steep / saddle etc.)
Issues to Consider with Raglan Yokes
- Creates distinct style which changes the shape of the garment from the more traditional squared shoulder look.
- This shaping can make shoulders look narrower.
The Light Fandango v-neck sweater and the Comfort and Joy Cardigan patterns are examples of top-down v-neck raglan designs, as is the Any Yarn Will Do Cardigan.
The Rainbow Smiles Sweater uses a less traditional hexagonal top down raglan construction with added v neck and back shaping on the neckline.
6. Top down Circular Yoke
The top-down circular yoke construction begins with a circle or oval with a hole in the centre which is folded and split at the underarm to create the body and sleeves, which are worked directly from the yoke, making it a seamless construction (new sewing!)
A yoke, in this context, is the structure of the garment around the shoulders and neck, from which the rest of the garment hangs.
You can read more about this style in my top down sweater post.


Benifits of top down Circular Yoke
- It is totally seamless – no sewing of seams and separate pieces together
- You can adjust to fit as you work
- There is no extra fabric at the under arm if fitted well
- Allows you to create stunning fair isle style uninterrupted colour work and expanding pattern repeats
Issues to consider with the top down Circular Yoke
- This shaping is quite distinctive and no shoulder seams can sometimes make shoulders look rounded
- Short rows can be used to add shaping around the neck line to avoid the symmetry that is created with a simple yoke – this can add complexity to the make
My most popular round yoke design is the Any Yarn Will do sweater. It’s a simple round yoke pullover, but the pattern is written for any of 5 different yarn weights. You can learn more about what went into this design here.
This is a great place to start if you are new to making garments.
The Abundance Cardigan, the Wilderness cape, the Circles in the sand tee, the corona halter top, and the Southern Pines Sweater also use this top-down round yoke construction with very different results in each case.
So there you have it!
Below is a little summary of the 6 styles. Which one are you going to try next?

If you’re interested in crochet design, please do pin this for later!
If you want to learn more about crocheting garments using any pattern, why not check out my ebook ‘how to crochet clothes that fit (and you actually want to wear)’? You can learn more here, or get your copy now!

You may also find the following posts useful:
How to seam crochet pieces using the mattress stitch (this is perfect if you’re not a sewer like me!)
Top Down Crochet Sweaters Explained
Happy Hooking
Dx
Copyright Dora Does Limited, Registered in England, Company Number 13992263. This pattern is for personal use only and may not be shared or reproduced in written, photo, video or any other form without prior written consent. All rights reserved. Terms of service.


Thank you for this!! I love learning the underlying principles of crochet in addition to following patterns and this is exactly the type of info I was after as I move into garment construction!! I made one whole drop sleeve sweater (that I didn’t even like that much) and now I’m insufferably obsessed with wearables. 😂
hahaha… It’s a slippery slope with garments, but a fun one to slide down crochet hook in hand! Drop shoulder sweaters are a gateway to all sorts of interesting crochet projects!
I am currently working with a sweater pattern – did a Search to research how to attach sleeves – found your article in Sweatermaking and SO glad I did – this article really gives me to confidence to go ahead and make one on my own! Thank you!
Thanks so much for sharing. I’m so glad you found the article useful! I have lots of articles on crocheting clothes so I hope you’ll explore them as your experience grows 🙂 (Head to the sub menu under ‘blog’ called ‘my crochet wardrobe’ for all the crochet garment related bits!)
Hello there. I’m making my first wearable out of a design that was originally supposed to be for a blanket. I’m thinking I’ll have to use a drop shoulder because I currently have two panels for the front and back, but I have no idea what I’m doing to be able to make it look right with the panels I have. It’s definitely going to be an oversized sweater which I’m fine with because I want it to be comfy but I don’t want the arms to look totally weird. If I were to share what I have with you, would you be willing to share your input?
Hi there, great work with the experimenting! There are lots of articles on the site that should help you with this. Just pick design tips from the menu and have a little scroll. If it’s sleeves you’re concerned about, this post talks all about sleeve shaping and might give you some ideas on how to start: https://doradoes.co.uk/2022/03/31/how-to-work-out-sleeve-shaping-for-crochet-garments/
I also have a separate post on how to construct drop shoulder sweaters which may help you along too: https://doradoes.co.uk/2020/04/11/how-to-construct-a-simple-drop-shoulder-crochet-sweater/
Best of luck, and certainly let me know how you get on 🙂
Dora
Another peerless Dora Does article !
You take my breath away, you Pommy genius. [grin]
Thank you. Grinning right back!
Hi Dora,
I am crocheting my first top down raglan cardigan, I’m only using a v-stitch pattern as a reference. My problem is that I am struggling with the sleeves. I like the idea of making them in the round; however I am struggling to get it right. Could you please give me some information on how to do it.
Thank you,
Louise
Hi there, I have never worked with v-st in the round so don’t have an immediate answer for this. The key would be to look at the stitch multiple and work out how to join rounds maintaining this multiple. Sometimes I find it helpful to sketch it out or practice on a small swatch to work out how to start and finish a round when using a stitch pattern like this. This post on stitch multiples may be helpful: https://doradoes.co.uk/2020/02/29/crochet-explained-what-is-a-stitch-multiple/
Best of luck 🙂
Dora thank you for another helpful article. Can you, (or maybe you have and I haven’t seen it) write an article about the best way to shape sleeves for different sweater styles – or at least for round yoke top down? I find that many of the patterns I’ve made in this style has a sleeve opening that’s too big for me and I have to decrease for a better fit. I never know how often to decrease, how many even rounds should be between decrease rounds, or if I’d have better success with changing to smaller hooks instead of decreasing. I’d love to know the correct technique for decreasing the width without causing it to ripple. Thank you
Hi Colleen, thanks for your comment. I’m glad you found this post useful. The answer to your question is really ‘it depends’. It depends on what shape sleeve you want to achieve really. As a general rule of thumb, you can work out how many stitches you want at the cuff, subtract that from the number of sleeves you have at the top of the arm, so you know how many stitches you need to decrease in total, and then distribute that over the number of rows you will work for the whole sleeve. This will achieve an even decrease down the sleeve. You’ll need to use your gauge measurement to do these calculations. I don’t have a blog post on this topic yet, but will certainly put it on my list as I think it’s a subject a few people get stuck on (as there is no ‘right’ answer). I do have a post on adjusting top-down yoke garments which may help you with the project you mentioned: https://doradoes.co.uk/2019/12/04/how-to-adjust-top-down-yoke-crochet-sweaters-to-fit/
Thanks again for the feedback.
Dora
Thank you so much fir sharing this information. I am a beginner and I will tackle each of these sweater styles to familiarize myself more with crocheting garments
You’re welcome! I’m glad you found it useful!
Omg SO interesting! I should have read this before all my failures lol thank you so much
I’m glad you found it helpful!
Hi Dora, I’ve recently started designing some kids’ clothing for a charity (4-6year old sweaters and sleeveless vests are desperately needed). I’ve read your suggestions on working out the no of stitches required, but can you suggest how would I work out the shoulder to waist measurement for a 4 year old? I don’t know how long to make the V shaped top part. I found most of the other measurements online.
Hi, when you say the v shapes top part, do you mean for a v-neck? If so then I am guided by the armhole depth measurement.
For the other measurement you mentioned, I think the craft yarn council standards have a back neck to waist measurement which should work. I’m fairly limited on my sizing resources for kids clothes as I mainly do adult garments bu I hope that helps!
Thank you for your wealth of knowledge! I’m an amigurumi designer who dreams of designing clothes one day and you’re giving me the confidence that I can!!!
You’re welcome!! You definitely can!! ?
This is extremely useful helpful and kindly shared formation. The crochet community really needs good quality helpful advice and information like this and your other crochet design posts. Crochet garments are really beautiful and more people need to know this so crochet can continue to develop and grow like knitting does. That is done by sharing information so we can all benefit. The more we know the better we grow!
This information is so useful and you are very kind to be so generous (it is exceptionally generous for you to share like this). Thank you for demystifying the processes of crochet design. It was something I found very hard to process for myself and I frequently wondered how people create phenomenal things when my brain was just stuck at first base. We actually all benefit from pooled resources as it helps us all to grow when we exchange information. That is a real service to everyone.
I so appreciate these posts (saw the post in crochetzine). I want to make a jumper but first off I have a little bag project in mind. I feel much more confident of success now. Many thanks x
Wow. Thank you for the lovely comment. When I was learning to design, I really struggled to work all this stuff out so hoped others would find it useful to have an overview!! It’s nice to know I am on the right track!!!
Dx
Thank you so much for sharing all this info! I have made quite a few chunky jumpers for my husband Phil, all using the easy first drop shoulder method. He loves them and I find them quite quick to do.
But getting to grips with the other methods is quite new and I think you have inspired me to find the confidence to give them a go!! Thanks again.
Roslyn Hill
Thank you so much for your comment – this was precisely my intention with this post so it means a lot! You can totally do it! Make sure you come back and let me know how you got ?on!!