Seamless, Top-down Yoke Crochet Sweaters Explained

One of my biggest goals for Dora Does is to dispel the myth that crocheting elegant, wearable, modern garments is akin to rocket science.
In this article, I explain how to crochet a top-down yoke based garment (and I’ll explain what yoke means for those less familliar) and wax lyrical about the glory of top down sweaters, and I’ll start with this statement…
If you can crochet a granny square or a circle, you can crochet a top down sweater!
It’s true!
BUT… I would be lying if i didn’t say that there is a little more to it than that (understanding gauge and having the ability to keep count of your stitches for starters), but nothing insurmountable!


This post contains affiliate links. This means if you click a link to a product and go on to make a purchase, I receive a small percentage of the sale at no extra cost to you. You can read my full affiliate disclosure here. As an Amazon Associate I earn from qualifying purchases.
Top-down yoke sweaters are seamless
Whilst top down sweaters may be a little more testing of the designer’s maths skills, they are beautifully simple to make. Obviously different designs will have different levels of complexity but for a basic sweater, you really just need to be able to follow patterns accurately, work in rounds (turned or unturned) and count.
In addition… are you ready for this…
Using the top down yoke* method means YOU CAN MAKE A SWEATER WITHOUT SEWING A SINGLE SEAM!
Yes. You read that right too!
One of the comments I have heard time and again which puts you off crochet garment making is this:
The prospect of making lots of parts and seaming them together in the right way is so intimidating that I never even start.
This exact thing put me off too when I started making and designing crochet garments because I am not the strongest sewer.
It’s also one of the reasons I try keep seams to a minimum in all my designs (though sometimes you really do need them for structure). With traditional top down designs, you do away with all of that seaming and joining.
Sounds good right?
But wait… There is more…
If you are already sold, you can browse crochet patterns for seamless top down yoke sweaters here.
You can try on top-down sweaters as you go
So you’ve done away with all the seams and jigsaw-ing pieces together but the top down method keeps giving. When working top down, you can try your garment on and adjust it as you work.
Imagine that, instead of putting all those hours in, joining everything up then holding your breath as you try it on hoping it fits (and wanting to cry if it doesn’t!), you can just check it and adjust it as you work!
Bcause you’re working outwards, you can change the length of the sleeves and body as you go. In fact you don’t really need to think that much about sleeve length until you get there.
Similarly, with the body you can decide as you go if you want to alter the shape by adding some decreases at the waist or increases over the hips.
The level of flexibility when working top down is immense!!!
I do need to add the caveat here that you need to account for blocking when trying on sweaters as you go.
Because you’re a well behaved crocheter you have made and measured your crochet swatch both before and after blocking, so you know that it’s your blocked swatch that matches gauge… If you didn’t do this, then now you know one of the reasons why your sweater wasn’t the size you expected…
I know, I hear you say you’re changing my life… tell me more!
Types of top-down seamless crochet garments
There are many methods of top-down working but this article focuses on the top down seamless yoke design. So I’m talking about the traditional method of making a ‘yoke’ which you then fold in half and split into the body and sleeves.
*What is a Yoke?
I remember the first time I heard this word in a context that didn’t mean the yellow bit inside an egg.
It felt like magic terminology that only people with years of knitting and dressmaking experience understood. I don’t have a background in sewing or fashion design, I just fell in love with crochet, so definitively had to learn on the go (and continue to do so!).
Technical sounding words like ‘yoke’ and ‘Ease’ can be very excluding if you don’t understand what they mean. Like you’re trying to join the club but don’t know the special handshake. It doesn’t feel very nice and it’s the opposite vibe from the one I’m trying to cultivate at Dora Does.
I’m working on a jargon buster to help melt this barrier. Raglan is another one in the top down world that scared me too. I’ll get to that in a minute, but for now I’ll try and stick on topic and explain yokes!
Basically; a yoke, in the context of a top down sweater, is simply the shaped piece of fabric which fits from the neck and increases outwards over the shoulders and bust. The yoke is the structural piece from which the rest of the garment hangs, so from a construction perspective it’s the foundation, and important to get right.
Generally yokes are either worked in square/rectangle (or maybe a pentagon or hexagon if you’re making a v-neck) or in a circle / oval – only you have a hole in the middle for your head!
This is why I, and others insist that if you can make a granny square or work in increasing rounds for a flat(ish) circle then you can make a yoke sweater!
Think about the shape of a typical poncho – when you lay it flat it’s usually a big square or circle – essentially this is a just a yoke which you keep increasing then split it off to separate the body and sleeves.

How to turn a yoke into a sweater
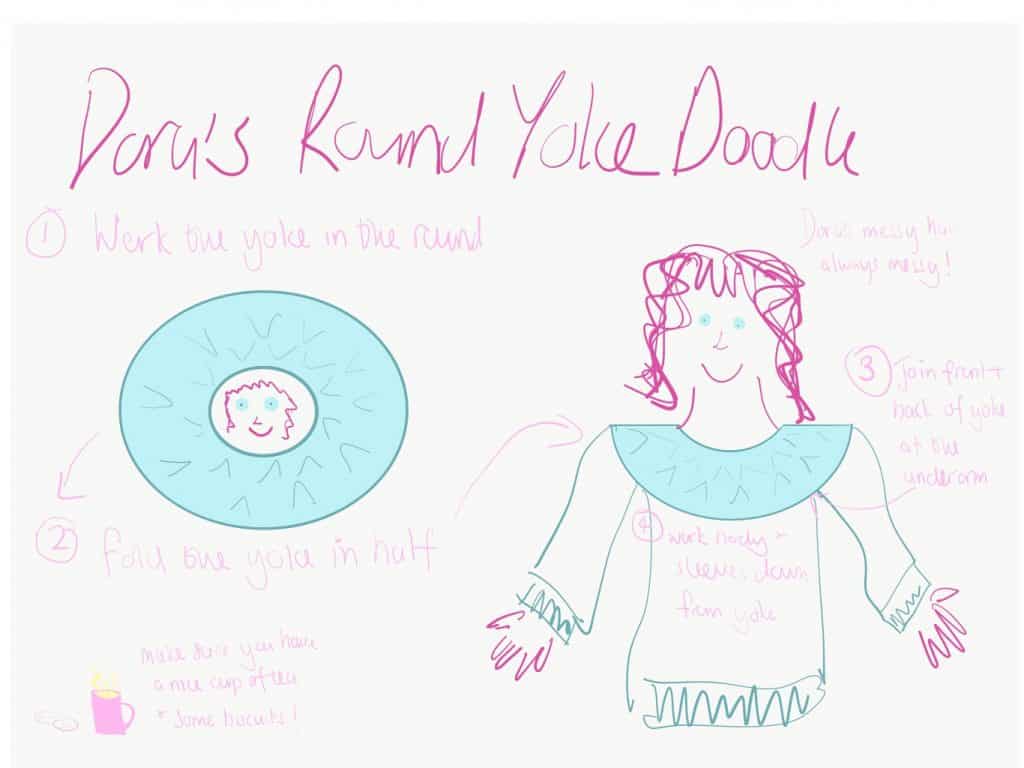
In a sweater, once the yoke is large enough (when it reaches your underarms), you fold it in half, section off a bunch of stitches on each edge for the sleeves (I advise using place markers for this!) and work the middle section as the body.
The pictures below from the ‘any yarn will do’ simple round yoke sweater give you an idea of how this process goes.

Your last yoke round is also effectively the first round of the body.
You will work your stitch pattern across the back body section, make a chain to create the underarm, skip the arm hole stitches (that you have marked with your place markers if you’re sensible – I am usually not and miscount and have to frog it all!).
Carry on working across the front of the body, make another underarm chain of the same length for the other arm hole, skip the arm hole stitches, and finish that round.
This round is the hardest part of working top down. But, remember you can try it on and check you got it right before you go further!

Once you’ve made the yoke, the sleeves and body basically just hang off it!
For cardigns the principle is the same – you just work the yoke in rows instead of joining at the end of each round.

There are obviously a lot of variations which can be worked into a yoke (think roll neck, v neck etc), but today I’m just going to explain the basic raglan and circular yoke styles.
Prepare to be impressed by my epic doodling skills!!
How to crochet a Raglan Yoke
Okay, first things first. What does Raglan mean?
Raglan describes a type seam which attaches the sleeve to the body by running from the underarm up to the neckline, usually on a straight diagonal.
The outcome of using a raglan shaped sleeve is that there are no traditional shoulder seams on the garment.
There are many variations on the raglan method (such as where the ‘seam’ starts and ends, what shaped neckline you want etc.), but the diagonal seam replacing the shoulder seam is the basic principle.
To crochet the raglan yoke:
- Start with your rectangle
- Increase at the four corners until the yoke is the right length to the underarms, width across the body and circumference around the upper arms
- Split the yoke to create the body and sleeves
- Crochet the body and sleeves to the shape and length desired.

When you are working a raglan sleeve top down, you will see the increase ‘seam’ running diagonal from where you start your increases at the neckline to where you join at the underarm.
There are no actual seams but the increases are placed on top of each other in each round which can create the illusion of a seam.
Below is an example of a raglan seam in the chunky version of the ‘any yarn will do’ cardigan.

You could, if you wished, make the raglan seam-line a feature, for example by working a different stitch pattern on the increase. But lets keep it simple for now!
In a traditional raglan sleeve, the yoke is worked in a rectangle, with increases being made in the 4 for the 4 raglan seams at the front and back of each shoulder. The number and distribution of the increases will depend on the angle of the seam. (As a designer, this is the hardest bit to work out across sizes!)
The red example pictured above is not a rectangle because it’s a v-neck cardigan design, so you start with just 3 sides of a rectangle and increase so the front panels are more wedge shape.
A very rough (and much debated) rule of thumb is that the shoulder widths / sides of the rectangle, which will evolve into the sleeves are normally start at about 1/3rd of the length across the back. But this will depend on the style of neckline you’re looking for.
My popular pattern, the Rainbow Smiles Sweater uses the raglan method, but, because I have to make things interesting, it also incorporates a v-neck so is more of an asymmetric hexagon than a square or rectangle.
The Light Fandango V-neck Raglan Sweater pattern is a more typical raglan design. Though you will often see raglan sweaters with the square neck as in the hopeless doodle above.


That’s really the basics of the raglan design. If I missed anything or you have unanswered questions, please do drop them in the comments.
How to crochet a Circular Yoke
A circular yoke works in a similar way to a rectangular one in terms of construction (make, fold then split the yoke). But here, the increases are evenly distributed rather than being worked at the corners, so you don’t get the same obvious seam.
If you’ve ever made a hat starting at the crown using the flat circle method, you will have used the same technique.
Think about all those beautiful Scando/ Icelandic / alpine sweaters – whether knit or crochet, these are made using a round yoke.
Prepare… bear witness to more of my epic drawing skills!
That’s really it for circular yokes. The rest of the construction is worked in the same way as the raglan yoke.
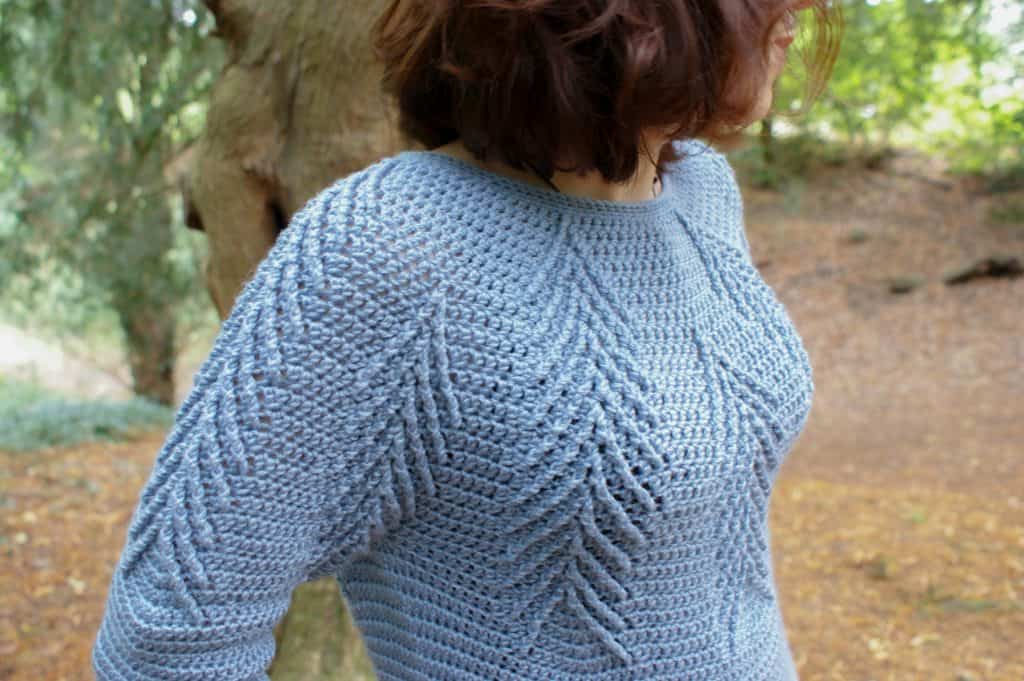
Here’s another version of the Any Yarn Will Do Sweater pictured earlier in the yoke overview. This one made with chunky yarn using a simple circular yoke.

Circular yokes are also a great way to make ponchos. In fact, my first poncho pattern, the Falling pines poncho was made with a round yoke, ironically, before I really knew that it was a yoke I was creating – I just knew it had to keep getting bigger!

I loved this design and went on to make the Southern Pines round yoke Sweater pattern using cable design based on this one.
These are all very simple yokes I’ve described here. You can add more shaping around the back of the yoke using short rows so that the neckline of the sweater is different at the front than the back and the garment sits a little differently. I explore this option in my any yarn crochet along.
So there we have my intro to the joy of working top down. I hope you found this helpful and that you are less intimidated at the prospect of trying a top down garment!
If you want to dig deeper than this summary of how to crochet a top down seamless garment, then you can check out my ‘top tips for top down’ article which shares lots techniques for getting a professional finish for your top down makes and tricks to make your life easier.
If you’re ready to go ahead and crochet a top down garment, you can have a browse through my top down seamless patterns which include raglan and round yoke designs.
If you’re not quiet there yet then make sure you pin this post for later so you can come back to it when you’re ready to go!
Let me know how you get on!
Happy Hooking
Dx
If you want to learn more about crocheting garments using any pattern, why not check out my ebook ‘how to crochet clothes that fit (and you actually want to wear)’? You can learn more here, or get your copy now!

If top-down garments are your thing, check out my posts ‘how to adjust a top down sweater’ and ‘how to design a top-down sweater‘
You may also want to have a look at the Any yarn will do sweater – a simple top down, round yoke sweater pattern written for 5 different yarn weights! You can read about what inspired this unique design here.
Top Down Crochet Garment Resources & References
Part of the reason I write these posts is to solidify my own knowledge and learn a little about what I still have to learn – I regularly discover in life that there is so much I don’t even know that I don’t know!
I have started to reach outside the world of crochet for garment making tips as there is so much info out there for knitters and sewers which can be applied to crochet too!
Below are some of the resources I have used in creating this post. And yes, they are actual print books rather than random googled sites!!
Knitting from the top by Barbara G Walker: This was written in the mid 90s (and a very kind friend lent me her copy!) and it’s a great example of how knitting principles apply equally to crochet.
I adore Barbara’s writing style. it’s a great read, even though there was a lot of knitting lingo I didn’t understand!
Top Down Crochet Sweaters – Dora Ohrenstein: This is a great book (which actually pays homage to the one mentioned above!) which has everlasting sweater patterns but also spends the first half of the book explaining design and construction.
I have a few of Dora’s books (nothing to do with the name!) and they are all incredible and PACKED with useful, well researched information.
If you love books, you can find my favourite crochet books detailed here. These have taken me from beginner to designer!
Copyright Dora Does Limited, Registered in England, Company Number 13992263. This pattern is for personal use only and may not be shared or reproduced in written, photo, video or any other form without prior written consent. All rights reserved. Terms of service.


Just what I was looking for! I haven’t crocheted much in recent years, and I’ve never made a sweater, but I have just acquired a large trove of free yarn — all different fibers, weights, and colors — and am just itching to make tops I would actually want to wear. (I’ve already got all the afghans and throw pillows that will fit in my house!) I really don’t like the idea of having to sew a bunch of pieces together only to have the sweater not fit, and the top down method also lends itself better to using up smaller quantities of different colors.
Hello I’m working a top down crochet pattern. Your instructions are very helpful. Can you tell me, when you make the chain under the armpit, do you use those ‘stitches’ in both the sleeve and the body? I’m confusing myself on this question.
Thank you
Hi there. Yes, you work on both sides of the chain, firstly for the side of the body from the armpit downwards, and secondly on the sleeve where it will sit at the underarm. I hope that helps.
This post is SO helpful! When it comes to armholes, if you’ve done the math like you mentioned above (working backwards to calculate the number of starting chains), why is it necessary to chain under the underarm? Would the length of the short side of the rectangle not be long enough?
I’m glad you found it useful 😊
So the underarm chains are more a part of the construction – they stop the fabric of the body being pulled into the underarm. If that makes sense! I would always advise a few chains (depending on yarn weight etc) just to give that extra room to move!!
A also – the underarm chains should be included in the maths rather than an add on – unless you want to use them for extra ease.
I adore the way you describe and define things. I have crocheted for decades, only recently coming to really love it and brave new stitches and designs. In 2 blog posts, I now know how to find and how to design a sweater for my son, who is wild for “anything mommy makes” and “mommy, can you make that one?”. Thanks to you, I can confidently say, “yes, honey, I can. What color would you like it in?”. Thank you so much for being such a wonderful Crochet Ambassador!
Gosh, thank you so much for your lovely words! I’m so glad I was able to help you make progress in your crochet journey!! Long may your son love his mommy makes!!
This is meant to follow hard on the heels of Dora’s saying “Thank-you, I think ..”
I find it largely impossible to have comments fall into their proper places, damn them !
Anyway: I have sent an impassioned email asked for urgent help re a foreign project; and I need the help to get this *u**i** project done and dusted, so that I can commence on the Waterfall cardi and NOT HAVE TO PUT IT TOGETHER AT ALL !!!
Seaming crochet bits is .. very very very challenging when they’re dc ..
Lol! I haven’t seen an email come through but will help if I can!
Vell. Vell vell .. Erhmm .. I think I must admit defeat, Michelle: this enthusiastic rave has turned me into a— no, that’s not true. It hasn’t turned me into anything: but it HAS determined me to do a top-down as my first Dora doing.
I absolutely love your enthusiasm, you mad woman ! 😀
Haha, thank you – I think!!! 🙂
I can’t figure out how to place increases in a circle yoke to save my life and every resource I find on this seemingly very simple construction element says that if I can crochet a circle, I can make a circle yoke, which seems crazy to me. Crown down hats are started in a flat circle and gradually curve down into the length, there’s a very set pattern of increases to do this. Increasing a large open circle is very different and dispite what every online resource I can find says, even though I have made probably hundreds of top down hats, making a closed flat circle is nothing like making a yoke. I simply cannot find any information online about calculating increases for an open circle anywhere that isn’t for a specific sweater pattern and it’s incredibly frustrating
So the reason you can’t find a definitive resource is because the answer is that it depends!! If you can make a circle you can make a round yoke, but designing one is very different!!
Essentially you need to know how many sts you want at the neck and how many at the point where you split the yoke, and how many rows that will take. Then you take the st increases and distribute that over the number of rows.
This is where the design process comes into play so, for me at least it’s trial and error. You need to increase by a significant enough number each row so that you don’t end up with a square or hexagon so often I will make an increase row then a non inc row. You kind of have to play with the numbers until they work.
So circle yokes = joy to make and killer to design!!
I hope that helps!!
Hello, I am trying to find a link here to purchase your top down squared yoke sweater
Can you help. I would love to try that one
Hi – do you mean the cream cardigan? Or the blue sweater with the squares? If it’s the latter, that is due for release today! I’ll let you know when it goes live!!
Hi Susan,
Just to let you know that the Tribute pattern – which is written both as a dress and a sweater has just launched! You can find it on my crochet patterns page or at this link: https://doradoes.co.uk/portfolio/tribute-sweater-and-dress-pattern/
Thank you for your interest! Dx
Whenever I try to do a top down sweater or blouse my ” seam” (wherever I slip stitch at the end of the round) is never straight and it does not look good. what is the best way to work it out? If I try to work in a spiral it does not look good because it is not even at the bottom. What is your suggestion. I love top down sweaters….
Good question – and a common issue! There are two things I would suggest – one (if you’re joining at the back) is to be really aware of where you place your first stitch – are you putting it in the same st as the chain? The slip stitch or the next stitch? It’s important to be consistent about what you do -if you’re turning at the end of the round It’s normally easier to keep straight. I never count starting chains as sts and always work into the first st if that helps. The alternative is that once you have finished the yoke and joined at the under arm, you fasten off and rejoin your yarn at the underarm so the seam is at the side and largely hidden! Or you could create a faux seam on the other side to match! I hope that helps! Dx
Thanks for this interesting article. I am working a top down square yoke. I have done a number of rows but unsure whether it is enough before I chain for the underarms and then continue round. Is there a particular area on the body that denotes where to stop the rounds and separate off? Is it level with your underarm? I am quite busty and want to ensure it fits over my chest too.
The maths involved really can be mind boggling – though it’s kind of simple at the same time!
I measure around the widest part of my body to get the measurement and number of sts needed at the widest part of the yoke. Then I measure the shoulder to underarm to get the rows needed and work backwards to get the number of starting sts.
Does that makes sense?
It’s usually still a bit of trial and error though!!
The good thing is that you can use extra underarm chains if the maths isn’t quite there!!
I’ve just re re- read and see it’s the row count you’re looking at. It needs to be at least as long as the armhole depth (more if you want loose fit). The craft yarn council website has standard measurements which may help!