The Free Flow Sweater: Free, easy crochet jumper pattern

The Free Flow crochet sweater is designed to let you do exactly that…
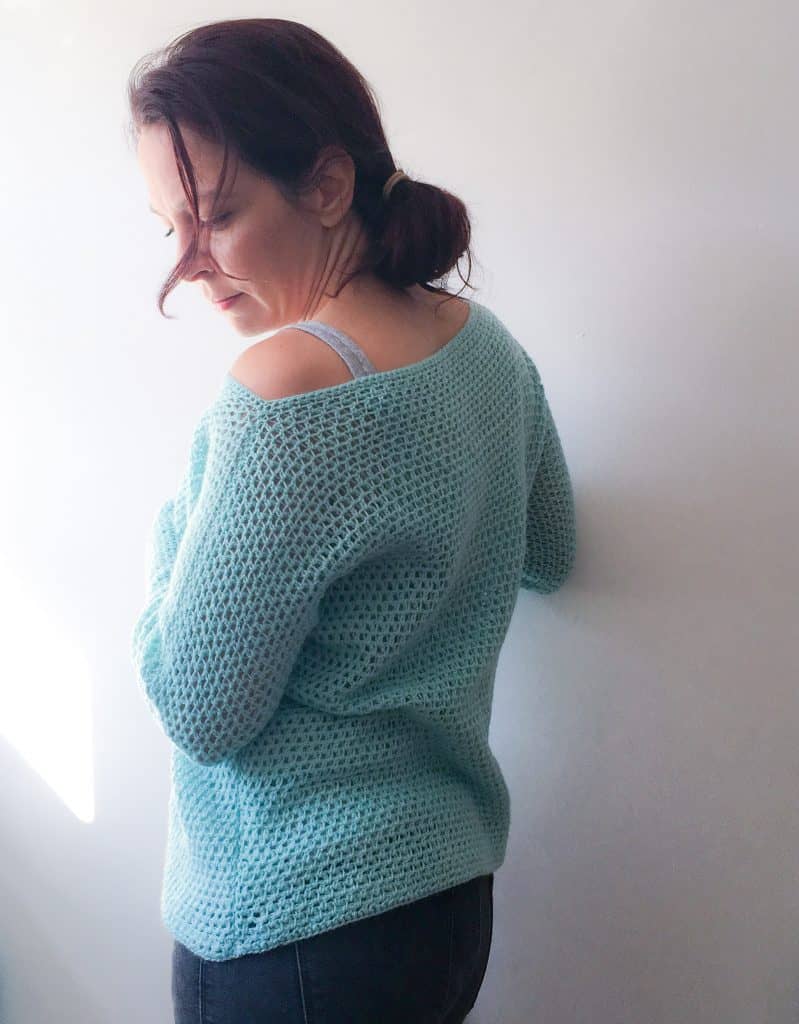
It’s a loose fitting, slouchy sweater which combines comfort and elegance. With 3/4 length wide sleeves, the sweater can be worn casually dropped off one shoulder, or in a wide boat-neck style.
The simple T shaped, dolman crochet pullover design (read this post to learn more about crochet sweater styles) uses an easy textured stitch pattern with 4 ply / sport weight yarn to give it that soft drape.

This post contains affiliate links. This means if you click a link to a product and go on to make a purchase, I receive a small percentage of the sale at no extra cost to you. You can read my full affiliate disclosure here.

The as-free PDF version of this pattern is available to purchase from Ravelry, Etsy or Love Crafts Crochet.
Read on and enter your email or sign into your ‘grow’ account to read the free pattern.
This is a favourite of mine to wear to yoga classes as it keeps me warm before the exercise heats me up and is perfect to throw on during cool down. It even allows me to stop off for a drink after class without feeling like I’m in in full on gym gear!
The Free Flow Sweater is a loose fitting, lightweight, wide neck sweater. It’s a simple pattern without complex shaping, allowing the garment to flow freely from your hook.
If you have any questions about the pattern, please email help@doradoes.co.uk.
Pattern Notes
General pattern notes
- Please read through the pattern and all associated notes before starting your project
- This pattern uses standard US crochet terminology (UK equivalents are given in brackets in the abbreviations list)
- Numbers at the end of a row indicate the number of stitches in that row and are only given at the start of a section or where there is a change
- Chain 1 spaces are included in the stitch count
- The stitch count is given in full and broken down into numbers of esc and ch1-sp for ease of counting
- Instructions written after *asterisks should be repeated as indicated
- Right and wrong sides are nominal
Sweater Construction Notes
- This sweater is constructed by joining two identical ’t-shaped’ pieces.
- The sweater is worked from the bottom up
- After blocking, the pieces are seamed at the sides, underarm and top of the sleeves
Crochet Skills Used
This sweater is aimed at those who may never have crocheted a sweater before. It was intentionally designed with an easy stitch repeat and a super simple construction, using two T shaped panels. The loose fit and stretchy nature of the fabric allows room for variation in tension.
Knowledge of basic crochet stitches, techniques and terminology is assumed. You’ll be working in rows and into chain spaces.
The pattern uses the Extended single crochet, which is described in the special stitches section, although you can also find a tutorial for extended single crochet here (that’s in US terms).
The pattern uses foundation chains and includes instructions and a video tutorial showing to help those who are less familiar with the technique.


Materials
Crochet Hook
I recommend you use a 4mm crochet hook (I used my clover amour), or size needed to obtain gauge.
Yarn Requirements
You will need approximately 1600(1800, 2050, 2250, 2550, 2750, 3000) meters of 4 ply / fingering weight yarn for sizes XS(S, M, L, 1X, 2X, 3X) respectively
The item pictured uses 4(5, 6, 6, 7, 7, 8) x 100g balls of Laxtons’ Bluefaced Leicester Sock Yarn, 100% wool, 100g = 400m / 440yds
The yarn used in the item pictured was picked up at a yarn show and was an unnamed end of line colourway.
Substitution Options
Any similar fingering weight yarn (e.g., sock, 4ply or fine) can be used if it meets the gauge. Different fibres will create different effects on the finished fabric.
You may find this post useful when choosing yarn.
Other Materials & Notions
- Yarn needle & scissors
- 2 stitch markers to help with the neckline trim
- I recommend blocking this project, for which a blocking matt and pins will be required. Learn more about blocking here
Finished Sizes
The pattern is written in sizes XS(S, M, L, 1X, 2X, 3X) for a finished bust of 96(106, 116, 126, 136, 146, 156)cm.
More detailed measurements and a schematic are given in the pattern.
- Approximate measurements of the finished (blocked) garment are given in the table to help you in choosing the correct size
- Additional measurements, row and stitch counts are given in the schematic at the end of the pattern
- The sweater is designed to be loose fitting in the body (about 20cm positive ease) with more closely fitted, three quarter length sleeves
- The pattern is designed for adults and offered in 7 women’s sizes
- Instructions for different sizes are written in increasing order, with the smallest size first and larger sizes following in brackets
- Each size is also indicated by a different colour reflected by the colours in the table. i.e. XS (S, M, L, 1X, 2X, 3X) sts or Rows
- If you are working from a hard copy of the pattern, you may want to go through and highlight or circle the relevant colour for your chosen size

How to purchase a Dora Does crochet pattern:
I sell my PDF crochet patterns in my Etsy, Ravelry and Love Crafts stores. You can purchase this pattern on any of these platforms, depending on your preference. Simply click the relevant links throughout this pattern page to be taken to the listing, or visit the store homepages in the links at the start of this paragraph.
Stitches & Abbreviations: US terms
(UK equivalents in brackets)
- ch = chain
- ch-sp = chain space
- esc = extended single crochet (see special stitches)
- fsc = foundation single crochet (see special stitches)
- PM = place marker
- rep = repeat
- RS = right side
- sc = single crochet (UK double crochet)
- sc2tog = single crochet 2 together (UK double crochet 2 together) – see special stitches
- sk = skip (UK miss)
- sp = space
- ss = slip stitch
- st(s) = stitch(es)
- WS = wrong side
- yo = yarn over (UK yarn round hook)
Special Stitches
Foundation Single Crochet (fsc)
You can find a full tutorial for the chainless foundation single crochet here, but below is a written description of the crochet stitch.
Ch2, insert hook into second chain from hook, yo and pull up a loop (2 loops on hook). *Yo and pull through 1 loop (this creates the base chain of the next fsc), yo and pull through 2 loops to complete the st. To start the next st, insert the hook into the ‘v’ of the base chain you just created, yo and pull up a loop. Repeat from * for required number of sts.
Extended Single Crochet (esc)
Insert hook, yo, pull up a loop (2 loops on hook), yo, pull through 1 loop (2 loops on hook), yo, pull through 2 loops.
You can find a full tutorial for the extended single crochet here.
Single Crochet 2 Together (sc2tog)
This is used for decreasing by one stitch.
Insert hook, yo, pull up a loop (2 loops on hook), insert hook into next st, yo, pull up a loop (3 loops on hook), yo, pull through all 3 loops. Decrease made.
Gauge
24 sts and 14 rows in 10cm (4inches) of blocked extended single crochet moss stitch using a 4mm crochet hook or size needed to obtain gauge.
The fabric will have some stretch so your unblocked swatch will likely be more dense, i.e., you will probably count more stitches than stated in the gauge above. To obtain the same measurements given in the measurement section, you should check your blocked swatch matches gauge.

Pattern repeat for gauge swatch
Make an odd numbered chain measuring 15-20cm;
Row 1: 1esc in third ch from hook, *ch1, sk 1st, 1esc in next st; rep from * to end, turn
Row 2: Ch3 (counts as 1 esc, ch1 throughout), 1esc in next ch1-sp, *ch1, 1esc in next ch1-sp, rep from * to end, turn
Rep Row 2 until swatch reaches a suitable size.
The ad-free version of the pattern can be purchased in PDF format from Love Crochet, Etsy or Ravelry.
The Free Flow Crochet Sweater Pattern
Enjoy your Free Flow Sweater!
2024 Confession & Update: Since making this sweater and wearing it a lot, I confess I shrunk it accidentally in the wash… you can see the sad result and learn how to care for your crochet makes in this article.
How to find me and share your finished makes
- On Instagram, you can use the hashtag #DoraDoes to share your finished projects or just tag me @doraexplored
- Sign up to the WiP Tip for weekly crochet chat, offers and exclusives straight to your inbox – click here to sign up.
- Check out my YouTube Channel for my biweekly ‘Crochet Studio Sessions’ podcast.
Happy Hooking
I hope you enjoy the pattern and, as always don’t forget to tag me on Instagram @doraexplored, or use #doradoes. I’d love to see and share your efforts.
Happy hooking
Dx
Copyright Dora Does Limited, Registered in England, Company Number 13992263. This pattern is for personal use only and may not be shared or reproduced in written, photo, video or any other form without prior written consent. All rights reserved. Terms of service.