A directory of crochet rib stitches and ribbing techniques (part 1)
I can’t tell you how many times I have seen someone post a picture of some crocheted ribbing and thought “ooooh… I’d love to know how they did that” only to realise that I already knew!
To stop myself going round into this loop, I decided to create a record of all the different kinds of crochet rib stitches I love.
In this post I share general information about crochet ribbing and Part 1 of my crochet rib stitch directory (Part 2 is here).
What is Ribbing in Crochet Fabric?
Ribbing, in the context of crocheted or knit fabric, can be defined as alternating high and low or raised parallel columns of fabric.
Typically these textured lines are vertical (as worn), and provide elasticity or offer strength, support or structure to the fabric (think how the bones in the rib cage offer structure).
Ribbing will often allow parts of the fabric to stretch without losing shape.
Approaches to crochet ribbing
There are a bunch of ways that you can approach ribbing in crochet. Most of these either involve working in the front or back loops, using slip stitches or post (UK raised) stitches.
Part 1 of my ribbing directory (this post) will look at the first two approaches. Part 2 will look at post stitch ribbing.
I have also updated this post to include a link to a full video tutorial for the main rib stitch techniques used across both parts of the ribbing directory. You can find details of these after the written instructions.


This post contains affiliate links. This means if you click a link to a product and go on to make a purchase, I receive a small percentage of the sale at no extra cost to you. You can read my full affiliate disclosure here. As an Amazon Associate I earn from qualifying purchases.
If you’re newer to working crochet ribbing then you may find this beginners guide useful. In it I introduce the concept of ribbing and demonstrate how to make a simple ribbed ear warmer.
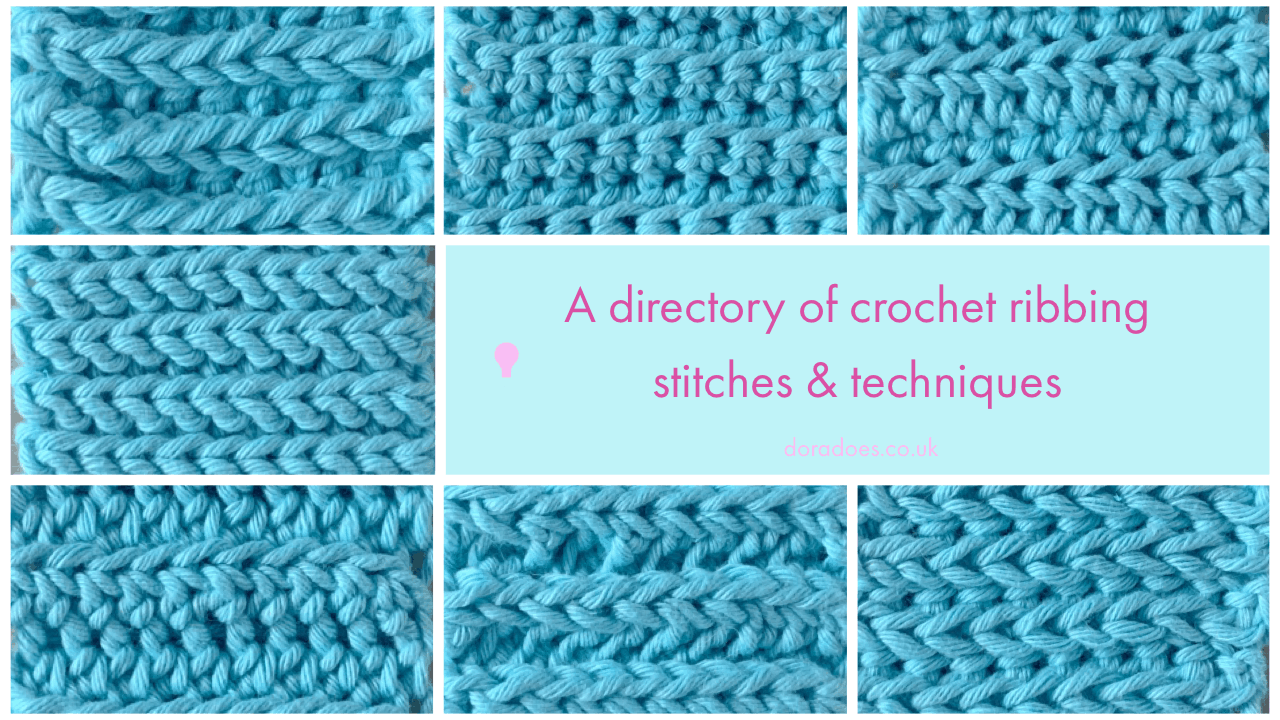
In the following tutorials, I compare some of the common approaches to crocheting kit-look ribbing using the back loops, front loops and slip stitches with a combination of the basic crochet stitches.
I think that seeing these styles all together will really help you make a decision on which type of ribbing to choose for your project. You can see below some of the examples I’ll be covering.
Why would you crochet ribbing?
The way I see it, ribbed stitches in crochet can fall into two main categories (and where they fall into both is the sweet spot!): functional or decorative.
Decorative ribbing simply looks pretty, whereas functional ribbing is added to a project with a design related purpose in mind – to get a hat to stay on one’s head for example.
The two are not mutually exclusive, so this doesn’t mean that functional ribbing can’t also look great!
One of the ways function is given to ribbing is in the form of its stretch; how big the rib can go, and it’s elasticity – how well it bounces back. (Note that these are my personal definitions used in the context of crochet, and may have other technical meanings!)
The types of crochet ribbing I’m looking at here are all worked horizontally, so the length of the row is the length of the rib. This differs to ribbing using post stitches, which tend to be worked vertically, i.e. you build up the ribs over rows so the number of rows determines the length of the rib. (Note that post stitches can also be used to create vertical ribbing.)
In the examples I share here, the stretch and elasticity are achieved between the rows rather than along them (the stitches have minimal stretch). This direction is important to be aware of when you are using stretch for a function.
The video below demonstrates the stretch and elasticity in all of the different ribs I’m about to share. It gives you a very useful overview, so I recommend taking a look to understand how the fabric moves.
For each of the crochet ribbing techniques, I will give you basic instructions on how to work it and discuss their properties including whether stretch, elasticity and whether they are reversible.
How to compare the ribbed swatches
For easy comparison, each turquoise of the swatches you see are made up of 10 stitches across and 20 rows in length. I used an 8.0 Hamanaka crochet hook (this is a Japanese size equivalent to a 5mm hook) and Drops Paris yarn (100% cotton aran weight) in each case.
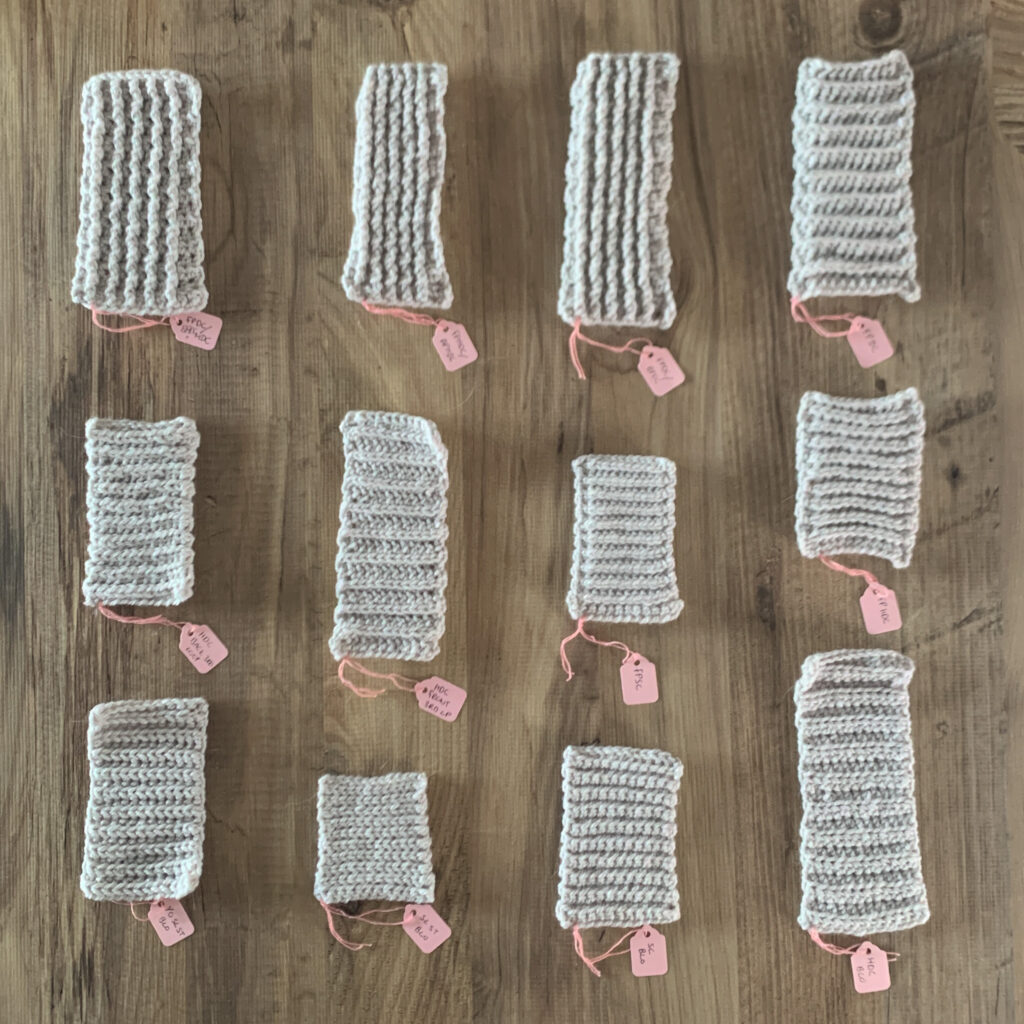
I have also added some additional images, made with a wool aran yarn (in the beige colour), so you can get an idea of what the crochet rib stitches can look like in different fibres. (These are the swatches demonstrated in the video tutorial.)
The images taken directly overhead were all done so from the same camera position. This allows you a compare the relative sizes of the swatches over an equal number of stitches, which I hope you will find useful. I have also included a picture taken from a lower, closer angle because the ribbed part of the stitches can look quite different from different positions.
Understanding how each type of rib moves, stretches and bounces can help you choose which ribbing style you might use to add a hat brim vs a sweater cuff or border on a blanket.
I have intentionally used cotton yarn for the main swatches as it has great stitch definition and has no stretch. This way, you know that all the stretch you see in the video comes from the stitch pattern and not the yarn.
I haven’t blocked or prettied up the swatches in any way (other than adjusting the lighting a bit on the images) because I want to give a realistic idea of what the different types of ribbing look like in their rawest form.
Crochet Stitch Abbrebiations
Below are a list of the stitch abbreviations I’ll use throughout the post using US terms (UK terms in brackets)
- BLO = back loop only
- FLO = front loop only
- ch = chain
- hdc = half double crochet (UK half treble)
- sc = single crochet (UK double crochet)
- ss = slip stitch
- st(s) = stitch(es)
Note that turning chains never count as stitches in these examples.
And with that all clarified, lets look at some of the rib stitch techniques!
Crochet ribbing using the back loop only (BLO)
In this technique you simply work your crochet stitches into the back loop of the stitch on the previous row, then turn and repeat.
This is probably the most common approach to ribbing and can be used with any crochet stitch. In each case, the fabric created is reversible, possibly one of the reasons for its popularity.
You can learn how to work it directly onto a project (or how to begin a project using ribbing) with this tutorial on how to create a ribbed hat band.
With the BLO technique, the choice of stitch makes a big difference to the finished look. I demonstrate 3 variations below, using the slip stitch, single crochet (UK double crochet) and half double crochet (UK half treble).
Slip stitch ribbing worked in the back loop only
Row 1: Ch11, ss in second ch from hook and each st to end, turn. 10 sts
Row 2: Ch1, ss in BLO of each st to end, turn
Repeat Row 2 for pattern


This creates a very dense and elastic rib that probably looks the most like a knit stitch. It’s a beautiful way to create ribbing, though can be time consuming.
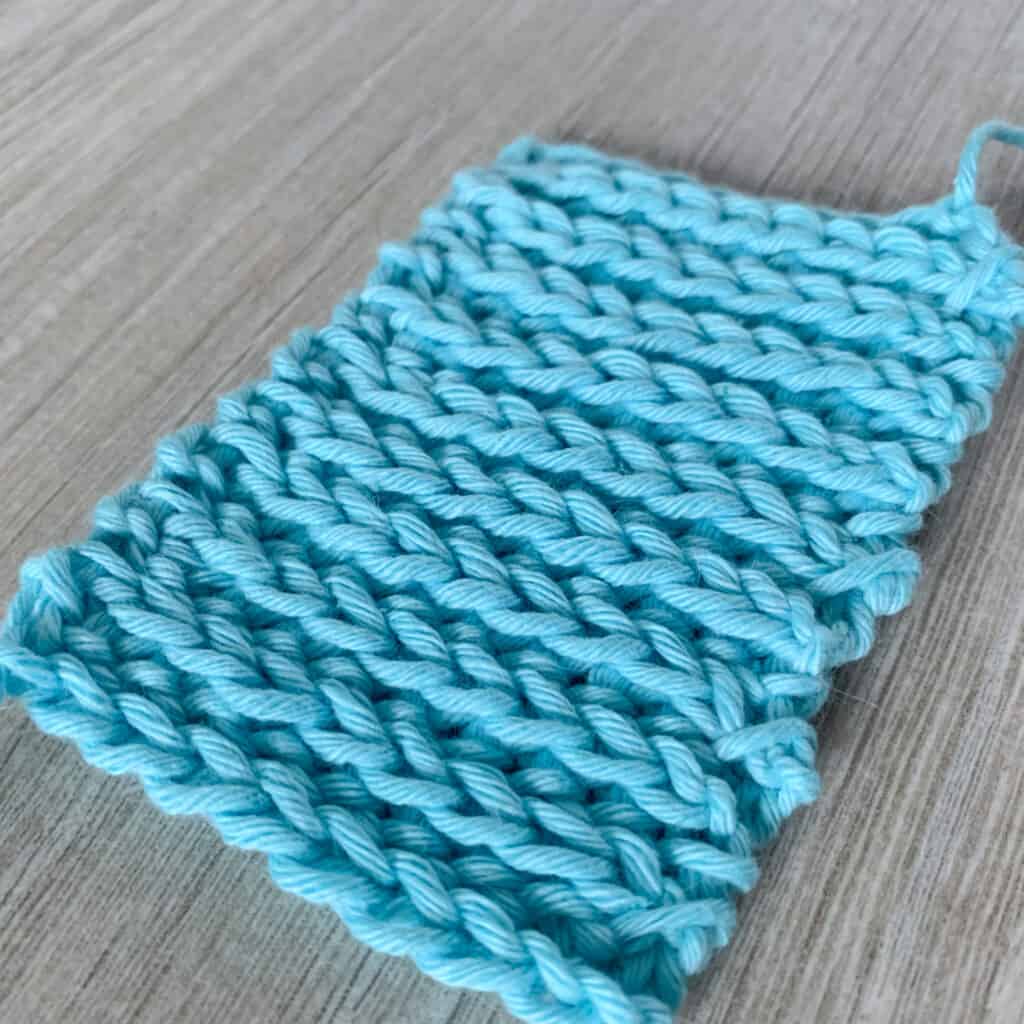
In this variation, I have started each row with a ch1 which does not count as a stitch. I find it easier to work the pattern this way, however, you can omit this or you can count it as a stitch and skip the first stitch of the row.
Single crochet rib worked in the back loop only
Row 1: Ch11, 1sc in second ch from hook and each st to end, turn. 10 sts
Row 2: Ch1, 1sc in BLO of each st to end, turn
Repeat Row 2 for pattern


Single crochet worked in the back loop only can create a very pretty and effective kind of ribbing. It has good stretch and bounces back well.
All these images were taken after I made the video where I stretched the swatches to their full extent, so they are representative of how the rib will look after it has been pulled about. I’m all for practicality!
Half double crochet ribbing worked in the back loop only
Row 1: Ch11, 1hdc in second ch from hook and each st to end, turn. 10 sts
Row 2: Ch1, 1hdc in BLO of each st to end, turn
Repeat Row 2 for pattern


Note that I only chain 1 at the start of the row when working with half double crochet in the back loop because it gives a tighter edge. Many crocheters chain 2 which is fine too and may be helpful if you want more stretch.
Hdc worked in the BLO is probably the kind of ribbing I use most often. I’m not sure that the picture really does it justice but hdc BLO ribbing is a great way to add a brim to a hat, to create stretch cuffs.
Of all the types of ribbing we’ve discussed so far, this probably has the most stretch. However, it is not quite as elastic as the slip stitch and single crochet equivalents.

Yarn over slip stitch in the back loop only
After this post was first published I discovered the ‘yarn over slip stitch’ or ‘half double crochet slip stitch’ version of the blo technique. This creates a lovely effect, somewhere between the slip stitch and single crochet versions which you can see below.
A yarn over slip stitch is created by yarning over, inserting your hook, yarning over and pulling the loop through the stitch and the other two loops on the hook all in one movement. It’s basically a slip stitch with an extra yarn over at the start. Fiddly but fun!
This is demonstrated in the video tutorial at after the written instructions.

Like the other back loop only rib stitches, the yarn over slip stitch (YOss) is worked back and forth in rows, again, I chain 1 at the beginning of each row but you can adjust this for a different tension if desired.
Row 1: Ch11, 1YOss in second ch from hook and each st to end, turn. 10 sts
Row 2: Ch1, 1YOss in BLO of each st to end, turn
Repeat Row 2 for pattern

Tips for crocheting back loop only ribbing
If you’re using this technique with single or half double crochets, to create a brim or cuff for example, you can create a neater edge by working the last stitch of the row through both loops. Only do this on the row that ends on the outer facing edge.
This may pull the edge in a little (as the stitch will be shorter when worked through both loops), but because you are only working through both loops alternate rows, it shouldn’t impact stretch too much.
This is the technique I use on the majority of my hat bands and hems as I think it has a much nicer finish which ages better.
If I’m working single or half double crochet BLO ribbing, I will also often go down a hook size or two as the tighter tension creates a more elastic version of the stitch.
Crochet ribbing working hdc in the 3rd loop
Half double crochet stitches have a loop just underneath the top of the stitch both on the front and back stitch. This is referred to as the third loop – the front third loop or the back third loop.
You can create an interesting crochet ribbing by working hdc in these front or back third loops instead of the back loop.
If you’ve not used the 3rd loop before, this post on crochet stitch anatomy shows you where it is.
Again, you work this in rows to create the rib effect and it is reversible.
Third loop ribbing will not work in the same way with single crochets as they do not have the equivalent 3rd loop to work into (the 3rd loop is created by the yarn over before you insert your hook). It can work with taller stitches, but I have limited it to half double crochet here as that is the most common form.
Half double crochet in the back 3rd loop ribbing
Row 1: Ch11, 1hdc in second ch from hook and each st to end, turn. 10 sts
Row 2: Ch1, 1hdc in the back 3rd loop of each st to end, turn
Repeat Row 2 for pattern


This creates a denser version of the hdc BLO method with smaller gaps between the rows (I have a direct comparison of the two below).

Half double crochet in the front third loop rib stitch
This one may be one of the best looking crochet rib stitches I’ve seen to date!
Row 1: Ch11, 1hdc in second ch from hook and each st to end, turn. 10 sts
Row 2: Ch1, 1hdc in the front 3rd loop of each st to end, turn
Repeat Row 2 for pattern

The difference between half double crochet in the BLO and the back 3rd loop
These two are very common ways to create ribbing so I have made a direct comparison between them. Although they are both worked with hdc, they are often used interchangeably, but there is quite a difference.
Ribbing worked in the 3rd loop is denser and, some say, more secure than worked in the back loop only. It doesn’t stretch as far as BLO but has good elasticity (it bounces back).
Below you will see the back loop and 3rd loop swatches side by side, which shows some of the clear differences.

Working a half double crochet in the back loop creates that knit look ‘v’ effect by pushing the front loop and 3rd loop forward.
When you work in the 3rd loop, you are pushing the top v (the one you traditionally insert your hook into) to the front to create the rib effect. This is why the rib sticks out a little more in the 3rd loop approach.
For me, it’s really useful to understand this difference – but I tend to geek out over such things!
The video tutorial (below) compares the front and back third loop ribbing in more detail.
Crochet Ribbing Video Tutorial
Below you will find both a left and right handed video tutorial which demonstrates the crochet rib stitches shown above as well as some of the post stitch ribbing techniques discussed in part two of my rib stitch directory.
You can watch the whole video for a full range of techniques including all my tips and tricks, or use the time stamp in the comments to jump to a specific crochet rib stitch tutorial. Both videos include closed captions.
Right handed crochet rib stitch tutorial
Left handed crochet rib stitch tutorial
Crochet ribbing using a combination of traditional and BLO stitches
You can also use a combination of stitches with the back and third loop only ribbing methods. There are endless permutations that could be used, but below I demonstrate the one I use un my Free ‘Off the Rails’ infinity scarf pattern .
These combinations are unlikely to be reversible, and may not have the same functional use, i.e. less elasticity, as some of the other ribs but can create beautifully decorative stitch patterns.
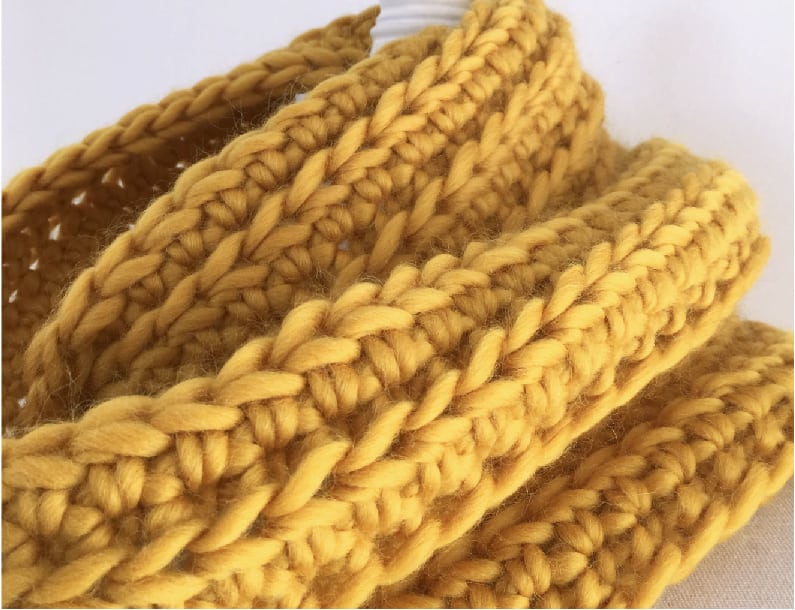
Half double crochet and single crochet BLO rib stitch
Row 1: Ch11, 1sc in second ch from hook and each st to end, turn. 10 sts
Row 2: Ch1, 1hdc in each st to end, turn
Row 3: Ch1, 1sc in BLO of each st to end, turn
Repeat Rows 2 and 3 for pattern
This is a decorative rib stitch with very little elasticity and is different on either side. I’m a big fan of this this one looks. Especially in super chunky yarn used in the scarf pattern.

More crochet rib stitch patterns using slip stitches
Slip stitches can be a very effective way to create a knit-look rib.
You’ve already seen how great slip stitches worked in the BLO look, but you can create other versions by combining slip stitches with single crochets. During the course of (and after) the research and swatching I did for this article, I played with many combinations of slip stitches and other stitches in front and back loops and through both loop.
You can use taller stitches in combination with slip stitches, but you may find that your work starts to ‘lean’ and creates more of a rhombus rather than a nice straight section of ribbing. I found this quite often in my experiments. I’ll explain why I think this happens in the final section.
When working with slip stitch ribbing, you need to keep an eye on your tension as it’s very easy to pull slip stitches too tight. If this is an issue for you then try going up a hook size or two on the slip stitch rows.
My other tips for slip stitches is to try and work them in one smooth movement. So you pull through the loop you’re working into and the loop on the hook all at once.
This can take a bit of getting used to, but I find it’s a good way to maintain a relaxed tension.
You can get some great looking stitches by alternating slip stitches with yarn over slip stitches (both in the BLO), by alternating slip stitches and single crochets, and by working its the front loops.
There are too many permutations for me to go into detail on as this article is already brimming with options, but I do encourage you to swatch and play!
Why does my crochet ribbing lean?
To understand why ribbing may lean, you need to appreciate that all crochet stitches have a natural lean. You can see this in my overview of basic crochet stitches worked in rows vs rounds
With slip stitch ribbing techniques, you are alternating rows of taller stitches with a slip stitch (which has minimal lean), so all your leaning stitches will be worked in the same direction. This causes the work to ‘move’ in that direction.
This is not exclusive to ribbing. In any pattern where you alternate tall and short stitches, you are susceptible to get this, but it is often more pronounced with slip stitching. Maybe because of the density of slip stitch crochet, I’m not quite sure on the mechanics of that.
Blocking may help to reduce this lean but it may not eliminate it entirely.
I have seen this ‘lean’ used functionally within a pattern before (unbelievably clever!), so I don’t tell you this to put you off experimenting. Mostly, I just want to make sure you’re aware of it as a possibility so that you can look out for and understand it!
So there ends the first part of my ribbing directory.
Keep an eye out for Part 2 coming soon, where I’ll look at ribbing using post stitches.
I hope you found this useful in the meantime!
Happy Hooking
Dx
Crochet Ribbing Part 2 – post stitch ribbing
Copyright Dora Does Limited, Registered in England, Company Number 13992263. This pattern is for personal use only and may not be shared or reproduced in written, photo, video or any other form without prior written consent. All rights reserved. Terms of service.


For the YO slip stitch. To make the one edge cleaner do you go through both loops on the last stitch before the turn and first stitch after the turn or just after the turn?
Hi there, If I recall, I don’t think I did this in the written tutorial, but you can try it to see if you prefer it!
All the best
Dora
I appreciate the visual and tutorials for all the rib-stitch options! However, there are instructional and grammatical errors. Please consider getting a professional proof-reader to review it and update it. One I will specifically point out that could confuse someone new to crochet, is the Half double crochet in the front third loop rib stitch. Row 2 says ‘back third loop’ when it should say ‘front’.
Having someone else review your post before it goes up will allow you to present in a professional manner.
Thank you for your feedback. I have updated the typo you identified. This post has been updated and added to multiple times since it was originally published and as a result some of the flow had been lost. I have reviewed it and made some additional updates. I do proofread all of my articles but I am one human who does this all myself and sometimes things aren’t perfect – I don’t get it right all the time. Readers are always welcome to ask me questions if any clarity is needed and constructive feedback is always gratefully received.
All the best
Dora
I love how you use your blog to teach us about crochet. I have found some very helpful information on your site and I plan to come back again and again to learn more. Expression Fiber Arts recommended your site to me when I asked a question about making gauge. I am so glad they recommended your website!
Thank you so much for the lovely feedback. It is appreciated! And it’s always lovely to hear other designers are recommending me. I appreciate your comment!
All the best
Dora
I just want to throw out one more variation I don’t see here that has quickly become my favorite– alternating rows of BLO slip stitches and BLO YO-slip stitches. (YO, insert hook, YO, pull through all loops). It looks fantastic, has a wonderful stretch and bounce, and it’s much easier to work into the back loop of the YO-slip stitch so it feels like you get a bit of a break every other row lol.
These two posts are so helpful, thanks!
I’m so glad you found them useful – and combining yarn over slip stitch with traditional ss sounds like a fun combo to try – I’ll have to pop that one on my list! 🙂
Great stuff Dora. I have recently given up on a tank top pattern which uses 2 row repeat, 1 row slipst, 1 row DC. I will now have another go using a larger hook for the slipstitch rows.
I also found that this pattern with some yarns is really hard to see where to work the stitches & the stitch definition can tend to disappear. Sirdar Saltaire (Aran) was an eg of this, but with another Aran yarn Paintbox (100% Acry;ic) it was easier to work & stitch definition was better. I have learnt a lot form this experience & your blogs
Have a lovely weekend- it’s blowing a gale here🙁
I’m so glad you found this helpful. The type of yarn you use definitely impacts the stitch visibility. When starting out in particular I recommend using those with a smaller halo (no fluff) until you get used to where the stitches go. Cotton and standard acrylic yarns can be great for this.