How to make and adjust crochet clothes to fit

In this article, you will learn the fundamentals needed in order successfully crochet a garment from a pattern, whether it’s a sweater, cardigan, jacket, dress or some other garment.
The lessons cover a range of techniques, from selecting ‘the right’ patterns and sizes, matching gauge, making adjustments for you body size and more.
Do crochet clothes scare you?
Recently I wrote a blog post for Love Crafts entitled Feel the Fear and Make the Sweater. It was an article outlining my mission to encourage crocheters to tackle their fear of making a crochet garment.
As part of my research for the post, I posed the following question in my facebook group, My Crochet Wardrobe;
What puts you off crocheting a garment?
The most common theme in the responses was concern about how the finished item would fit (or if it would be a waste of time and yarn!).
Whether it was meeting (and sticking to) gauge, choosing the right size, or worrying that the design may not be suitable for taller or shorter or pear or apple shapes. So much of the worry came down to fit. So, in order to quell those worries, fit is a major focus of this article.


I realised a couple of things from the overwhelming response to this post.
Whilst I maintain that anyone who can crochet a hat in the round or a dishcloth can also crochet a sweater, I had to admit that there is something else you need… the will to do the preparation and pay attention to detail.
Pretty much all the concerns shared in the post could be addressed relatively simply. But it would require taking some time to do the prep work.
Creating a beautifully fitting sweater is not the same as making a granny stripe blanket in front of the T.V. (but if you want ideas for TV projects, this will get you started!) To pretend it is would be disingenuous. Neither is better or worse than the other. They are just two different aspects of the craft and I have a love for both.
Different types of project serve different needs; sometimes you want to get out of your comfort zone and challenge yourself, sometimes you want to switch off your mind and just crochet!
For me, it’s useful to recognise this distinction.
The point I’m making is that if you want to crochet a garment that fits well, then you are going to have to make the effort.
The good news is, the more you do it, the easier it gets!
So with lesson one out there with some tough love, I’m going to tackle some of the more specific areas you can look at to help you make crochet clothes that fit.
I’ll talk you through the impact of gauge, pattern selection, size selection, making adjustments and checking your progress.
These are the areas over which you have some control, and putting a little thought into each will greatly improve the outcome of your project.
Let’s talk honestly about gauge
I’m going to address the gauge / tension issue right off the bat because it’s a fundamental when it comes to fit. (Note that I refer to tension and gauge interchangeably.)
The short answer is, that if you want a garment to fit to the specifications in the pattern, then you have to swatch and match gauge accurately.
But I’m coming to accept that maybe that isn’t for everyone. That sometimes you just want to pick up a hook and go. And that is okay. You can still make a sweater and get a lot of wear out of it. But the chances of a precise fit are smaller.

Making a gauge swatch is a decision.
If you make one and meet gauge, you’re setting yourself up for success. If you don’t swatch and freestyle it, then you’re taking a much bigger risk that the finished item won’t fit.
Both of these options are valid choices. If you aren’t fussed about having an oversized or undersized sweater, or are happy to adjust as you go then that is totally up to you. If you understand the consequences of not swatching then crack on!
My job, as I see it, is to make sure you do understand the principles – to teach you the rules so you can choose whether to break them.
And if you do want to learn how to make and measure a gauge swatch (and all the benefits that come with it on top of measuring gauge), which I hope you do, then read this post!

Here’s the catch when it comes to gauge…
Gauge is a fickle thing. One of the comments on that facebook post read as follows:
I find when I do a tension swatch, it’s always tighter than I end up crocheting the actual garment. This is an expensive mistake and I have a half-finished jumper in a yarn that just won’t frog sitting looking at me. If I finish it, it will just drown me!
There’s two points I want to address here. The first is that it’s common to find that your gauge swatch is tighter than your gauge in the finished item.
When working a swatch, you are getting to know a stitch pattern so you may be concentrating harder and tensing up. When it comes to making a larger version, the stitch will become habit, you will relax and, inevitably, so will your gauge.
Infuriatingly, the exact opposite is possible too as it’s a matter of individual crochet style.
There are a few possible solutions to this issue:
- The first is to make sure you make a large gauge swatch. I aim for about 15cm / 6 inch square at least (bigger for heavier yarn weights).
- The second is to make sure you monitor your gauge as you work.
- Measure your swatch before and after you block it
Gauge can change both as you crochet AND with washing and blocking. If you take the time to make a swatch, take the time to wash and block (the same way you will treat your finished item) it so you get an idea in advance how much your garment is likely to stretch. You might also want to pull it about a bit to mimic the movement that comes with putting on and taking off the finished garment.
The second point the commenter makes about expensive yarn is also frustrating. When you’re new to garment making, choose a yarn which you can frog (i.e. pull out and reuse easily).
Once you have more experience and understand how you crochet (loose, tight etc.), then you can start getting a bit more risky with a mohair or something with a big halo (which are typically the types of yarns that are hard to frog). Either that or just save the unfroggable yarn for something that doesn’t need to fit precisely.
On a side note, if you have a yarn that’s tricky to frog, try popping it in the freezer inside a freezer bag for ten minutes or so and always pull out the stitches slowly. You might be surprised by the impact.
Picking the right crochet pattern
I rarely see this mentioned, but for me, it’s one of the most important factors in succeeding with crochet garments.
Pick a pattern for a garment whose shape ‘works’ for you. I’m not making any judgements about body shape or what ‘works’ might mean for anyone, but here’s my tip;
If you’re making a garment for yourself, start by taking a look in your own wardrobe and think about what items you love. Is there one sweater or cardigan for example that you always feel super confident and comfortable in? Take it out and look at it. What shape is it? How do the sleeves fit onto the body? What shape are the sleeves? What does the neckline look like?
Notice it all, examine all the details.
Learn about what shapes and styles of clothing make you feel good.

If you went shopping in the high street would everything you tried on be suitable? Would the shape and fit be right first time? I very much doubt it. So why should crochet be any different?
I still try on shift dresses because I love how they look, but they simply don’t fit me. I’m a classic pear shape, so if it fits on the hips, it falls off my shoulders and if it fits my shoulders, I can’t get it over my butt! I’ve come to terms with this, but I still try them on now and again… just to check they still look wrong!
Construction styles can be daunting, but really they are just shapes, like a jigsaw. You can learn more about the 6 most common construction styles used in crochet sweaters here.
Once you’ve chosen a construction style and shape that matches that item you love, then it’s time to start looking for a pattern which uses that style.
Ravelry has an advanced search function which allows you to search by style. Alternatively, a targeted Pinterest search could be a starting point.
Once you’ve found something you like the look of, have a look at the description of the pattern. If it’s free you may be able to read the whole thing in advance.
Check the sizes covered, the level of guidance given, the format of the instructions etc. If you like working with video tutorials, does it include one?
Our learning styles are all so different, so if you can find a pattern that suits yours, so much the better.
Taking time to pick a pattern with consideration of these factors will really help you get ahead, before you’ve started.
Choosing the right size to crochet
Most garment patterns should have a schematic or table (or both) which gives details of more than just the chest measurement.
Chest / Bust measurement is a good place to start but it’s important to check other areas. Think about underarm depth, bicep, sleeve length, body length and neckline.
If you’re making for you, take your own measurements and see how they compare.
Also, make sure that you are clear about what the measurements in the pattern are describing. Sometimes they just have a ‘to fit bust’ guide, which is not the same measurement of the actual finished project.
Understanding the level of ‘ease’ (that is the difference between the body size and the garment size) in different parts of the garment is important so you know whether you have room to manoeuvre. You can learn more about positive and negative ease in this article.
It’s really hard to perfectly replicate a garment from the maths of it. Even if we match gauge, there will always be a bit of variation because we are humans, not machines. But just taking a little time to scrutinise the measurements is going to get you ahead.

How to adjust to crochet clothes
Learning how to make adjustments to to crochet garments in order to customise fit is an incredibly valuable skill. It’s one that mostly only comes with experience, trial and error, but here I’ll try to give you the benefit of many of my errors!
It’s not feasible to go into depth on how to adjust every garment type. But what I can do is to give you some basic principles which you can apply to any pattern. Note that I do I already have a post describing how to adjust top down yoke sweaters, so I won’t repeat that guidance here.
Comparing the measurements of the recipient to the schematic would highlight areas where fit might be a problem. Your understanding of the pattern and how the garment is put to gather is essential in deciding where you might want to make changes.
Whether you are making adjustments on the fly or in advance, you need take the same factors into account.

Understand your stitch & row multiples and construction
Before you jump into making adjustments to patterns, it’s important you understand how the stitch multiple of a pattern works (and row multiple of relevant).
If you’re working with a multiple of 4+3 for example, and change the foundation row from 43 to 53, then you’re going to get into some trouble.
Once you are familiar with the stitch and or row multiples you’re working with, you need to make sure you understand the garment construction. This will help you consider how adjustments might impact different areas.
Only then should you start thinking about how and where to make your adjustments.
Here are some of areas you may want to adjust and a basic suggestion of how to do it.
Body length
Length can generally be changed by adding or removing rows in the body section (between the underarms and the hem), if the pattern is worked bottom-up or top-down. If the pattern is worked side to side, you can adjust the length by adjusting the stitch count in the same area.
Remember to account for hems and or neckline trims when playing with body length.
You should also think about whether there is shaping around the sleeves and arm holes, as alterations here will impact the fit of the sleeves.
Bust and Chest
Bust or chest measurements are probably the easiest thing to change because this is most easily achieved by changing the size you are working.
However, that may not help in all cases. For example, you may want to adjust the bust in more specific areas. In this case you would normally add or remove stitches (make increases or decreases) to make the alteration in the desired area. The more experienced / confident amongst you may wish to try making adjustments with short rows. This is all assuming the garment is made in rows top-down or bottom-up.
As with length, it’s important to consider the impact changing the bust might have on the fit of the sleeves. This will be dependent on the construction type.
Armholes
This one is another that is heavily dependent on the type of construction you have chosen.
For a simple panelled drop shoulder garment, you can simply change the armhole depth by changing the length of the side seam.
If the sleeves are set in or modified drop then you’ll need to make alterations to the armhole depth as you work the pattern.
If it’s a yoke based design, you would need either to alter the number of stitches allocated to the sleeve when splitting the yoke, or to increase the number of underarm chains. (Again I’d refer you to the post specific to adjusting top down yoke garments for more info.)
All of these approaches will impact the sleeve size, so it’s important to think through how you will accommodate that.
Sleeves
Sleeves can be altered in length or width in the same way as the body, though you would need to account for the shaping.
The way you alter a sleeve will depend on how it fits the body. If it’s a simple drop shoulder construction then sleeves are relatively easy to adjust by adding increases or decreases and working more or fewer rows.
I have a separate article which looks at sleeve shaping as it’s a question I get asked about a lot.
In a drop shoulder type sweater, you could actually choose to work the sleeve in a different size to the body so you can crochet a more custom fit.
This is an option I suggest in the It’s Just Not Cricket Sweater patterns. Many patterns, especially those with more complex stitch patterns or larger stitch multiples, will have fewer size options for the sleeves, where maybe one sleeve instruction covers two sizes.

Neckline
Adjusting a neckline with no shaping could be as simple as changing the length of the shoulder seam. Always make sure you do the same on both sides if you’re going down this avenue, unless you want an asymmetric look.
If there is shaping involved then you may have to rethink how it’s worked. You could add extra decrease rows to the shaping of a garment worked bottom up in rows (or work fewer for a narrower neck), but you would, once again, need to think about how this might impact the armholes and sleeves.
It’s all interrelated so you always need to zoom out to consider how one change impacts other areas. Do this before you make the change so you don’t get down the line and have that sinking feeling in your stomach greet you!
You could also adjust necklines by changing the depth of the trim or collar. Depending on the specifics, this may only give you a small amount of flexibility. But when you’re looking at the neck, a cm here or there can make all the difference
Waist and hip shaping
Adding shaping to accommodate waist and hips can be a little more of a challenge.
As a designer, we tend to use standardised body measurements, but few people actually conform to those measurements. I know it’s a reason that I prefer to offer suggestions for shaping rather than specific instructions.

If you know your measurements and body shape and are a bit of a wizz with numbers, then you can make adjustments with more confidence in this situation.
Typically you would make adjustments for waist and hips at the sides of the garments. But there are other techniques such as dart style decreases, short rows or pleats which could also be employed.
You also may want to make adjustments for maternity wear as another example. In this case you would want to concentrate increases around the front, maybe in a pleat style.
Waist and hip shaping is another area in which I would reach for the off the peg clothes for guidance. If you can see how it’s done in an item that fits you, then be guided by that.
That’s the way I approached the Winter Solstice Dress which uses short rows to increase the size at the hips.

How big of an adjustment should you make?
By this point you have a good idea of which areas you want to adjust. But how do you know how many stitches you should alter the pattern by?
Let’s say you want a longer body and the adjustment needs to be made before the arm hole shaping starts. You know you want to add an inch in length, but how do you know how many rows to add?
Well here is where we loop back to the start. To gauge.
You can use your tension measurements to work out the number of extra rows needed to increase the body by the length you desire.
Being able to master simple gauge calculations will allow you to know, for example, that adding 4 rows is the same as adding 3cm to the length (or whatever your gauge tells you).
This post explains, how to use gauge to calculate stitches and row counts for specific measurements. It’s an incredibly useful calculation to learn (bookmark it and come back to the post if maths isn’t a strong point!) and will save you a lot of frogging!
Check your work as you go
This is my final piece of advice and may actually be the most important once you get started on crocheting your garment.
As you work, keep an eye on your tension, on the shaping and the fit. If you can, try it on, or pin the pieces together to try before you seam them. If trying on as you go, remember to account for size changes that might come with blocking (with the information you gathered from your swatch.)
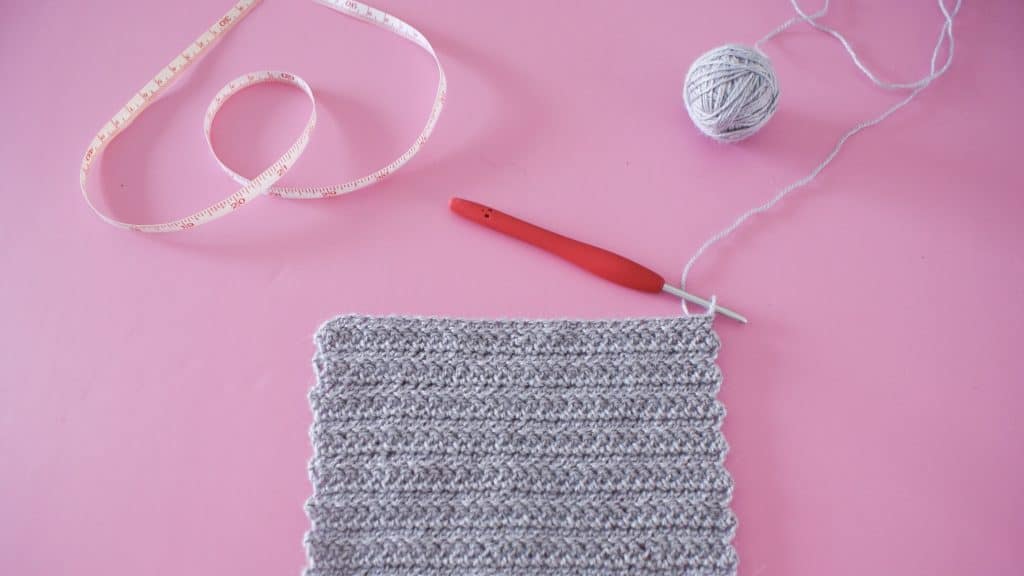
Get friendly with your tape measure!!
As mentioned right at the start, it’s easy for gauge to fluctuate throughout a project. So if you find, for example, that your rows are getting taller, you can take the decision to work fewer of them.
Making adjustments on the fly is something that comes with experience and a bit of fearlessness. Having that bit of confidence to go off piste can be the difference in making a garment that you love and one that you feel ‘meh’ about.
Getting to know your crochet style helps with this whole process enormously. I’m one of those who tends to crochet more loosely as I relax, so I know that it’s important for me to keep an eye on it.
As much as designers standardise how patterns are written, crochet is not an exact art. It’s an art art. Which means you’re the artist you are in charge!

So there we have it, my guide to getting crochet garments to fit. I hope you have found it useful and have some food for thought.
I know there’s a lot of information here, so don’t feel overwhelmed. You can come back to it and review as you need to.
My aim is to share the information which will give you the confidence to give that garment a try!
If you want to expand on these topics, try out my ebook: How to crochet clothes that fit (and you actually want to wear)

Happy Hooking
Dx
Read more articles about crocheting garments here
Copyright Dora Does Limited, Registered in England, Company Number 13992263. This pattern is for personal use only and may not be shared or reproduced in written, photo, video or any other form without prior written consent. All rights reserved. Terms of service.


I have added in my .. ahh .. “A gussets”, Michelle, and have more to do around the bottom and then the collar. I look forward to posting photos so that you can laugh like anything. 😀
I look forward to seeing it!! The gusset is not something I have quite got my mind around, other than in socks!!
But for me, with this granny-stitch kind of automatic cardi, it’s vital ! 😀
Necessity is the mother of invention!! These creative challenges are the most satisfying when we nail the solution!!