The Anatomy of a crochet stitch
Today I am going to take a look at the fundamental anatomy of a simple crochet stitch. Breaking it down into its basic parts, so you can really understand what makes your crochet work.
This is one of those things that no one really teaches you. As you practice, you get more familiar with how crochet stitches are formed. But then you go to try a new pattern or technique, and maybe you’re not quite sure what they mean by the 3rd loop or ‘between stitches’.
Having a good understanding of how crochet basic stitches are constructed will give you the best foundation to build your skills, without getting lost in the weeds.
Right Sides and Wrong Sides of Crochet Stitches
Before I talk more about the parts of the stitches, I wanted to clarify the terms ‘right side’ and ‘wrong side’. Where crochet stitches are concerned, ‘wrong’ and ‘right’ are only relative terms.
The ‘Right side” (RS) of a crochet stitch is the side which is facing you as you work. The “Wrong side” (WS) is the opposite; the side that faces away from you as you work.
In a pattern, you are often told there is a right or wrong side, sometimes also called the public or private side. This relates to the overall stitch pattern (and what side you want seen ‘publically’) rather than the individual stitches, so it’s important to distinguish between the two.
With that clear, let’s take a look at the breakdown.
The Anatomy of a crochet stitch

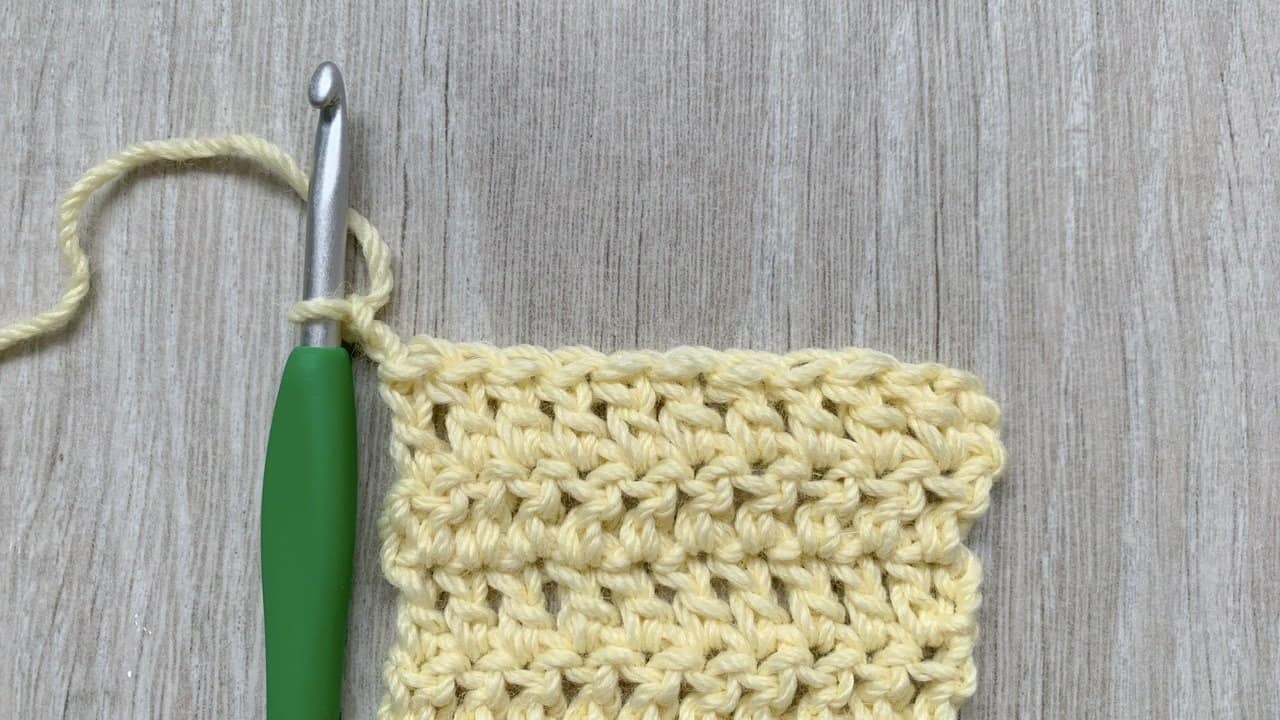
The most common parts of the stitch you will see referred to, are the ‘top’ of the stitch and the ‘post’. Both of which you can see clearly highlighted in the image above.
I will say a few words about each, then break it down further into the ‘sub-parts’ (for want of a better term!) that you need to know about.
Top of the stitch
In simple terms, this is where you insert you hook when working a traditional crochet stitch.
It’s the two loops that look like a ‘v’ on it’s side, when you look at it from above (see image below)
When a pattern says something like; “slip stitch to the top of the stitch to join”, they mean work your hook under those two loops at the top of the stitch.
Front and back loops
The top of your stitch consists of two loops, or two sides of the ‘v’. These are referred to as the front loop and the back loop and are identified with the stitch facing you.
You can see the front and back loops marked in the image below (with the sides marked for context)

In some patterns, you may be asked to insert your hook ingot the ‘Front Loop Only’ (abbreviated to FLO) or ‘Back Loop Only’ (abbreviated to BLO). To do this, you literally just insert your hook under the one loop (front or back) instead of two. That’s really all there is to it.
Inserting your hook, and working your stitch into one of the loops creates different textures and structures. The most common example is probably when you work in the back loops to create crochet ribbing.
Note that the front and back loops are also relative. They will change when you turn your work as the loops are always identified when the stitches are facing you. (This is why I needed to get the right / wrong side definitions clear!)
Where is the Third Loop on Crochet Stitch?
Sometimes you may be asked to work into the 3rd loop of a crochet stitch. A stitch which starts with one or more ‘yarn overs’ will have a third loop both behind the top two loops and in front of the top two loops – i.e. a back third loop and a front third loop.
Once again, the terms back and front are relative and are given in the context of the work facing you.
Working in the back third loop is probably the more common technique and you might see this instruction in conjunction with working into the back loop. For example “insert hook into BLO and 3rd loop” could be an instruction you see.
Working in the front third loop pushes the top of the stitch away and is becoming a more common way to create a knit look rib or stripe on a piece of fabric. This post on crochet ribbing styles goes into more detail on making ribbing with the front and back third loops.
Note that you won’t find the third loop in a single crochet (UK double crochet) stitch as it does not have the yarn over at the start (which is what contributes to this extra loop).
The back third loop in a crochet stitch
The back third loop is found on the back of your work as you look at it, just below the back loop.
The hook and the pink arrows in the image below point to the back 3rd loops on a swatch of (US) double crochet (UK trebles). The swatch is laid flat with the wrong side of the stitches facing, so you will be working on the other side.

The third loop may be a bit narrower than the main loops, so can be a bit fiddly to get your hook into until you get used to it.
The third loop is only present in half double crochet (UK half treble) and taller stitches.
Traditionally the third loop is used to create depth or layers. It can also be a way to remove stretch from stitches made in the back loops.
The front third loop of a crochet stitch
The front loop of a crochet stitch is found in half double crochet and taller stitches just below the front loop of the stitch as the work faces you.
The placing of the front loop differs a little with half double and double crochet (UK half treble and treble) so I have created two small swatches to show the difference. It is probably more common to work into the front third loops of half double crochet but the same crochet technique is also used in taller stitches from double crochet and upwards.
In the pictures below, the swatches are laid flat with the side you will be working facing you. The yarn needle is inserted under the front third loop in both cases.


When working into the front third loop, you insert the hook from the bottom up so it moves towards the top loops of the stitch (whereas when working in the back you insert it top down, away from the back loop).
The post of a crochet stitch
Now we’ve addressed the tops of stitches and their loop variations, let’s look at the second major part of a stitch; the post. Sometimes called the body, of a crochet stitch.
The post of a stitch is the vertical part which gives the stitch it’s height. In a single crochet (UK double), the post is very short, whereas in a double treble (UK treble treble) it is much taller. In both cases, it’s still called the post.
The posts sit slightly to the side of the top of the stitch as you work.
The image below comes from my tutorial for the Alpine stitch. This uses front post double crochet (UK raised treble front) stitches. I’ve included this picture because it shows the hook being inserted under the post of a US double crochet. Just in case there was still any doubt about where the post part is!

Crochet stitches are slanted
This is something that I don’t see discussed to often either, but it’s important to know that crochet stitches are generally slightly slanted. The taller stitches tend to have more slant than the shorter ones, with single crochets (UK double) being almost square.
It’s important to bear this in mind because it explains a lot about how crochet behaves.
When working in rounds in the same direction, you may notice that your seam wanders off in one direction. This is generally caused by the natural slant in your stitches, although there are other factors which can make it more significant. (That’s a whole other story – it’s going on my ‘to blog’ list!).
When working in rows (as with this very simple and somewhat messy swatch seen below), you will get a kind of zig zag effect caused by the slant. This is normal.

The degree of the slant will vary with crochet style as well as stitch type, and can be straightened a little with blocking. But it is there and we can’t pretend otherwise!
Working Between Crochet stitches
If a pattern asks you to work between crochet stitches, then it is asking you to insert your hook between the posts of the stitches.
If you take another look at the picture right at the start of this post, I have pointed out what ‘between posts’ looks like. It’s literally the space between the upright posts. With shorter stitches, this space will be smaller, and with taller stitches, it could be quite a big gap. It’s the holey part of crochet.
I imagine that the first place most crocheters will see this is when working a traditional granny square. In granny squares, you work 3 double crochet between the posts of the group of 3 double from the row below.
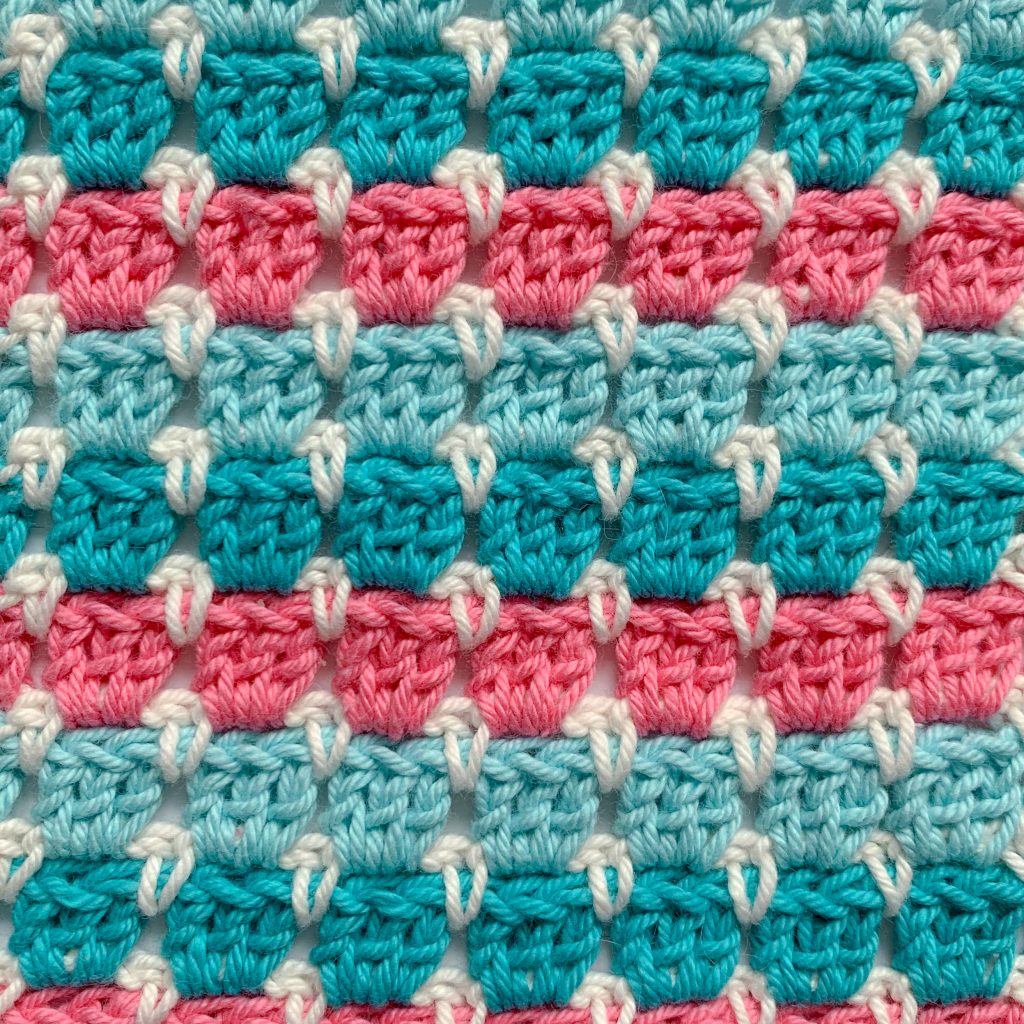
The Block stitch, shown in the photo below, is another example of a common stitch pattern where you work between stitches. You can see that the single crochet stitches in white are worked between the posts of the groups of 3 double crochet in pink and blue.
When working common stitch patterns that you’re familiar with, working between stitches feels quite natural. However, in my Light Fandango Sweater pattern, there is a set up row which asked crocheters to work between stitches. This is by far the most queried part of the whole pattern, so I wanted to address the instruction at a fundamental level!
The Golden loop of a crochet stitch
Before I finish my tour of a crochet stitch, I wanted to talk about one last part that you can only really see as you make it.
The golden loop.
The golden loop is essentially the first loop you pull up after you have inserted your crochet hook into the place where you are working the stitch.
In the picture below, the arrow points to the golden loop for the first part of a double crochet (UK treble).
Typically, the golden loop should be about the same as the height of the crochet hook to achieve even stitches.

I won’t go into great detail about this here, but I think it’s useful to know what the golden loop is because it is the main factor in how tall your crochet stitch is.
If you’ve ever made a puff or bobble stitch, then you will know that when you pull up your loops, you are pulling them to the whole height of the stitch. In this example, you are making your golden loop taller, which will increase the height of the stitch accordingly.
Mostly, the height of your golden loop will become automated and won’t be something you think about too much. However, if you find that your rows are a lot taller or shorter when you make a gauge swatch, then this golden loop may be the culprit! I have another post on how to adjust the height of your stitch using the golden loop which you may find useful.
So there ends the crochet stitch biology lesson! I know that I find it useful to go back to the start and break things down sometimes, so I hope you have found it helpful too.
Next time you pick up your hook, why not try slow it down a bit and see if you can see these parts of your stitch forming?
Maybe it’s the geek in me, but I find it satisfying to see it coming together.
Happy Hooking.
Dx


I left previous comment. Am creating my own pattern of hdc ch1 rows and then hdc rows. Hv u an article about the end stitches, turning. I think i figured out that the ch2 becomes the last hdc inside the ch2 on nxt row, but then not sure if the hdc goes into space or the hdc.. & think am adding sts..so my count going up.
It sounds like you’re describing moss stitch with hdc rather than sc. Which Ever stitch you use, the principle is the same. This is my moss st tutorial which you may find useful: https://doradoes.co.uk/2019/06/26/how-to-crochet-the-moss-stitch-also-known-as-linen-stitch/
The other thing to try is to sketch out the stitch pattern on gridded paper so you can see how the stitches stack. If the ch2 counts as 1hdc and ch1 then you can draw that out too and work it out. There are different ways to creating the edges on moss stitch so whatever you find that ‘works’ is good to go!
I agree with all other comments. I was doing wrong whole time, easy afghans, crocheting between post. When I began exploring with #10 crochet thread, steel hooks from my mothers stash, I was making hdc ch1 and when doing 2nd row was putting in ch1, as stitch crooked & looked like top was where ch1 loops were. I was also prbly slipping hook into the 3rd loop & front of hdc as the top of stitches hangs over back so I wasnt sure. Now I fully get it, and after making & looking at process of doing hdc i see loop in front of post is where goes. When doing all hdc without ch 1, think it looks easier to find loops, but this is gold & so appreciated
I’m so glad you found this helpful. It’s such a common source of confusion. But once it clicks it’s there! Here’s to straight intentional crochet stitches from here on!
Thank you, thank you, thank you for this post! I’ve been crocheting off and on for decades and everything I find confusing about crochet is related to the anatomy of the stitches.
Sometimes when watching videos it’s difficult to see which loop or how many loops they’re actually going into with the hook.
This is absolute gold.
Ahh. You’re welcome – I’m glad you found it helpful. I know that I learned a lot of this later than I’d have liked. Never too late to look at the basics though! And a good reminder for designers to be explicit about which loops are being used if anything other than the top two!
Thank you so much! I’ve given up on crochet three times before because I simply couldn’t grasp this. I would quickly lose sight of what I was doing and where I was supposed to insert my hook because when there’s lots of rows everything would become a complete mashed mess of yarn! But with this post I completely see it now, I can’t believe it 🤣🤣 And I couldn’t find an explanation as good as yours anywhere else. Again, thank you so much!
I’m so glad you found it helpful. I know that once I understood how the crochet stitches were made it helped a lot of things fall into place, so I’m happy it worked for you too!
This is a really useful and informative article, I would like to share this with my crochet students if that is OK?… you have written it clearly, although I am not reading it from a beginners understanding. Thankyou for writing this.
Thank you so much for the feedback, I am glad yo hear you found it clear and informative! Please do feel free to share the link with your students. I know a lot of this is stuff I wish I had known as a beginner!!