How to adjust row height to meet gauge using the golden loop
I’ve talked a lot in the past about gauge and how important it is to check you are making tension when crocheting something that needs to fit. In this post, I want to break that down a bit further and look specifically at row gauge, i.e. row height.
Let’s say you’ve been really diligent and made your gauge swatch. Your stitch count is bang on but your row count is off.
This is a situation I see talked about quite often in my facebook group and on other social media forums.
If you know a little about gauge then you’ll know that the advice says: if you don’t meet gauge then try changing your hook size.
But it doesn’t always say what to do if you meet one part of the gauge but not the other.
That’s what I want to address today. Changing your hook size is a great way to change the size of your stitches. But if you only want to change the height of your stitches then it’s not going to help you in your quest to meet both parts of the required tension.
So how do you change your row gauge without changing your stitch gauge?
What to do if you meet stitch gauge but not row gauge
First off, ask yourself if it matters.
I realise that this is probably not the purists approach! But if you’re working on a project where you can easily add rows, or row repeats, to make the item right length, then it may be that the path of least resistance is the best one to take!
However, if adding rows here and there is going to cause problems with maths and fit or is just not an appropriate work around, then you are going to need to change your row height.
The rest of the post will focus on how you go about that.
Understanding row height
Lets say, as an example, the gauge measurement in the pattern your working reads something like this:
18 stitches and 10 rows in 10cm of US double crochet, using a 5mm crochet hook.
You make your swatch, you measure it and have 18 stitches in your 10cm width. But when you count up your rows in 10cm, you don’t have 10.
If your row count is higher than 10, then your rows are shorter than the pattern gauge requires. If you have fewer rows, then your rows are taller than the designer’s.
Either way, you’re going to have to change the height of your rows to get on gauge.
To change your row height, you need to understand which part of the crochet stitch affects it.
The answer is what has become known as ‘the golden loop’.
What is the golden loop?
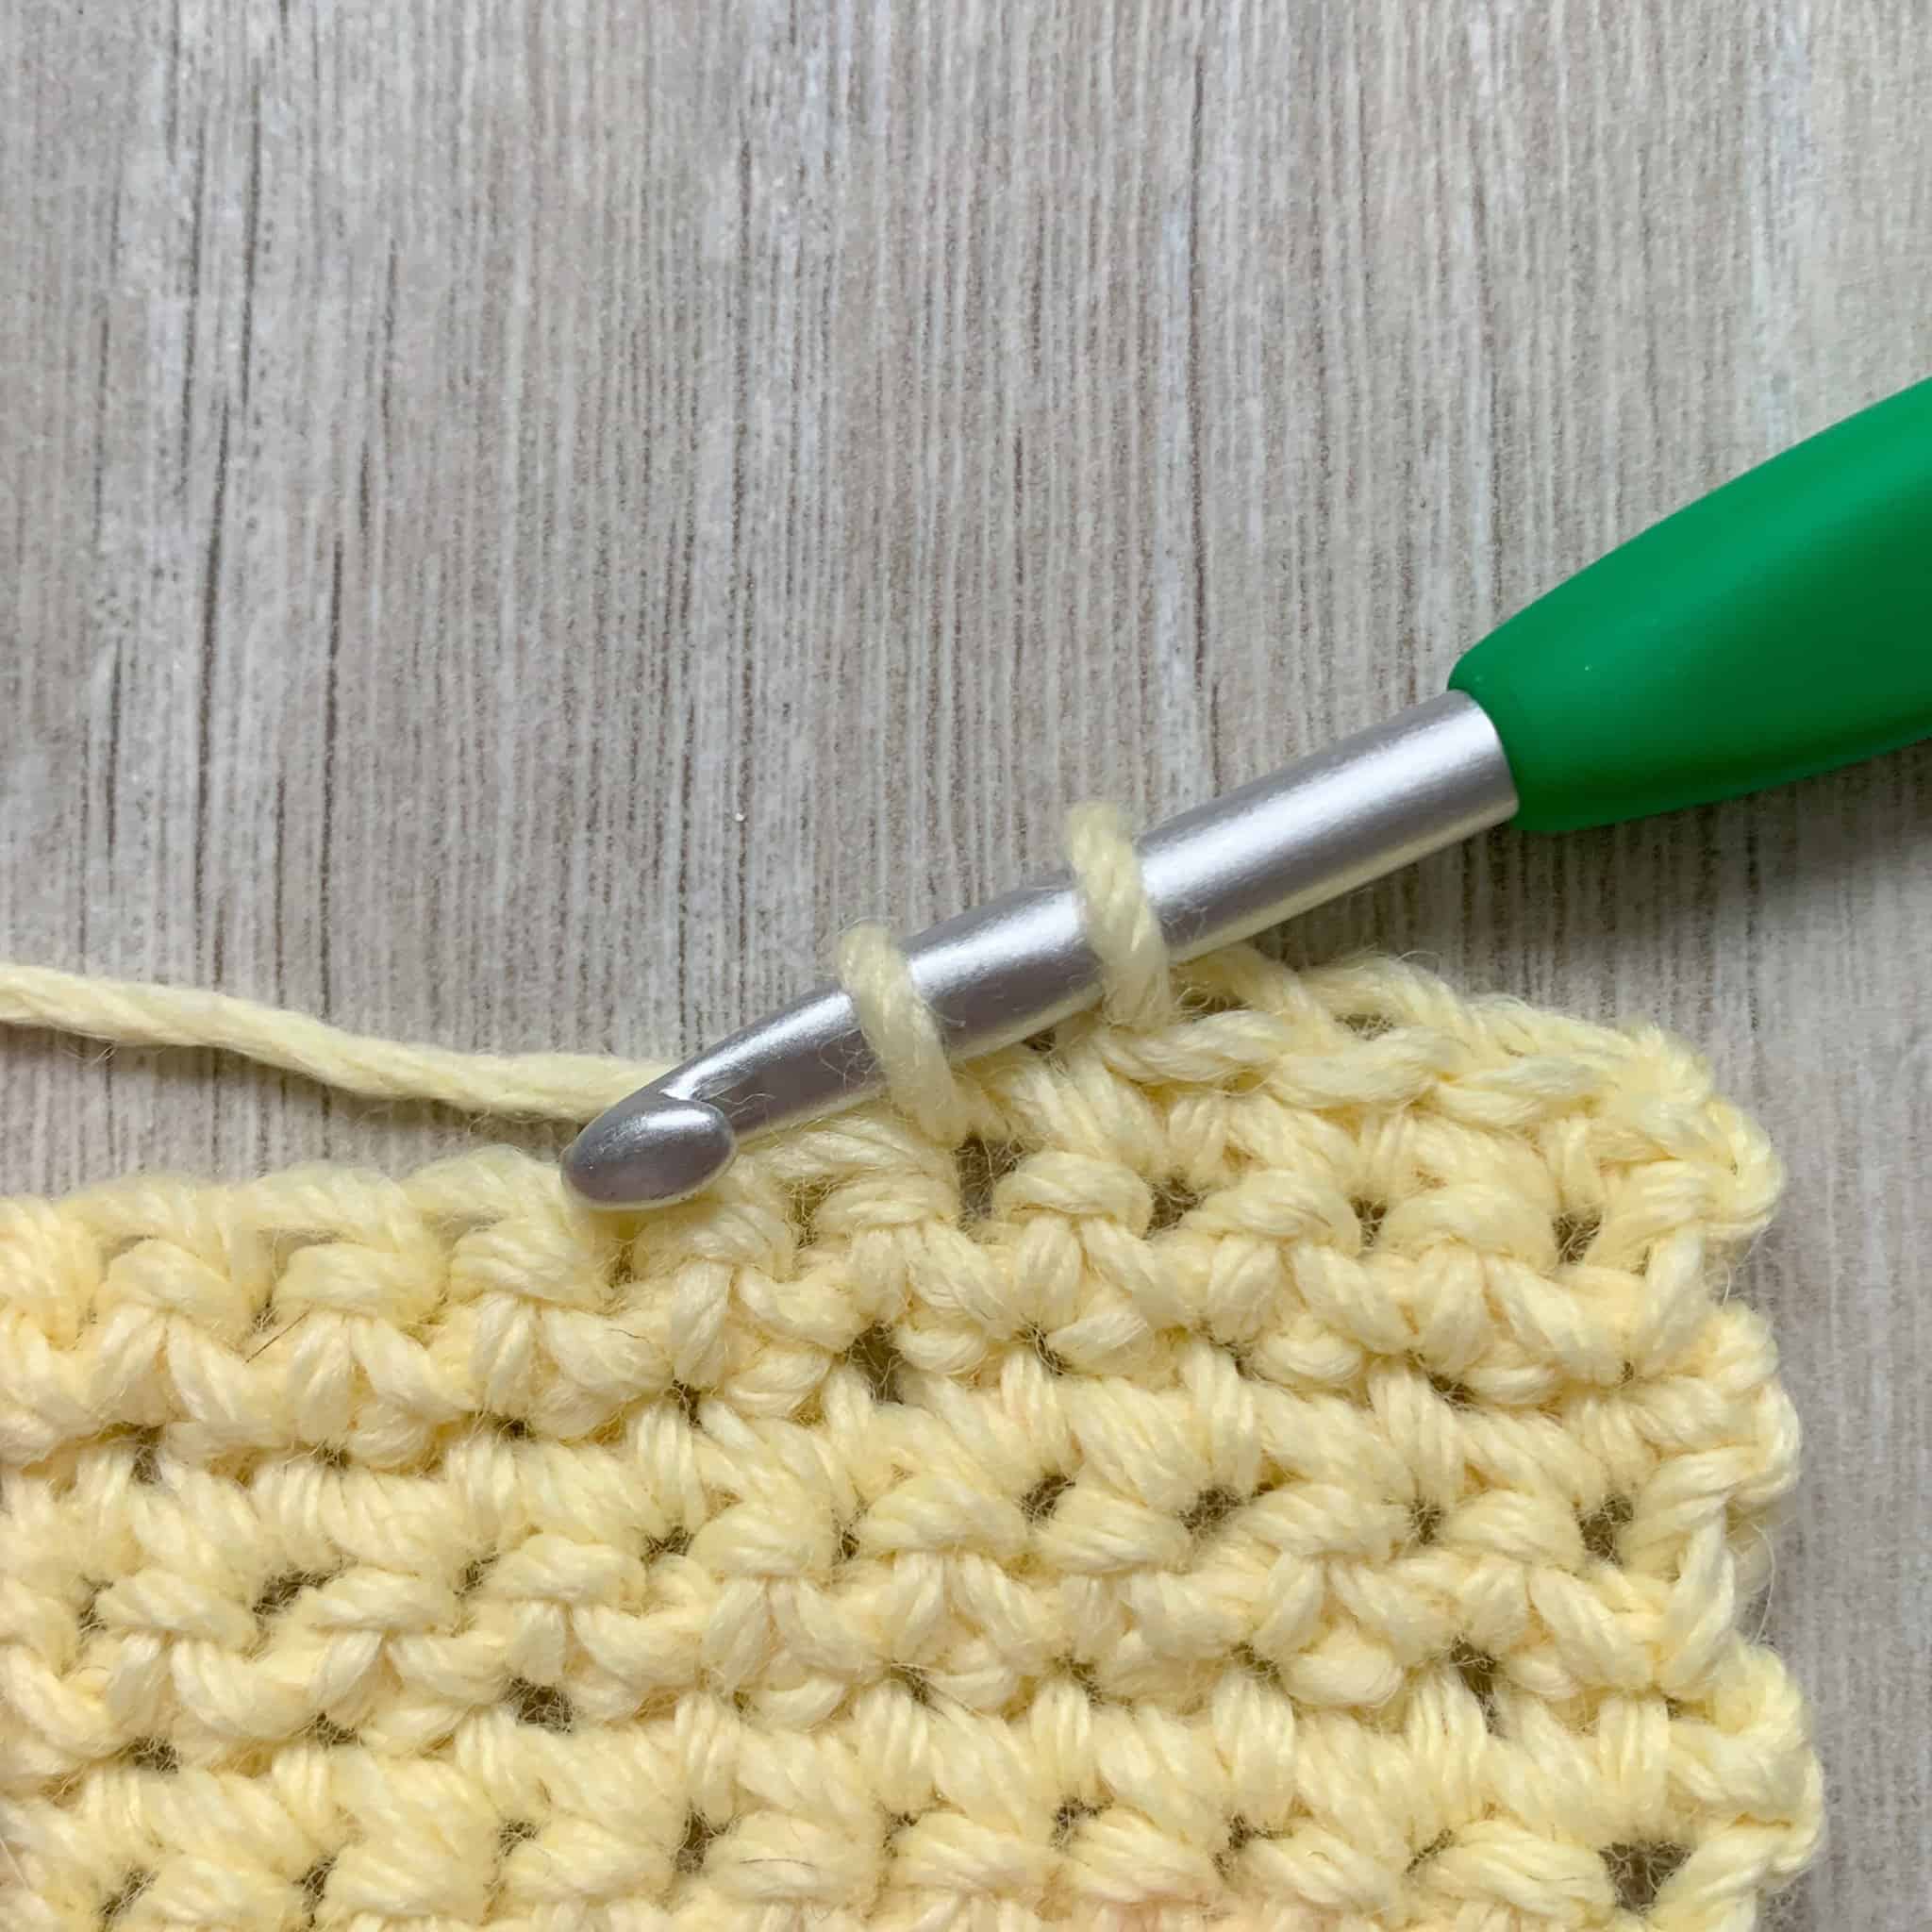
The golden loop of a crochet stitch is the first loop you pull up after inserting your hook into the stitch you’re working in.
The height of this loop determines the height of the crochet stitch.
The smaller the golden loop, the shorter the stitch and vice versa.
The picture below shows the golden loop of a double crochet. The loop closest to the tip is the golden loop, the second loop is the yarn over you made before starting the stitch and the loop furthest from the head of the hook is the working loop.

If you’re newer to crochet, you may want to brush up on your crochet stitch anatomy to understand in more detail about the different parts of a crochet stitch.
For the rest of the examples I have used a single crochet stitch to illustrate how the golden loop effects row height because as it is easier to ‘see’. I included the US double crochet example above as I thought it would be useful to show the golden loop in different stitches.
In a typical stitch, the height of the loop is intended to be the same as the height of your hook. Using this as a guide is a good way to achieve consistent tension in your row height.
How to use the golden loop to adjust the height of your crochet stitches
There are 3 common ‘types’ of crocheter when it comes to row hight;
Riders, Yankers and Lifters.
I am not sure who came up with this terminology, I have seen it used in many videos and discussions but can’t find where the original terms came from! But I would like to thank the person that coined them as they are a nice descriptive way of explaining different crochet styles.
What is a ‘Rider’?
I want to start with explaining what ‘riding’ is in crochet terms, because yankers and lifters can be more easily be explained when compared to a rider.
A rider is where your stitches ‘ride’ along the top of the row below. You pull up your hook so the golden loop sits comfortably on top the stitch you’re working into.
For riders, the golden loop is roughly the same size as the hook and the same size and tension as the working loop. You can see this in the image below.

A rider can be seen as the middle ground of row gauge.
What is a ‘Yanker’?
A Yankers is someone who pulls (yanks) their golden loop tight when working so that it creates a smaller loop. The working yarn is held tight which increases the tension on the golden loop.
Consequently, a yanker’s rows will be shorter than a rider’s.
In the picture below you see that the golden loop is tighter than the working loop. This is typical of a yanker crochet style.

What is a ‘Lifter’?
A lifter is the opposite of a yanker. Instead of creating a small, tight golden loop, they ‘lift’ the loop up and away from the work, so it is larger or taller than the hook.
You can see below that the golden loop is looser than the working loop. This leads to a taller crochet stitch.

There are some stitches, such as puff stitches or bobbles, where you will intentionally lift your golden loop up to the full height of the stitch.
Are you a crochet ‘Rider’, ‘Yanker’ or ‘Lifter’?
By examining your own crochet as you work, you can work out which of these categories of crochet style you fall into.
You may also find that you switch between categories. Especially if you are particularly stressed or relaxed. I know when I crochet stressed everything tightens up! It may even be impacted by the nature of what I’m watching on TV whilst I crochet!!
I want to make it clear that none of these styles are good or bad. They just are.
What matters is that you can match the gauge of the designer, who may be prone to lifting, riding or yanking!
So how does this help with row gauge?
Once you understand these categories, you can adjust your crochet style to alter your row height to fit what’s needed.
If you’re a yanker who needs to work taller rows, then you will need to concentrate on lifting your golden loop up further than normal. Conversely, if you’re a lifter, you’ll need to focus on tightening that golden loop.
I’m not going to lie that this will take a bit of concentration to get right. This is why I started my advice off with the question about whether it matters or not!
When you’ve been crocheting a while, your style becomes automatic so you don’t have to think about it. Making it conscious again takes quite a bit of mental effort. But you will be able to adjust quickly once you get into it.
It’s a bit like adapting to a new hook shape. It can take a while to acclimatise, but you will get there!
As a designer, I always feel a bit guilty that I’m the one who sets gauge. But there isn’t really another way around that and I’m a rider (most of the time) so I hope that means less adjustment is needed to get to gauge.
And if you do have issues with meeting row gauge on any of my patterns, I’m happy to offer advice for adjusting row counts if you can’t meet the row gauge.
Part of the reason I have written this post is to help you understand why there can be such variation in row height. But also, I don’t want the issue of not making row gauge to be a reason you don’t give a pattern a try!
Whatever your crochet style, there are always many ways to achieve the same result!
I hope you have found this a useful explanation of how you can control your crochet stitch height. My goal is that it will give you more confidence in being able to meet crochet gauge.
Happy Hooking
Dx
For more about gauge, you may find these articles useful
What is gauge and why do we need it?


Thank you SO much. I have been so frustrated because the “square” I was working called for 22 stitches but 30 rows. So, obviously, it was rectangular. I figured I was just going to have to block it really hard to get it in shape, but now I know I can adjust the “loop” instead.
So glad you found this useful! And remember to compare it to the gauge on the pattern you’re working. Most crochet stitches aren’t square so differences in the row and stitch count can still achieve a square fabric depending on the stitch pattern! There is always a way to get to where you need to be! 🙂
Wow it finally makes sense… After 28 years of crocheting 🤣 Thank you!
Yay!! I’m so glad I could help you crack it!
Thank you so much for this post! I have crocheted most of my life and never been able to meet to row gauge and always wondered why.
I’m so glad you found it useful. It was a bit of an ah-ha moment for me to! 🙂
I tend to be a bit of a lifter, but I’m learning how to adapt to a designer’s gauge, which can be quite challenging at times. Thank you for taking the time to explain this in detail. Very helpful!
I’m glad you found this helpful. It can definitely be a challenge but it’s a great skill to develop! 🙂