Fisherman’s Winter: Ribbed crochet beanie hat pattern

‘Fisherman’s Winter’ is my take on the classic knit-look ribbed crochet beanie hat pattern.
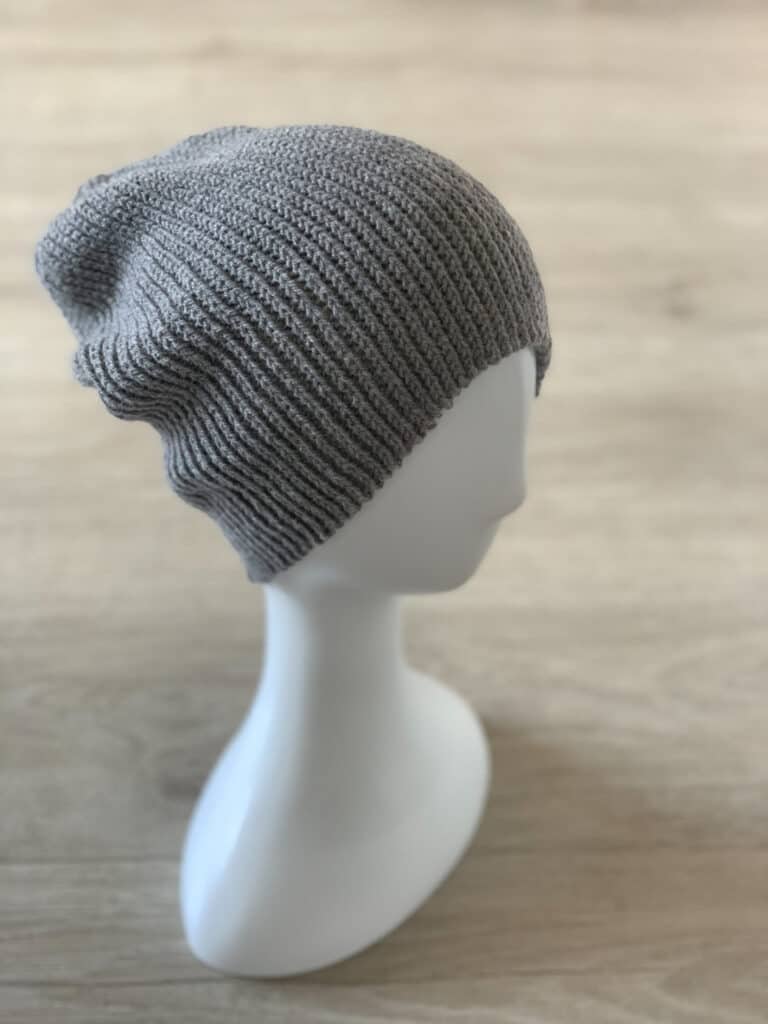
It has a fitted crown, seamed to make it fit over the head with no gather. You can wear it as a slouchy skater style beanie or toque, or turn or roll it up at the brim for a seafaring vibe.
In the ‘any yarn’ spirit, following my any yarn will do sweater and cardigan crochet patterns, I’ve written this ribbed crochet beanie hat pattern for multiple yarn weights too!
You can find the 4ply adult size version of the crochet pattern free to read on this page, or buy the ad free, printable pdf to get the pattern written in 4 sizes (toddler, child, adult and XL adult) for 3 different yarn weights; 4 ply / fingering / sock weight, double knit and aran / worsted weight yarn.
Purchase the PDF now from Etsy, Ravelry or Love Crafts

The paid PDF also includes an additional photo guide for the construction.
A left and right handed video tutorial is available (linked to below just before the start of the pattern) to accompany the pattern, covering the potentially challenging areas.
The stitch pattern has amazing stretch and it’s easy to alter the length to suit your preference.
This pattern makes an ideal gift, that will be worn for years to come. I’ll certainly be making one for all my family this winter. (After gifting the ones I’ve already made that is!)
It’s taken lots of trial and error to create this rule breaking construction method, so I do hope my experimenting can help your gifting!


This post contains affiliate links. This means if you click a link to a product and go on to make a purchase, I receive a small percentage of the sale at no extra cost to you. You can read my full affiliate disclosure here.
About the Fisherman’s Winter Crochet Beanie Hat Design
When I design a new pattern, I often start with a problem that I want to solve.
For example, the any yarn sweater and cardigan patterns arose out of the challenges people have with meeting gauge. (My solution was to offer the pattern in 5 gauge measurements.)
I LOVE a ribbed beanie hat.
There are 100s of free patterns for them on the internet. Typically these are made by working rows of half double crochet into the back loop (or other ribbed stitch patterns), making a rectangle that fits round your head, joining the short sides and then pulling the top in to close the crown.
I imagine most crocheters have made a hat in this style at some point. I’ve made tons.
This type of hat design is super simple, quick and easy.
But… they do end up with a big gathered section and lots of extra bulk around the crown of the head… which most people (myself included) just stick a pom pom on to hide.
I’m not dismissing this approach at all, but if I’m honest, the gather was always something that bothered me. It’s a problem I’ve been wanting to solve for a loooong time.
I had my first stab at it a couple of years ago when I released the My Brother’s Beanie pattern (designed for my brother’s birthday).
If I say so myself, it does a pretty good job at addressing this issue by using a different construction technique.
But, never one to rest on my laurels, and after my recent exploration of different ribbing techniques, I decided that I wanted to make a beanie in 4 ply yarn using slip stitch ribbing.
I wanted this hat pattern to become a go to gift for pretty much any recipient. I knew it wouldn’t be a quick simple make, but it would be a worth while.
The technique I used in My Brother’s Beanie wouldn’t work with this kind of rib stitch, so I set out to find another way to achieve the vision I had in my mind.
I spent a lot of time looking at cut and sew patterns (I often step outside crochet when I am looking for new construction ideas), made some sketches, then swatched, did some maths and started on my first prototype… which was just not quite right.
So I tweaked the maths and made another… and another… and eventually I got to a design I was happy with. The one you see here.
During this ‘proof of concept’ phase, I switched to making it in DK instead of 4 ply yarn, because this is not a 1 hour project! This lead me back down the ‘any yarn’ rabbit hole, so I decided to write this one for multiple yarn weights too.
I stopped at Worsted weight / aran yarn because the pattern doesn’t work so well once you go any heavier.

A different construction for crochet hats
The construction I’ve used for this design is not something I’ve seen in crochet before.
Typically this kind of shaping is used with short rows, so this design probably breaks a whole bunch of traditional crochet and knit ‘rules.’
But what matters to me is whether it makes the thing it is meant to make. And it does!
There is some sewing involved in this design and, largely for that reason I have classed this as an intermediate level pattern.
However, I also offer an option to pick up stitches as you work (essentially using the short row method). If you prefer to work that way, so do make sure you read the joining notes before you start.
Personally I found I could get a more consistent look from sewing the seams (and I am not the worlds best sewer as you will see in the video tutorial!). However, I will continue to look at ways to develop this design in this area.

Skill Used
As I’ve already touched on, this pattern is not a super quick hat to make. It’s a different proposition to the simple rectangle construction, one I believe is well worth the time investment.
The pattern use slip stitches and chains and that’s pretty much it.
I know that some people can find slip stitching repeatedly a bit of a challenge, so I have included my tips in the tutorial on how to make it enjoyable.
This also gives some handy tips for getting a neat finish at the brim.
It is not an especially tricky pattern to follow, but there are a couple of areas that might catch people out.
First off, it’s keeping count of your stitches, which you do need to do. In the pattern notes, I give guidance on keeping track of your stitches, as slip stitches can easily ‘disappear’ if worked too tight.
The second area that some may be a little intimidated by, is the sewing required to create the crown seams at the end.
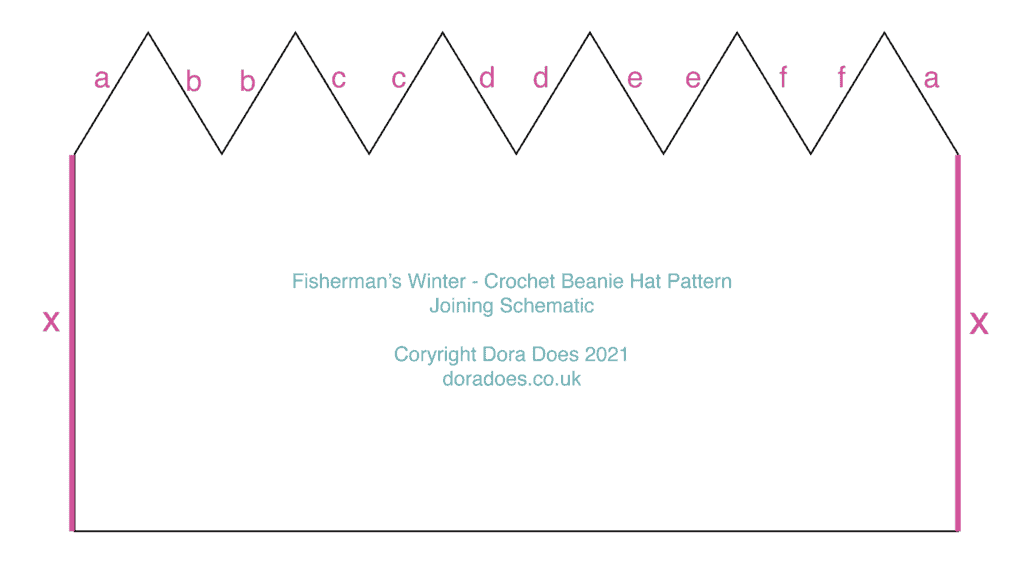
I have provided a joining schematic so you can clearly see which parts go where and spend some time in the tutorial showing how to create the crown.
Oh and knowing how to work in the back loops is important too. You can learn about the anatomy of a crochet stitch here, if working in the back loop is new to you.

Materials
For the adult 4ply beanie pattern available below, you will need:
- 4mm (US G/6) crochet hook
- Approximately 290m 4ply / US size 2 / fingering weight yarn
- Stitch marker (optional)
- Yarn needle
- Tape measure
- Scissors
The full pattern can be worked with any yarn from 4ply (US2) to aran / worsted weight (US 4) which meets one of the 3 gauge options. Yarn meterage for different sizes and yarn weights are detailed in the pattern.
I used a Clover Amour Crochet Hook for this project – one of my favourites – learn more about different crochet hooks here.

How to purchase a Dora Does crochet pattern:
I sell my PDF crochet patterns in my Etsy, Ravelry and Love Crafts stores. You can purchase this pattern on any of these platforms, depending on your preference. Simply click the relevant links throughout this pattern page to be taken to the listing, or visit the store homepages in the links at the start of this paragraph.
Below is a list of the different yarns I used for all the versions you see pictured. It gives you an idea of the variety of yarns you can use when working with the full pattern.
Yarns used in pictured samples
4ply / Fingering / Sock Weight (US 2)
Dark grey version (used in video tutorial): Bergere de France Caline, 4ply, 60% Acrylic, 20% Wool, 20% Polyamide, 50g ball = 180m / 197 yds.
Shade: Limaille
Black and white version : The Yarn Whisperer, 4ply, 100% Highland Wool NSW, 100g hank = 400m / 440 yds
Shade: Judgement (from the hand dyed tarot range)
Double Knit (US 3)
Bright pink-purple version: Stylecraft special DK, 100% Acrylic, 100g ball = 295m / 322yds
Shade Fuchsia Purple (1827)
Red version: West Yorkshire Spinners Colour Lab DK, 100% Wool. 100g ball = 225m / 248yds
Shade: Crimson Red (556)
Aran / Worsted Weight (US 4)
Browny Cream version: Lionbrand Heartland, worsted weight, 100% Acrylic, 140g ball = 230m / 252yds
Shade: Acadia (098)
Blue colour block version: Lighter blue main colour: West Yorkshire Spinners, The Croft Aran, 100% Shetland Island Wool Shetland Colours, 100g = 166m 182yds
Shade; Huxter 397
Darker blue on the brim: This was from my stash and had no ball band
Notes on colourwork
In the two tone blue version pictured below, I changed colours mid-row the same way I normally do: by pulling the new yarn through on the last pull through of the previous stitch.
I dropped one yarn and picked it up again when I came back down the next row so there was no carrying through. With slip stitches it is very easy to miss a stitch on your colour changes as picking up the new yarn can pull the last stitch made with it super tight. So count, count and count again if you are using multiple colours.

Finished size
The full PDF is written in 4 sizes, toddler, child, adult and large adult and contains detailed measurements for all sizes.
Because of the amount of stretch in this fabric, the finished hat contains quite a lot of negative ease – that is it will be a few inches smaller than the head it is designed to fit.
The free pattern below measures about 37.5cm in circumference and is 29cm in length from crown to brim. This is intended to fit a head with a circumference of 50-55cm / 20-22inches.

How to change the length of the hat
You can easily increase or decrease the length of the hat by increasing or decreasing the length of the starting chain (respectively). I like my slouchy hats quite long and the pattern is designed so that the brim can be turned or rolled up for a fitted look or worn as a slouchy beanie.
If you know you want to change the length by a specific amount, you can use the gauge measurement to calculate how many stitches to add or remove from the starting chain.

Pattern Notes
General Notes
- Please read all the pattern notes and joining instructions before starting your project
- This pattern uses standard US crochet terms (UK equivalents are given in brackets in the abbreviations list)
- Numbers at the end of a row indicate the number of stitches in that row and are only given at the start of a section or where there is a change
- Turning chains do not count as stitches unless specified otherwise
- Unless otherwise indicated, stitches should be worked in consecutive stitches
Construction
- The hat is worked sideways in rows
- The hat is worked flat with the first and last rows being seamed together at the end
- You will increase from the shortest part of the hat to the tallest part and back down 6 times
- The peaks that this creates will be seamed at the end to create the crown
- All stitches are worked in the back loop only unless specified otherwise
- The joining schematic at the end of the pattern may help you visualise the construction

Disclaimer:
Information given on this page, website and in associated crochet patterns and products is for reference only. Any reliance on information given on this page, website and associated reference materials is at your own risk. (see Terms of Service)
When making items, especially for babies, infants, toddlers and children, take extra care to ensure pieces are securely sewn together and be mindful of choking hazards and health and safety risks.
Stitches and abbreviations (US Terms)
(UK Equivalent in Brackets)
- BLO = back loop only
- ch = chain
- dec = decrease (denotes decrease row)
- inc = increase (denotes increase row)
- rep = repeat
- RS = right side
- sk = skip (UK miss)
- ss = slip stitch
- st(s) = stitch(es)
- WS = wrong side
Gauge
Gauge is important for this project. Below is the unblocked gauge for the 4ply version.
24 sts and 44 rows in 10cm of slip stitch worked in the back loops only using a 4mm crochet hook, or size needed to meet gauge.
Managing your gauge / tension
Given the size of the finished item and the length of time it would take to make a swatch, you may wish to start the hat using the hook size suggested for your yarn weight then measure your gauge after you get started.
I also recommend keeping an eye on your gauge as you work. I found my gauge very easily tightened up.
Because the fabric created here is so stretchy, this pattern can be quite forgiving when it comes to gauge but if it’s too big, it’s hard to make it smaller so keep your eyes peeled.
The tighter your stitches, the less stretch the hat will have, though it will most likely stretch out with wear (the amount will be influenced by the fibre you’re using).
If your stitches are too loose then it will be less elastic and may end up being too big. If you find that, with time and wear, your hat begins to stretch out, you can sew in some hat elastic to the brim to give it new life.
Personally, I would err towards keeping a slightly tighter tension, but not so much you struggle to get your hook into the stitches. That is no fun for anyone!
The video tutorial shows how I adjust the hold of my yarn to keep my tension even.

Right sides and wrong sides
I have allocated right and wrong sides, but until you seam the crown of the hat, it is reversible. (Once you add the seams it is not.)
You can allocate your own right and wrong side. When doing this, you may wish to consider which side of the brim you prefer the look of and think about whether you will wear the hat with the brim rolled up or not and which side will be on display.
Tips for a neat brim
For the last ss of the RS rows (which finish at the brim of the hat), you may wish to work your ss through the BLO and the unworked loop of the ss 2 rows below. This helps provide a neat base to the brim and reduces the potential for the hat to over stretch.
When turning to start a new WS row, turn against the working yarn to start the first ss of the row. This makes it easier to ‘find’ the ss when you come back to work into it. Alternatively you can place a stitch marker in the first st of the row.
These tips are demonstrated in the video tutorial.
Video Tutorial
You can find a video tutorial to accompany this pattern for right handers here and here for left handers.
This tutorial will demonstrate:
- How to slip stitch with ease
- How to begin increase rows
- how to keep your brim neat (techniques for finishing and starting rows)
- How to work decreases
- How to join the two sides of the hat
- How to seam the crown
Reminder: The pattern below is for the 4ply adult version of the hat. You can purchase the full PDF pattern written for 3 yarn weights, each in 4 sizes from Etsy, Ravelry or Love Crafts.
The Fisherman’s Winter Ribbed Crochet Beanie Hat Pattern
Row 1 (WS): Ch55, ss into second ch from hook and each ch to end, turn. 54 sts
Row 2 (RS)(inc): Ch3, 1ss in second ch from hook and next ch, 1ss in BLO of each st to end, turn. 56 sts (2 sts increased)
Row 3: Ch1 (does not count as a st here), 1ss in BLO of each st to end, turn
Rows 4 – 13: Rep Rows 2 and 3. 66 sts
Row 14: As Row 2. 68 sts
Decrease tips:
You have just made your tallest row and will now start to decrease.
In your decrease row, you will work to 2 sts from the end. In the row after the decrease row, you will work 1ss into each st, but the ch1 you use to turn will count as a st, so you will miss the first st of the row and work the first ss in the second.
This is demonstrated in the video tutorial.
Row 15 (dec): Ch1 (does not count as a st here), 1ss in BLO of each st to 2 sts from end, turn. 66 sts (2 sts decreased)
Row 16: Ch1 (counts as 1ss here), sk first ss, 1ss in BLO of second st and each st to end, turn
Rows 17 – 26: Rep last 2 rows. 56 sts
Row 27: Ch1 (does not count as a st here), 1ss in BLO of each st to 2 from end, turn. 54 sts
Repeat Rows 2 – 27 five more times (6 repeats in total), but miss the last row of the last repeat as this will be used as your joining row.
You will now have a total of 156 rows.
Do not fasten off

Joining the sides
You may wish to block your work to even out any fluctuations in tension before you seam it.
For the final row, you will join the long sides (sides marked x in the joining diagram below).
Fold the hat with the right sides together. Working from the wrong side, align the sides matching stitch to stitch from the brim up.
Ch1 to start the joining row;
Joining Row (WS): Work a ss through the unworked loop from 2 rows down (i.e., the front loop you didn’t work into) and the corresponding front loop of the starting chain.
Use this method to join corresponding stitches up until the end of the starting chain. This will be 2 stitches from the end of the previous row as the joining row is essentially a decrease row.
This method may seem a bit fiddly but creates a subtle join by pushing the penultimate row outwards to the front of the hat to create a rib. If you have a different, preferred method of joining the sides, you are free to use your own approach.
Joining the side seam and seaming the crown are both demonstrated in the video tutorial.
Fasten off, leaving a long tail for seaming
Seaming the crown
You should have finished the joining row at the crown end of the hat at the base of the peaks – At the bottom of ‘a’ in the diagram above.
To seam the crown, pull your yarn tail through and add a yarn needle to it.
Continue with WS facing and, referring to the joining schematic above, seam side a to a, b to b, c to c, d to d, e to e and f to f, ensuring all the points of the peak align in the centre top of the crown.
You may wish to pin the crown section in place before you start seaming, or use an interlocking stitch marker to join the peaks.
When seaming, it can help to align the ‘steps’ created on the increase and decrease rows to make sure the short, slanted sides are aligned.
I used mattress stitch to create the seams but you can use a stitch of your choice.
I left quite a deep seam allowance to ensure I didn’t get any parts poking through to the right side of the hat. I also advise checking your seams as you work and not to weave in any ends until you’re happy with the final look

Once your seams are complete, turn the hat the right way round and get ready for winter!
Optional alternative crown method – join as you go / picking up stitches
If you are an experienced crocheter, you may wish to create the crown seam as you work by picking up stitches on increase sections rather than seam the peaks together at the end at the end.
You will join the same sections as shown on the schematic, but do it as you crochet.
For this approach, work the first pattern repeat as in the pattern. Then, when you move onto the second, as you start to increase the length of your rows, you can slip stitch into the corresponding stitches in the previous decrease section.
I gave this a try as follows:
I worked the chain 3 at the start of the increase row as normal, then worked those first two slip stitches through the chain and the corresponding stitches on the previous decrease section. I worked each increase row in this way to the tallest row, then worked the next decrease section as in the pattern and start to join again on the next increase and so on and so forth.
I am not sure I would recommend this approach to anyone other than very confident crocheters. I found the results little inconsistent and untidy which is why I have used sewing as the main joining technique.

If you’re used to picking up stitches, then you may have a knack for this I have not yet mastered – if so then go for it!
And there you have your finished Fisherman’s Winter beanie!
How to find me and share your finished makes
- On Instagram, you can use the hashtag #DoraDoes to share your finished projects or just tag me @doraexplored
- Sign up to the WiP Tip for weekly crochet chat, offers and exclusives straight to your inbox – click here to sign up.
- Check out my YouTube Channel for my biweekly ‘Crochet Studio Sessions’ podcast.
Happy Hooking
Dx

Copyright Dora Does Limited, Registered in England, Company Number 13992263. This pattern is for personal use only and may not be shared or reproduced in written, photo, video or any other form without prior written consent. All rights reserved. Terms of service.
Is ss single crochet or a slip stitch?
Hi there, this is listed in the abbreviations. ss means slip stitch here.
All the best
Dora
You are brilliant! You never cease to amaze me with your mad math skills and innovative designs. I’ve always felt the same way as you but never had the ingenuity to figure out how to solve it. I have to give this a try! Thank you so much for sharing all of your hard work with us. I’ve learned so much from you!
Awww. Thank you so much for the lovely kind feedback. It’s always so rewarding to hear I have helped others lear 🙂
How do I go about increasing the size of this hat to fit xl male head, using worsted weight?
The full pdf includes sizing for a large adult size which should stretch to fit most sizes. Going up a hook size to relax your gauge may also help if you need something larger.