7 textured crochet stitch patterns using front and back post stitches
I am a huge fan of crochet post stitches. There are simply so many ways you can use them to create all kinds of effects, textures, patterns and shapes. In this article I’m going to share some of my favourites.
Some of these are classics you may have seen before, others are new ones, developed and included to help teach you some of the fundamentals of working with post stitches.
Post stitches, or raised stitches as they are known in the UK, create amazing texture by lifting the post of the stitch away from the fabric. When these stitches are combined with traditional stitches or with other post stitches, the results you can achieve are endless…

About these crochet post stitch patterns
In this article, I want to show you a range of stitch patterns which use post stitches in different ways to create patterns. Some front and back, some horizontal, some vertical some diagonal and a mixture of all of the above.
If you are brand new to using post stitches, I suggest you read this tutorial on how to work front and back crochet post stitches as I have assumed you have a basic working knowledge of them in these patterns.
Before I start, I want to let you know that although I include one stitch pattern here which has a ridged effect, I have a whole separate article on using front and back crochet post stitches to create ribbed fabrics which you can read here if that’s what you’re looking for.
Also, I haven’t included any traditional cable patterns in this round up as I feel the technique, where you cross post stitches to create cables, requires a post all of it’s own… watch this space!
If you’re keen on the idea of cables however, I suggest you give number 6 a try as this will get you used to working post stitches at angles and would be a good foundation for cablework.
Tips and techniques for crocheting with post stitches
Before I get into the stitch patterns, I wanted to share a couple of tips / techniques I’ve learned over the years when it comes to crocheting with post stitches. I think these will help you to crochet these, and other post stitch patterns.
They are largely my personal preferences developed through experience, but are useful factors to think about if you’re free styling a crochet project.
How to reduce the holes behind crochet post stitches and crochet cables
When you work around the post of a stitch, you are lifting it away from the fabric – either in front or behind – and this can cause gaps or holes as a result.
Sometimes these holes form a desired part of the pattern. Sometimes they can be a bit unsightly and make the work look knid of untidy.
I’ve tried various ways to minimise the impact of these gaps and have found two approaches, which can be used on their own or together, which work well.
Add a row of single crochet
I find that working a row of single crochet between the post stitch rows gives the fabric more of a structure as you’ll always have at least one stitch underneath the post.
Stitch patterns 4 (reversible alpine) and 6 (cabled chevrons) use this technique.
Using this method also allows you to create a more flat ’wrong’ side of the fabric and to work all the posts on the ’right’ side. This is a great way to avoid working back post stitches if you’re not a fan.
That said, you can still work back and front posts if you have a row of single crochet between to great effect (see stitch pattern 4 – reversible alpine stitch).
To get an idea of what this looks like on a larger scale, check out the So what sweater (free pattern) which uses it.

This post contains affiliate links. This means if you click a link to a product and go on to make a purchase, I receive a small percentage of the sale at no extra cost to you. You can read my full affiliate disclosure here.
Find all Dora Does crochet patterns made with post stitches here.
The ’2 together’ method
Another technique I’ve used (also in the ‘so what’ sweater) is to work a ’2 together’ stitch either before, after or as part of the post stitch.
This allows you to work into the top of the stitch you are working around as well as working around it.
Let’s say you’re working a pattern repeat of 4 double crochet (dc) followed by 4 front post treble crochet (fptr). You are likely to see a gap before the first and after the last of the front post stitches where the posts lift away from the fabric.
To remedy this using the 2tog method, you would work the last dc of the 4 as a double crochet 2 together (dc2tog) over the 4th and 5th stitches.
When you come to work that first post stitch (around the post of that 5th stitch), you will have the second part of the dc2tog already behind the post, which will fill up the gap.
The fptr counts as the same st in which you work the second part of the dc2tog, so your stitch count should remain consistent.
Likewise, you could work the first dc after the last of the 4 fptr as a dc2tog, working the first part into the previous stitch, behind the post, and the next part where the dc would go.
Another option using this method is to work the 2tog as part of the post stitch, so you are working around the post of the allocated stitch and into the top of the stitch you would otherwise be missing, all within a single stitch.
I use this technique in the cabled chevron stitch pattern and have written a description of ‘dc/fptr-tog’ and ’fptr/dc-tog’ in the special stitches, where the post is either the second or first part of the stitch.
It’s a bit of a wordy explanation, but if you have a bit of crochet experience, it will become intuitive. If not, you can work the pattern without the 2tog and you will soon see where the gaps are that need filling.
This approach is particularly effective where your post stitches are worked at an angle, so is useful for crossed and diagonal cables.
If using any of these 2tog methods, do keep an eye on your stitch count. In fact with any post stitch patterns, it’s important to keep tabs on your stitch count!
When working post stitches, you can see the tops of the stitches you have worked around, so you can allocate that ’top’ to your post stitch for your stitch count. When you’re working at angles, or using this 2tog method, it does get a little more tricky so you’ll need to pay attention.
I used this 2tog method in my ’it’s just not cricket’ sweater pattern to minimise the gaps made by the slanting post stitches.

How tall should I work my post stitches?
I’m going to share my rule of thumb here on the height of post stitches I use with different combinations of standard stitches.
For clarity, let me just list crochet stitches in increasing row heights, where, for the purposes of this article, each is a ’unit’ taller than the last: single crochet (one unit), half double crochet, double crochet, treble crochet, double treble.
Generally speaking, if I’m working a post stitch into a stitch in the row directly below, I will work it ‘one unit’ taller than the non post stitches in the row. This ensures that the top of the row will be even.
So if I’m working in rows of half double crochet, I would work a front / back post double crochet (the next ’size’ up) to ensure that the stitches are even in height across the top of the row.
If I were working a row of half double crochet on top a row of single crochet and wanted to work my post stitch two rows down, then I would work a front / back post treble crochet. That’s two sizes up from the half double because I’m working into two ‘units’ down.
This unitary approach changes in some stitch patterns and with different desired tensions, but I find it a great place to start when playing with post stitches.
The stitch patterns below will help you better understand these tips and put them into practice for yourself. There’s no better way to learn than doing.
So without further ado, let’s get to the patterns.
7 textured crochet stitch patterns using post stitches
For each of the stitch patterns, I will give you an idea of pattern difficulty (though this is always subjective), list the stitches used, confirm what the stitch and row multiples are, indicate whether the pattern is reversible and share any other pattern specific notes or suggestions for modifications.
I’ll also give you some ideas of the properties of each stitch and what you might want to use it for.
Where available, I’ll link to full video and picture tutorials for these patterns. This post includes written instructions only.
Lastly, I will confirm the number of stitches I’ve used for the swatch and the measurement of each swatch to give you an idea of sizing.
Pattern notes for all stitch patterns
- This post uses US crochet terms
- Turning chains do not count as stitches throughout
- You can replace the set up rows, where stitches are worked into chains, with suitable chainless foundation stitches.
- Instructions written after *asterisks should be repeated as indicated
Materials Used for Swatches
The yarn used in the swatches you’ll see in this post was Hayfield Soft Twist Double Knit from Sirdar in shades Ivory and Copper.
I worked with a 4mm crochet hook throughout.
Stitches and Abbreviations
US Standard Crochet Terms
- bpdc = back post double crochet
- bptr = back post treble crochet
- ch = chain
- dc = double crochet
- dc/fptr-tog = double crochet, front post treble together (see special stitches)
- fpdc = front post double crochet
- fphdc = front post half double crochet
- fptr = front post treble crochet
- fptr/dc-tog = front post treble, double crochet together (see special stitches)
- hdc = half double crochet
- rep = repeat
- RS = right side
- sc = single crochet
- st(s)) = stitch(es)
- WS = wrong side
- yo = yarn over
Special stitches
Double crochet / front post treble together (dc/fptr-tog): Yo, insert hook into top of indicated stitch, yo pull up a loop (3 loops on hook), yo, pull through 2 loops (2 loops on hook), yo twice, insert hook around post of indicated stitch, yo, pull up a loop (5 loops on hook), yo, pull through 2 loops (4 loops on hook), yo, pull through 2 loops again (3 loops on hook), yo, pull through all 3 loops to complete the stitch.
Front post treble / double crochet together (fptr/hdc-tog): Yo twice, insert hook around indicated post, yo, pull up a loop (4 loops on hook), yo, pull through 2 loops (3 loops on hook), yo, pull through 2 loops again, (2 loops on hook), yo, insert hook into top of indicated stitch, yo, pull up a loop (4 loops on hook), yo, pull through 2 loops (3 loops on hook), yo, pull through all 3 loops to complete the stitch.
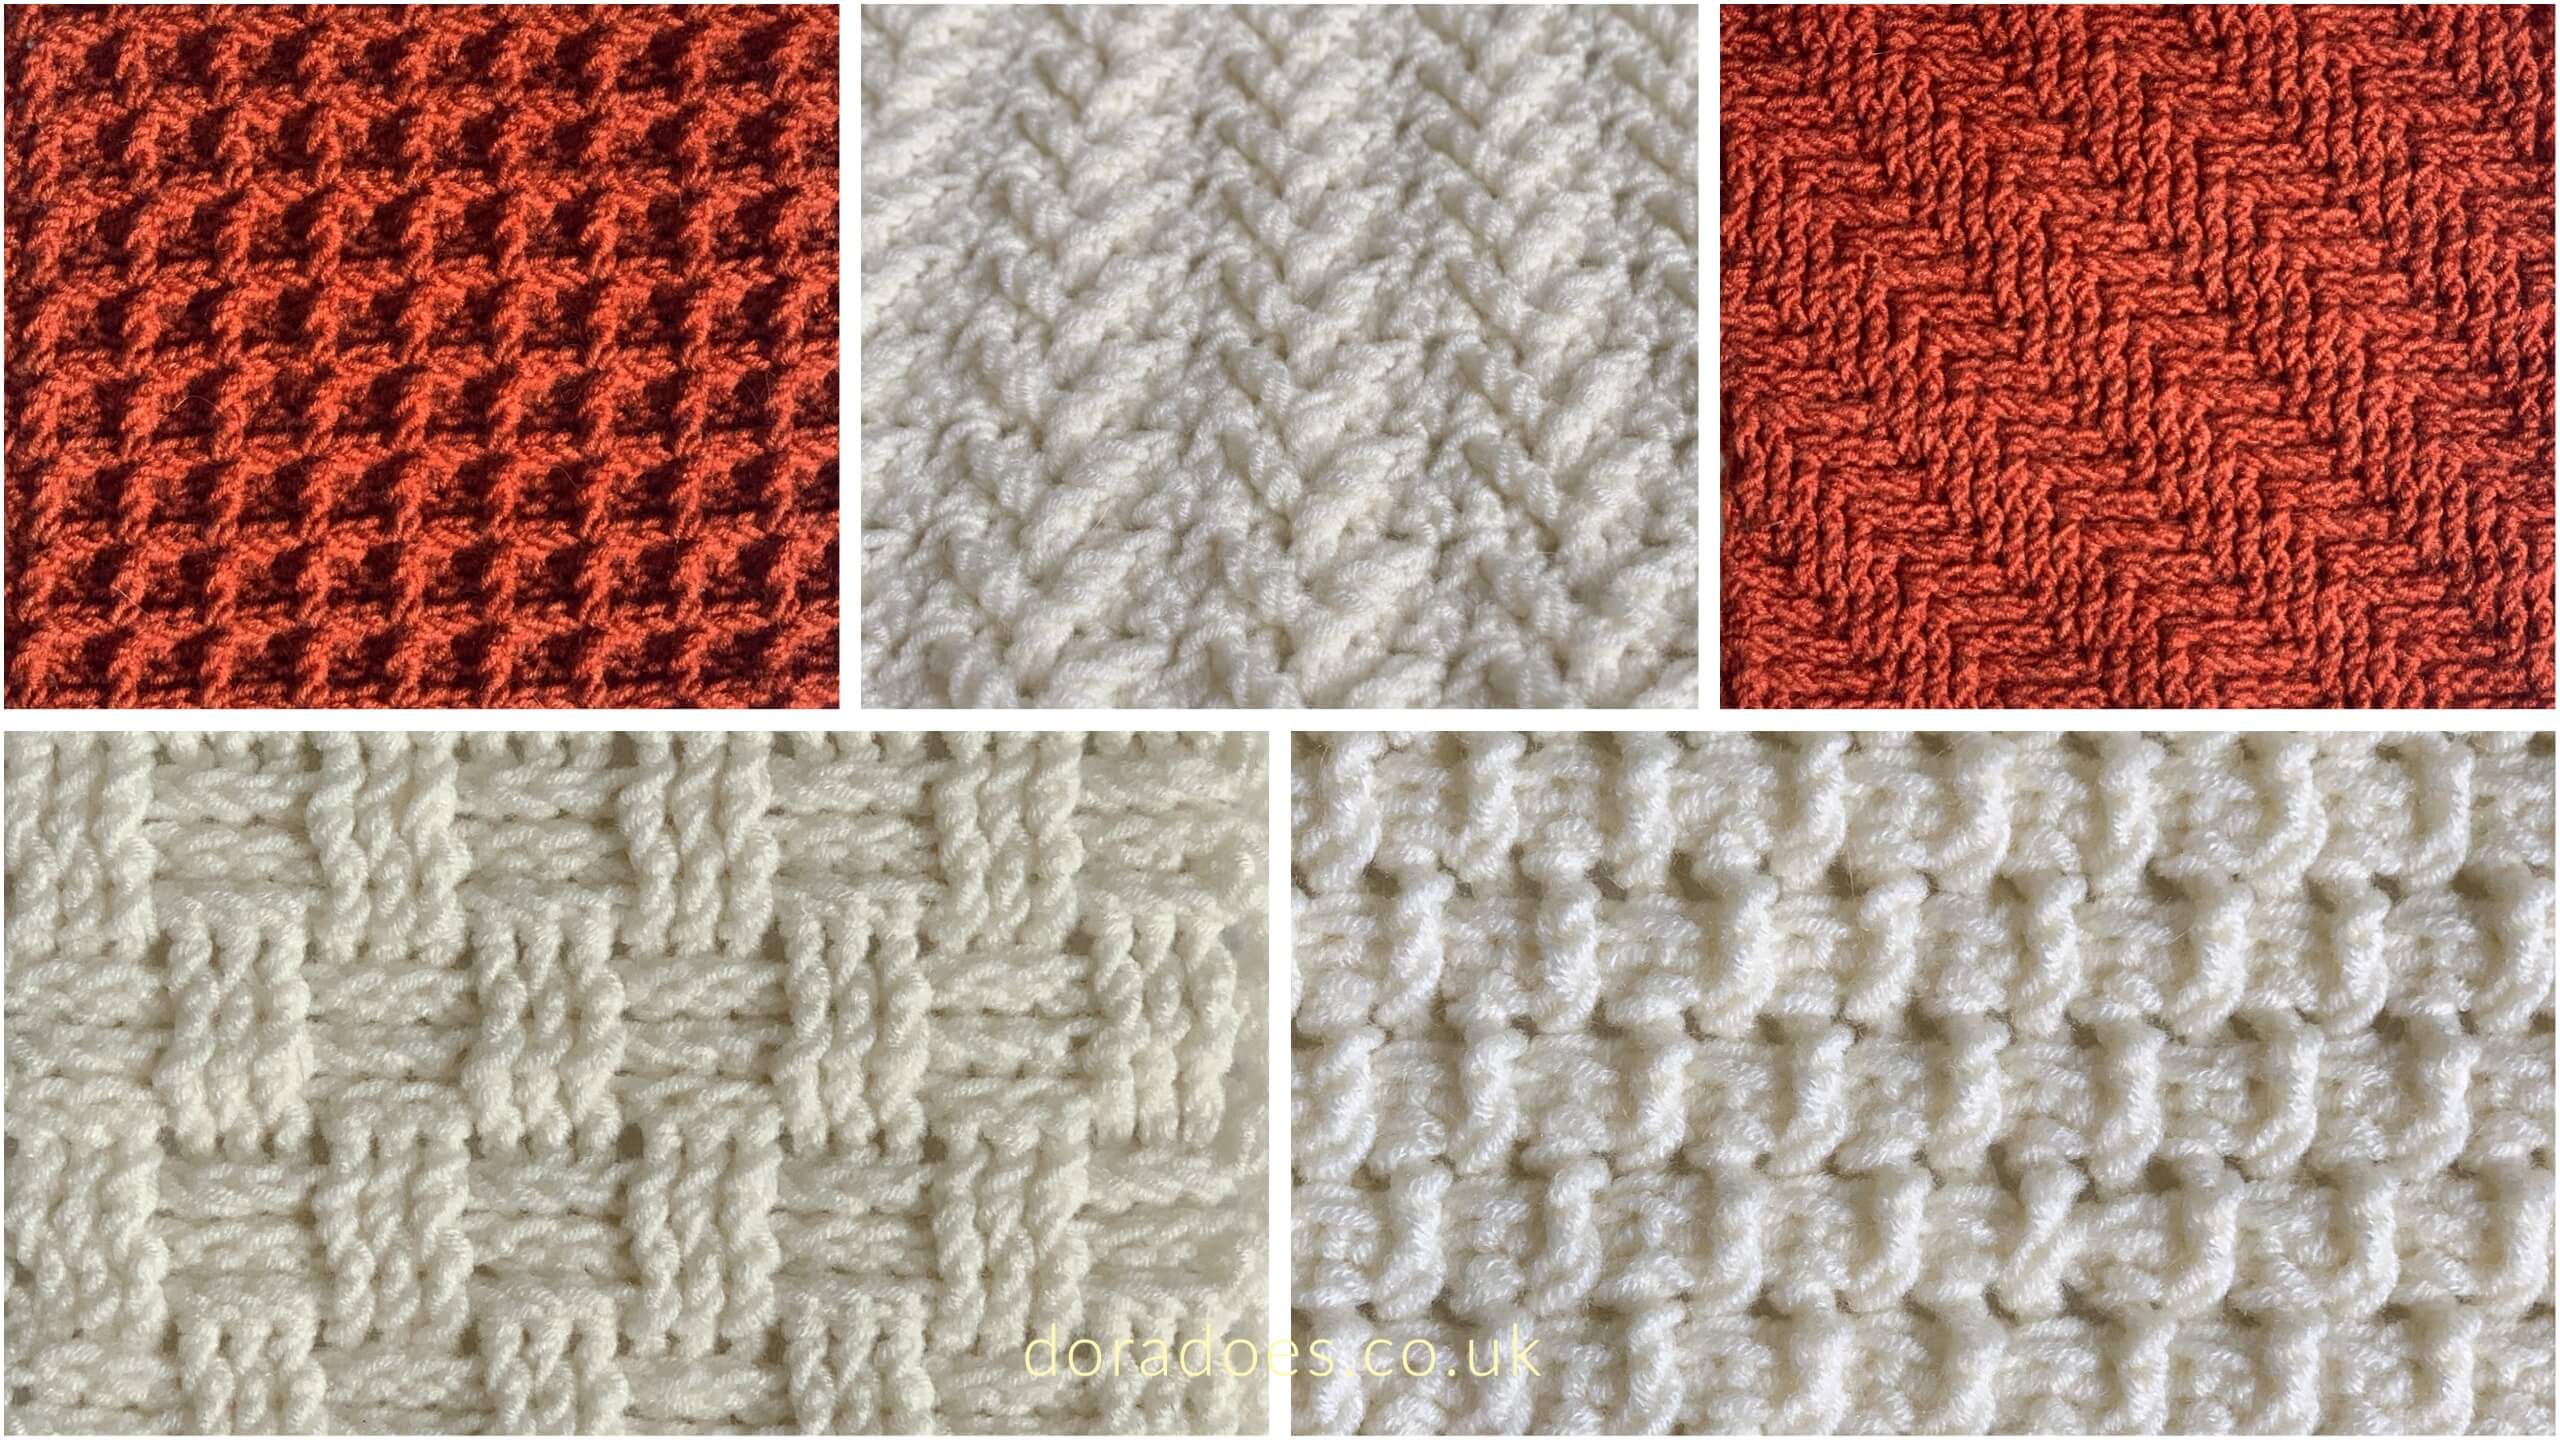
1. All Front Post Double Crochet

Sometimes keeping it simple is the way to go, so I’m kicking off with an all front post stitch because I love the ridged texture it creates.
This pattern creates a thick fabric with deep ridges (probably too deep for a ribbing design). It doesn’t have much stretch but would make a super warm accessory or blanket.
- Difficulty Level: Easy (once you know how to work fpdc)
- Stitches Used: Chain (ch), double crochet (dc), front post double crochet (fpdc)
- Stitch Multiple: 1 (add a further 2 to foundation chain for turning chain)
- Row Multiple:1+1
- One sided / Reversible: Reversible
- Swatch details: 30 sts and 20 rows, measures 16cm wide by 13cm tall
All front post double crochet written instructions
Set-up Row: Ch your desired length, ch2 more for the turning ch, 1dc in third ch from hook and each ch to the end, turn.
Row 1: Ch2 (does not count as a st throughout), 1fpdc around each st to end, turn
Rep Row 1 for pattern
Below is a close up of this pattern to give you an idea of the 3d texture.

2. Basketweave stitch

I’m giving you fair warning that this one is a yarn eater… but what a beautiful one!
Basket weave is a lovely traditional pattern which crochet does brilliantly. You can change the width and length of the weaves to suit and I’ve included some instructions for this in the modifications after the written pattern.
Basket weave creates a thick, opaque and cozy fabric which works great for anything you want to keep you warm. It has a little drape but you may want to go up a hook size to increase that.
The first crochet project I ’designed’ (made up as I went along) was a basketweave cowl with a little split up the side. I still wear it to this day to be fair… perhaps I’ll write it up at some point…

- Difficulty Level: Easy (once you know how to work fpdc / bpdc)
- Stitches Used: Chain (ch), double Crochet (dc), half double crochet (hdc), Front post double crochet (fpdc), back post double crochet (bpdc)
- Stitch Multiple: 6+2 (add a further 2 to foundation chain for turning chain)
- Row Multiple: 6 plus set-up row. (You can also repeat a row of simple dc to finish if desired which would make it 6+2.)
- One sided / Reversible: Reversible
- Swatch details: 26 sts and 20 rows, measures 15cm wide by 15cm tall
Basketweave stitch written instructions
Set-up Row: Ch a multiple of 6 + 2 sts, ch2 more for the turning chain, 1dc in 3rd ch from hook and each ch to end, turn.
Row 1: Ch2 (does not count as a st throughout), 1hdc in first st, *1fpdc around each of next 3 sts, 1bpdc around each of next 3 sts; rep from * to last st, 1hdc in last st, turn
Rows 2 – 3: As Row 1
Row 4: Ch2, 1hdc in first st, *1bpdc around each of next 3 sts, 1fpdc around each of next 3 sts; rep from * to last st, 1hdc in last st, turn
Rows 5 – 6: As Row 4
Rep Rows 1-6 for pattern

Modifications:
The example I have given here creates a ’medium’ size basketweave stitch. You can make a smaller or larger basket weave stitch bu changing your stitch and row multiples.
For example, a small basketweave stitch would use a multiple of 4+2 stitches and 4 rows. Instead of working each repeat into three sts you would work it into two. You would work each row twice in total (rather than three times).
If you wanted a larger basket weave stitch you would work with a multiple of 8+2 stitches and 8 rows. Here you would work 4fpdc then 4 bpdc for 4 rows, then 4bpdc followed by 4fpdc for the second set of 4 rows.
If you wanted to go to town you could go even larger…
3. Waffle Stitch

Waffle stitch is an absolute classic and deceptively simple for the deep ridges and distinct waffle shape pattern it creates. This stitch is yarn hungry but creates a very warm and cosy fabric, great for winter accessories or cosy blankets.
And if you want to challenge yourself with waffle stitch increases (requires an attention to detail!), why not try the off piste beanie hat pattern that you can read for free here?

- Difficulty Level: Easy (once you know fpdc)
- Stitches Used: Chain (ch), double crochet (dc), front post double crochet (fpdc)
- Stitch Multiple: 3+3 (add a further 2 to foundation chain for turning chain)
- Row Multiple: 2+1 you can finish on an odd or even row once the pattern has been established
- One sided / Reversible: One sided but the back also has an interesting texture
- Swatch details: 30 sts and 20 rows, measures 16cm wide by 15cm tall
Crochet waffle stitch written instructions
You can find a full tutorial (including a video and photo guide) for the waffle stitch here. Below you will find the written instructions.
Set-up Row (WS): Ch a multiple of 3 sts, ch2 more for the turning ch, 1dc in 3rd ch from hook and each ch to end, turn.
Row 1: (RS) Ch2 (does not count as a st throughout), 1hdc in the first st, *1fpdc around the next st, 1dc in the next 2 sts; repeat from * to 2 sts from the end, 1fpdc in the next st, 1hdc in the last st, turn
Row 2: Ch2, 1hdc in the first st, *1dc in next st, 1fpdc in the next 2 sts; rep from * to 2 sts from end, 1dc in next st, 1hdc in last st, turn
Rep Rows 1 and 2 for the pattern

4. Reversible alpine stitch

I love alpine stitch. It’s one of my favourite stitches using post stitches . You can find a video and photo tutorial for alpine stitch here.
Seeing as I have included alpine stitch in stitch round-ups in the past, I want to share what I have termed ‘reversible alpine’ stitch instead. I
t’s very similar to traditional alpine stitch but you get the texture on the front and back. This makes it great for projects such as scarves or blankets where both sides will be seen.
I used this stitch in The Bumps pocket shawl and form some angles it almost looks like a diamond or lattice pattern. It really is the stitch pattern that keeps on giving.

Difficulty Level: Intermediate
- Difficulty level: Fairly simple once you get going
- Stitches Used: Chain (ch), double crochet (dc), single crochet (sc), half double crochet (hdc), front post treble crochet (fptr), back post treble crochet (bptr_
- Stitch Multiple: 2+2 (add a further 2 to foundation chain for turning chain)
- Row Multiple: 4+1 – I suggest finishing on either a Row 3 or Row 5 repeat.
- One sided / Reversible: Reversible – though the texture is marginally different on each side
- Swatch details: 30 sts and 28 rows, measures 20cm wide by 17cm tall
Additional Pattern Notes: You can replace the starting chain with a row of foundation double crochet instead of the set up row.
You will only work post stitches around post stitches or dc from two rows below, you will not work post stitches around any of the single crochets.
Reversible crochet alpine stitch written instructions
Set-up Row: Ch a multiple of 2+2 sts, ch2 more for the turning ch, 1dc in 3rd ch from hook and each ch to end, turn.
Row 1: Ch1 (does not count as a st throughout), 1sc in each st to end, turn
Row 2: Ch1, 1hdc in first st, *1fptr in corresponding dc 2 rows below, 1bptr in corresponding dc 2 rows below; rep from * to last st, 1hdc in last st, turn
Row 3: As Row 1
Row 4: Ch1, 1hdc in first st, *1bptr in fptr 2 rows below, 1fptr in bptr 2 rows below; rep from * to last st, 1hdc in last st, turn
Row 5: As Row 1
Row 6: Ch1, 1hdc in first st, *1fptr in bptr 2 rows below, 1bptr in fptr 2 rows below; rep from * to last st, 1hdc in last st, turn
Row 7: As Row 1
Rep Rows 4-7 for pattern

5. Crochet brick work stitch pattern

This stitch pattern is a modification of a pattern I used in my design, the Building Blocks Pillow and Throw (free to read).
It uses a combination of dc and hdc post sts to create cables both on the horizontal and vertical. These are arranged to give the appearance of brick work – hence my imaginative title!
Because the post stitches are relatively sparse, compared to the other patterns here, this fabric has a reasonable amount of drape but retains a lovely textured and tactile feel.

- Difficulty Level: Intermediate (simple when you get going!)
- Stitches Used: Chain (ch), half double crochet (hdc), front post half double crochet (fphdc), front post double crochet (fpdc), back post double crochet (bpdc)
- Stitch Multiple: 8+1 (add a further 1 to foundation chain for turning chain)
- Row Multiple: 8+1
- One sided / Reversible: One sided
- Swatch details: 33 sts and 23 rows, measures 19cm wide by 13cm tall
Crochet brick work written instructions
Set-up Row (RS): Ch a multiple of 8 + 1 sts, ch1 more for the turning chain, 1hdc in second ch from hook and each ch to end, turn
Row 1: Ch1 (does not count as st throughout), 1fphdc in each st to end, turn
Row 2: Ch1, turn, 1hdc in next 4 sts, *1fpdc, 1hdc in next 7 sts; rep from * to 5 sts from end, 1fpdc, 1hdc in next 4 sts, turn
Row 3: Ch1, turn, 1hdc in next 4 sts, *1bpdc, 1hdc in next 7 sts; rep from * to 5 sts from end, 1bpdc, 1hdc in next 4 sts, turn
Rows 4: Rep Row 2
Row 5: Rep Row 1
Row 6: Ch1, starting in first st, *1fpdc, 1hdc in next 7 sts; rep from * to last st, 1fpdc in last st, turn
Row 7: Ch1, starting in first st *1bpdc, 1hdc in next 7 sts; rep from * to last st, 1bpdc in last st, turn
Rows 8: Rep Row 6
Row 9: Rep Row 1
Rep Rows 2-9 for pattern

6. Cabled crochet chevrons

I actually came up with this stitch kind of by accident when experimenting with modifying diamond stitches. It’s one of those patterns that looks so much better in real life than on a flat image.
It is made up of raised v’s stacked on top of one another which Look like little chevrons and almost create a herringbone or tweedy type texture.
This pattern is a great way to practice working post stitches at an angle. Perfect if you want to play with twisted cablework patterns. It also uses the 2tog method discussed earlier in this article.

- Difficulty Level: Intermediate
- Stitches Used: Chain (ch, double crochet (dc), single crochet (sc), double crochet / front post treble 2together (dc/fptr-tog, see special stitches) front post treble/double crochet 2 together (fptr/dc-tog, see special stitches)
- Stitch Multiple: 5+2 (add a further 2 to foundation chain for turning chain)
- Row Multiple: 2+3
- One sided / Reversible: One sided
- Swatch details: 27 sts and 20 rows, measures 17cm wide by 15cm tall
Cabled crochet chevrons written instructions
Set-up Row (RS): Ch a multiple of 5+2, ch2 more for turning ch (does not count as a st), 1dc in third ch from hook and each ch to end, place a stitch marker in the 4th dc from the start and every 5dc to the end (so there are 4 sts between the markers)
Row 1 (WS): Ch1 (does not count as st throughout), 1sc in each st to end, turn (leave markers where they are)
Row 2: Ch2 (does not count as st throughout), 1dc in first st, *dc/fptr-tog starting in next st and working second part around marked st, 1dc in next 3 sts, fptr/dc-tog working the first part around the post of the previous marked st (the same one you just worked around) and second part in the top of the next st, move marker up to centre dc of 3dc just made; rep from * to last st, 1dc in last st, turn
Row 3: As Row 1
Rep Rows 2-3 for pattern
Note that after the second repeat of Row 2, you may wish to stop using markers. The post stitches are always made around the centre of the 3 consecutive dc after the first Row 2 rep.

7. Crochet stairs

Last… but absolutely not least. This one is a corker!
I found this pattern in a vintage stitch directory and made a few minor modifications to it to make it easier to follow for this swatch.
You could think of this stitch as a kind of wandering basketweave stitch where the columns of post stitches are staggered to create the appearance of diagonal lines.
I think this is the most challenging stitch in this round up as it takes a few repeats before the front and back post double crochet combinations become intuitive. But as you work it, it will start to make sense, so prepare some patience.
It creates a super thick and dense fabric with ALL the texture.
The vertical posts create the upward movement and the reverse side of the posts create that horizontal line to create a step effect. On top of that, you kind of get a diagonal stripe caused by the shadows, bit somehow it’s not too much.
This one really shows what posts can do…

- Difficulty Level: Intermediate to advanced – you need to pay attention for this one!
- Stitches Used: Chain (ch), double crochet (dc), half double crochet (hdc), front post double crochet (fpdc), back post double crochet (bpdc),
- Stitch Multiple: 8+2 (add a further 2 to foundation chain for turning chain)
- Row Multiple: 8+2
- One sided / Reversible: Reversible
- Swatch details: 34 stitches by 26 rows, measured 19x19cm
Crochet Stairs written instructions
Set-up Row: Ch a multiple of 8+2 sts, ch2 more for the turning ch, 1dc in 3rd ch from hook and each ch to end, turn.
Row 1: Ch2, (does not count as st throughout) 1hdc in first st, *1fpdc around each of next 4 sts, 1bpdc around each of next 4 sts; rep from * to last st, 1hdc in last st, turn
Row 2: Ch2, 1hdc in first st, 1 bpdc around next st, *1fpdc around each of next 4 sts, 1bpdc around each of next 4 sts; rep from * to end working only 3 bpdc on last rep, and finishing with 1hdc in last st, turn
Row 3: Ch2, 1hdc in first st, 1fpdc around each of next 2 sts, *1bpdc around each of next 4 sts, 1fpdc around each of next 4 sts; rep from * to end working only 2 fpdc on last rep, and finishing with 1hdc in last st, turn
Row 4: Ch2, 1hdc in first st, 1 bpdc around each of next 3 sts, *1fpdc around each of next 4 sts, 1bpdc around each of next 4 sts; rep from * to end working only 1 bpdc on last rep, and finishing with 1hdc in last st, turn
Row 5: Ch2, 1hdc in first st, *1bpdc around each of next 4 sts, 1fpdc around each of next 4 sts; rep from * to last st, 1hdc in last st, turn.
Row 6: Ch2, 1hdc in first st, 1fpdc around next st, *1bpdc around each of next 4 sts, 1fpdc around each of next 4 sts; rep from * to end working only 3 fpdc on last rep, and finishing with 1hdc in last st, turn
Row 7: Ch2, 1hdc in first st, 1bpdc around each of next 2 sts, *1fpdc around each of next 4 sts, 1bpdc around each of next 4 sts; rep from * to end working only 2 bpdc on last rep, and finishing with 1hdc in last st, turn
Row 8: Ch2, 1hdc in first st, 1 fpdc around each of next 3 sts, *1bpdc around each of next 4 sts, 1fpdc around each of next 4 sts; rep from * to end working only 1 fpdc on last rep, and finishing with 1hdc in last st, turn
Row 9: As Row 1
Rep Rows 2-9 for pattern

And there we have it. I hope you’ve seen something fun you want to try here.
Which one is your favourite?
Or do you have another go to post stitch you want to tell me about?
You can find my range of crochet patterns using post stitches here if you want some more inspiration!
I’d love to hear your thoughts in the comments!
Happy Hooking
Dx


Hey, this article was very informative but is there a video tutorial for the Cabled crochet chevrons? I am more of a visual learner so that would be very helpful!
Hi there, I am glad you found this informative. I don’t have a video for the chevron stitch, but if you want to give it a go, I encourage you to slowly try with a small swatch and the written instructions anyway. Trial and error is the best way to learn… maybe you’ll be surprised at what you can actually do, even if it’s creating a totally new stitch pattern! 🙂