The Christmas Gift Hat – Free Crochet Pattern

Creating a new novelty festive hat is fast becoming a holiday tradition for me and this years I have designed a crochet gift hat for the crochet loving givers of gifts!
You can find all 4 sizes, from child to adult for free on this post.

This post contains affiliate links. This means if you click a link to a product and go on to make a purchase, I receive a small percentage of the sale at no extra cost to you. You can read my full affiliate disclosure here.

For weekly crochet tips and more exclusive offers, make sure you sign up to The WiP TiP, the newsletter from Dora Does
Skills Needed
You’ll need to know basic crochet stitches, how to work in rows and rounds and make simple increases. There is some simple sewing involved.
The pattern uses the star stitch for the body of the hat (to emulate pretty festive wrapping paper!). A basic description of the star stitch is included in the special stitches section below, or you can access the full Star Stitch tutorial here.
This tutorial will show you how to create the bow. (which is made using simple stitches)

Materials
Crochet Hook
4mm crochet hook or size needed to obtain gauge.
Yarn
You will need approximately 50-150gPaintbox Yarns Simply DK, 100% acrylic, 100g = 276m
Main Colour (MC), for the hat body: 40g-100g Paintbox Simply DK in Lipstick Pink (shade 151). Meterage by size given in sizing chart
Contrast colour (CC), for the bow and ‘ribbon’: approx 10g-25g Paintbox Simply DK in Mustard Yellow (shade 123). You’ll need about 15g-25g / 50m-80m depending on your size
Substitution Options
Any acrylic or wool double knit yarn which meets gauge can be used with this pattern.
You may find this post useful in choosing a substitute yarn.
Other Materials and Notions
Yarn needles tape measure and scissors
Measurements & Finished Size
- The hat pattern is written in 4 sizes (the hat pictured is the Large Adult size)
- Instructions for different sizes are written in increasing order, with the smallest size first and larger sizes following in brackets i.e. up to Child(Teen / Small Adult, Adult, Large Adult) sts or Rows / Rounds
Finished hat measurements, are as follows for up to Toddler(Child, Teen / Small Adult, Adult, Large Adult) respectively;
- To Fit head (cm): 50(54, 58, 61)
- Approximate circumference of finished hat (cm): 52(58, 52, 54)
- Length from crown to brim (cm): 119(20, 21, 22)
- To convert to inches, divide the cm figure by 2.5
- Approximate meters of MC of yarn required: 155(190, 210, 220)

Pattern Notes
General Notes
- Please read all the pattern notes before starting your project
- This pattern uses standard US crochet terms (UK equivalents are given in brackets in the abbreviations list)
- Numbers at the end of a row / round indicate the number of stitches in that row / round and are only given at the start of a section or where there is a change.
- Where applicable, I have included the stitch count and the ‘star’ count (which does not include the ‘end star st’
- Instructions written after *asterisks should be repeated as indicated
- Instructions written between [square brackets] should be repeated the specific number of times indicated
- This hat should not be used as a toy
Construction
- The body of the hat is made as a rectangle using star stitch
- The rectangle is folded in half and seamed along the sides and top and a brim is added
- The ‘ribbon’ and bow (tutorial included) are then added to adorn your gift hat
Stitches & Abbreviations: US terms
(UK Equivalent in Brackets)
- ch = chain
- fsc = foundation single crochet (UK foundation double) – click here for tutorial
- hdc = half double crochet (UK half treble crochet)
- rep = repeat
- RS = right side
- sc = single crochet (UK double crochet)
- sk = skip (UK miss)
- sp = space
- ss = slip stitch
- st(s) = stitch(es)
- WS = wrong side
- yo = yarn over

Special Stitches
Star Stitch
You can click here for a full star stitch tutorial, though I have included descriptions of the stitches below. Note that in the PDF version of the pattern you will get a more detailed description of the star stitch.
Beginning Star St (beg star st)
The beg star st will be worked at the start of each star row. The row will use a ch3 turning chain to start, but this does not count as a stitch.
Insert hook into second ch from hook, yo pull up a loop (2 loops on hook), insert hook into next ch, yo, pull up a loop starting on the first st of the row, [insert hook into next st, yo, pull up a loop] 3 times, (6 loops on hook), yo, pull through all 6 loops (this completes your sc5tog), ch1 (which creates the ‘eye’ or centre of the star) to complete the beg star st.
Star Stitch (star st)
Insert hook into ch1 or the ‘eye’ of the beg star stitch, yo, pull up a loop (2 loops on hook)
insert hook into the ‘leg’ of the last loop you pulled up on the previous stitch (this is where the tutorial may help you), yo, pull up a loop (3 loops on hook), insert hook into the same st as the last part of the previous stitch, yo, pull up a loop (4 loops on hook), insert hook into the next unworked st, yo pull up a loop (5 loops on hook), insert hook into next st, yo, pull up a loop (6 loops on hook), yo, pull through all 6 loops and ch1 to complete the st.
End Star Stitch (end star st)
The end star stitch is like a partial star stitch, working until you just have 5 loops on the hook instead of 6;
Insert hook into ch1 or the ‘eye’ of the last st, yo, pull up a loop (2 loops on hook), insert hook into the ‘leg’ of the last loop you pulled up on the previous stitch, yo, pull up a loop (3 loops on hook), insert hook into the same st as the last part of the previous stitch, yo, pull up a loop (4 loops on hook), insert hook into the last st of the row, yo pull up a loop (5 loops on hook), yo, pull through all 5 loops.
For this pattern you do not need to work a chain at the end as this will be included in the turning chain at the start of the next row.
Gauge
20 sts and 11 rows in 10cm of star stitch using a 4mm crochet hook or size needed to obtain gauge.
Note that each ‘star’ counts as 2 stitches (the star and the chain) and measures about 1cm across width ways.
Learn how to make and measure a gauge swatch here
Disclaimer
Whilst I endeavour to ensure all patterns are error free, occasional typos or errors may slip through. No liability is accepted for this or subsequent variation in finished projects. However, please do contact me if you think the pattern contains an error or you are unsure about interpreting the instructions.
Information on this website, in this crochet pattern and in associated products is for reference only. Any reliance on information given on this post and associated reference materials is at your own risk. This pattern falls under Dora Does Terms of Service.
When making items, especially for babies, infants, toddlers and children, take extra care to ensure pieces are securely sewn together and be mindful of choking hazards and health and safety risks. Always use caution.
This hat is not intended to be used as a toy. Babies, infants and children should not be left unattended whilst wearing this hat.

The Gift Hat Pattern
Hat Body
Using MC and a 4mm crochet hook;
Row 1: Make 42(48, 52, 54)fsc
Row 2 (RS): Ch3 (does not count as a st), work a beg star st, the work star st across until there is one unworked st left, make an end star st, turn. 42(48, 52, 54) sts, 20(23, 25, 26) stars (includes the beg star but not the end star st)
Row 3: Ch2 (does not count as st), 1hdc in first st (end star), 2hdc in each ‘eye’ (i.e. the ch1 of the star) to the last eye (the beg star st), 1hdc into the top of the turning ch3, turn. 42(48, 52, 54) hdc
Rows 4 – 39(41, 43, 45): Rep rows 2 and 3 finishing on a Row 3 rep.
Fasten off, set aside
Hat Accessories
You will now make the ‘ribbon’ for the hat and the bow to add on. You may wish to add other adornments as desired!
The ‘Ribbon’
Using CC and a 4mm crochet hook;
Ch76(80, 84, 88), or a length long enough to reach along the longest side of your rectangle with a couple of inches excess. Remember that your chain will most likely shrink a bit once you start working into it!
Row 1: Ch1, 1sc in second ch from hook and each ch to end, turn. 75(79, 83, 87) sts
Row 2: Ch1, 1sc in each st to end, turn
Rows 3 – 5: As Row 2
Fasten off, set aside
Note that you can make the ribbon wider or narrower by adding or removing rows. You may find that the ribbon twists and curls so you could give it a gentle block (or light steam press under a tea towel!), though when you sew it onto the hat, this should flatten out naturally.
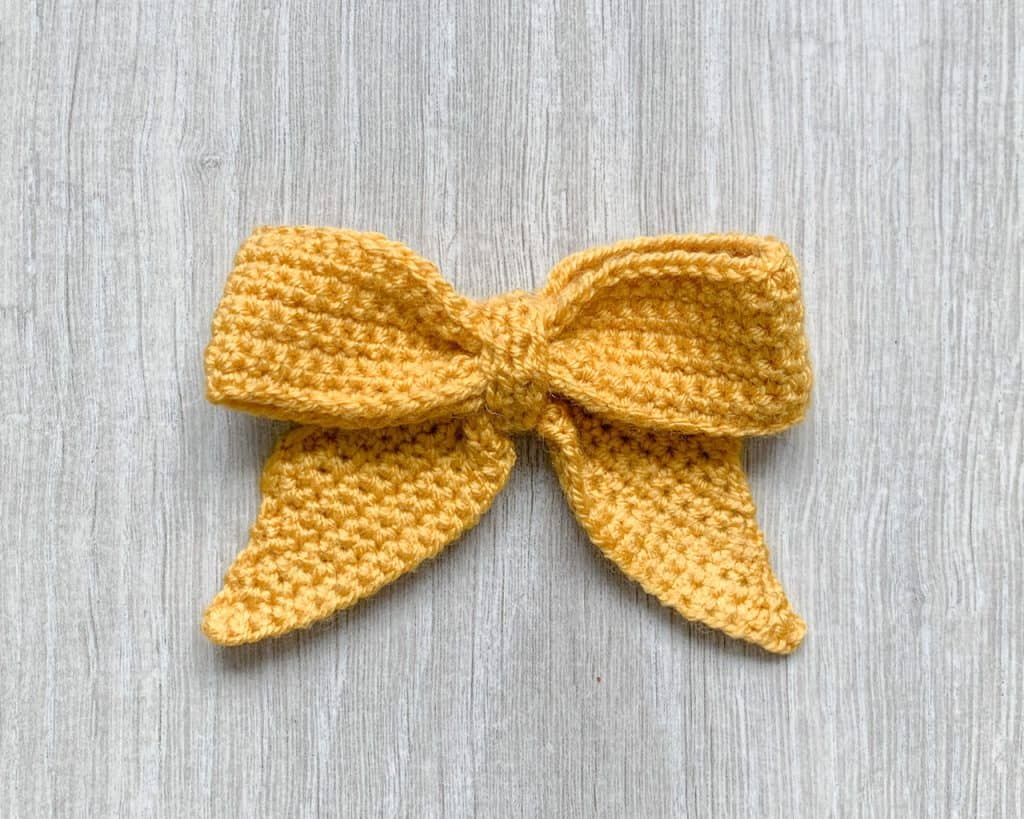
Making the Bow
You can visit this page for a full written and photo tutorial demonstrating how to make the bow.
This includes guidance on adjusting it’s size to suit.
Your finished bow should look similar to the image below. It’s important all the parts are sewn together securely.
Constructing the hat
You should now have your 3 parts; the hat body, the ribbon and the bow.

Taking the body of the hat first, fold it in half down the centre of the long side (along the rows) so that the WS is facing you. Using a yarn needle, sew together the sides, working from the base up to the fold.
To give the hat some extra structure, I have also stitched along the fold row, then sewn together the other side seam, leaving an opening for your head.
Adding the brim
Wit RS facing, attach your MC yarn to the side seam;
Round 1: Ch1 (does not count as st), 1sc in each st around the brim of the hat to end (you will be working into the back of the fsc on one side and the last row of hdc on the other), ss to top of first st, turn
Round 2: Ch1, 1sc into each st to end, ss to top of first st, turn.
Fasten off and weave in ends
Adding the Ribbon and Bow
Take the ribbon and pin it in the centre front of the hat, up to the crown and over the back.
Leave a small length at either end to tuck under the brim for a neater finish. Sew in place securely on either side of the ribbon.
The front and back of the hat are more or less the same. You will see a slight difference where you worked the brim into the back of the foundation row compared to the last row of star stitch, so just choose which you prefer the look of!
Take your bow and stitch it to the front centre of the hat (or wherever you find suits) and stitch into place securely.
And you’re done! Time to get gift giving!!

I hope you enjoyed this pattern.
I love seeing your finished makes, so if you fancy sharing, here’s how you can do it
How to find me and share your finished makes
- On Instagram, you can use the hashtag #DoraDoes to share your finished projects or just tag me @doraexplored
- If you have the bug for creating garments, why not join my dedicated facebook group “My Crochet Wardrobe” and share them there?
- Sign up to the WiP Tip for weekly crochet chat, offers and exclusives straight to your inbox – click here to sign up
Happy Hooking
Dx
Copyright Dora Does Limited, Registered in England, Company Number 13992263. This pattern is for personal use only and may not be shared or reproduced in written, photo, video or any other form without prior written consent. All rights reserved. Terms of service.
Thank you for the awesome hat pattern.
Super cute! Thanks for sharing! 🙂
Thank you so much for sharing this wonderful “Gift”
I love this pattern It is sooooooo cute!!!!! And you are so sweet to do this and share with use all
thank you Dora
Thank you for the beautiful gift hat. I will make this for one of my grandkids. thank you again
You’re welcome. The will look adorable!
Thank you so much for the pattern!! Love it!!
You’re welcome:)
Thank you for the free pattern through Marly Bird. It’s a great way to try a new designer’s patterns.
you’re welcome. And I agree – it’s a fab way to find new designers. Enjoy the hat:)
Thank you for sharing your adorable gift hat
Thank you for the free gift pda.
Thank you so much for including this in Marly’s giveaway! Can’t wait to make these for all my coworkers!
You’re welcome! I hope your colleagues enjoy it too 🙂
Thank you for joining the 24 days of quickies, this pattern is so cute!
Thank you and you’re welcome!
Thank you so much!!
You’re welcome 🙂
Thank you for sharing! What a fun pattern!!! Can’t wait to make it!
You’re welcome – I hope you enjoy it! 🙂
Thanks for sharing this pattern!
You’re welcome 🙂
Thank you for the pattern from 24 quickie Christmas with Marly bird & friends. I love it.
You’re welcome! Enjoy hooking it up. 🙂
Thank you for sharing! This looks so cute! Can’t wait to make it!
You’re welcome! Happy hooking!