Crochet Sock Sizes and adjusting socks to fit your foot

I’m in the midst of designing my 3rd crochet sock pattern. Whilst calculating the sizes, it occurred to me how many different sources I consulted and compared in order to create the size chart I use when designing socks.
There are plenty of foot size charts around, including the easy to use Craft Yarn Council size chart, but socks are made with *negative ease generally so how do you know how big to make your sock?
*negative ease means that the sock (or other finished item) is smaller than the foot (or other body part) it is made for, so it stretches to fit. (Learn more about ease here)


When I first started designing socks, I did a lot of research, learning which parts of the sock I should shrink to get a good fit. This article from interweave was a great starting guide.
I couldn’t find any suitable tables or references with a ‘this is how big the sock should be’ measurement. Just discussions about the proportions of ease used in different areas of the foot.
Whilst I learned a lot about socks through various knitting blogs and books, crochet fabric generally stretches in a different way to knit fabric so there are different considerations.
With my sock designs (like the cosy toes and step on socks), I create only a small amount of negative ease around the circumference, so that you can get your heel through the tube, and add a bit more negative ease to the length of the foot. This is because it’s easier to stretch the rows to create the snug fit. So your crochet sock will look shorter than your foot when you’re not wearing it.
Like many of those areas where I have collated information, I wanted to share it with you in an abridged version of the numbers I use.
Toddler – adult foot measurements & shoe size chart for crochet socks
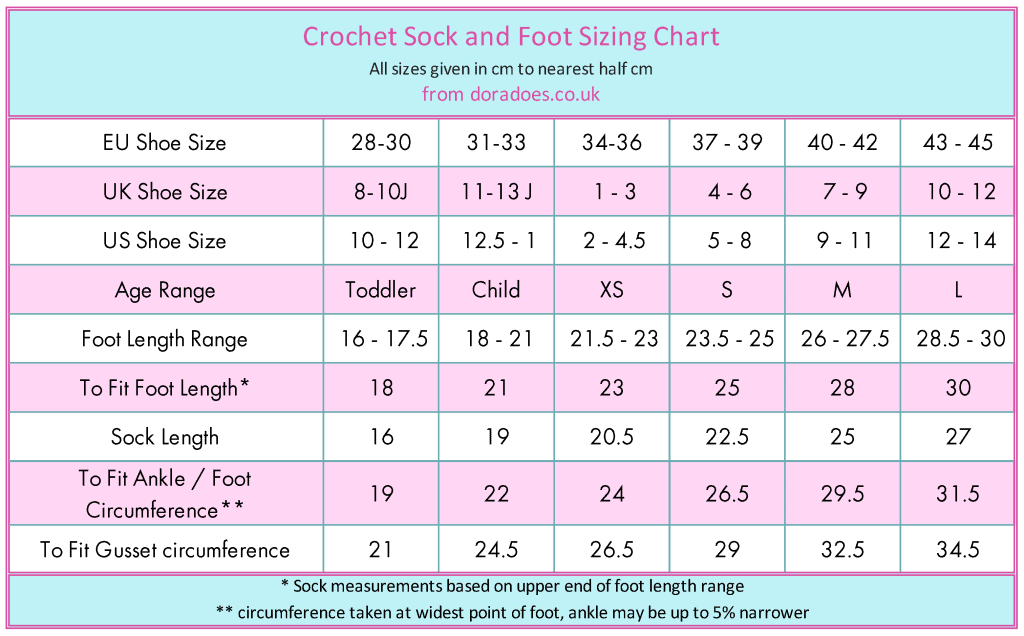
This chart isn’t perfect, because we all have differing shapes and sizes of feet. Like all size charts, it’s a generalised guide, but I find it a good framework to start from.
These numbers are based on standard foot size measurements and shoe sizes. Because I add just a small amount of ease to the foot circumference, I have included the ‘to fit’ measurement I use for my designs.
With the foot length, I have given the sock (foot) length I use.
Note that some foot or sock charts also include ankle height but as that varies depending on sock design, I have excluded it here.
When thinking about ankle height, the length will impact the design as taller socks need to take into account the calf.
Baby foot sizes & measurements for crochet socks and booties
The chart below shows average baby foot sizes which you can use when crocheting booties or socks.

Note that my socks start at toddler size but I know, having recently written some bootie patterns, that baby foot sizes are hard to find!
The information in this table is an amalgamation of averages sizes from a number of different charts and resources on the internet, the most useful two being Clarkes Size Chart (if you’re in the UK, there’s a chance you got your first school shoes from Clarkes!) and Merrell size chart.
It seems fairly simple to find shoe size charts, but getting actual foot measurements (other than just length and width) took a lot more digging and a bit of detective work!
How to adjust crochet socks to fit
Understanding how my sock patterns are sized will, I hope, help you make any necessary adjustments to fit. Below I describe few common adjustments you may want to make as you crochet your socks.
A while back, I wrote a post about the anatomy of crochet sock construction which will help you put these measurements, and suggestions for alterations, into context if needed.
My most common adjustment is the ankle circumference so I’ll start with some guidance on that one.
Crocheting a smaller ankle
Generally, in my patterns, the circumference of the ankle is the same as the circumference of the foot. However, I have proportionately skinny ankles, so will sometimes need to adjust a sock to make the ankle part a little narrower than the foot, to fit me.
To do this, whether toe up or cuff down, I will reduce the number of stitches around the ankle to fit (normally at either side and by no more than a couple of stitches per round), and make up the difference during the gusset increase / decrease section.
Requiring a smaller ankle is not uncommon and some resources suggest that ankles are around 5% smaller than the foot circumference. However one needs to account for the calf in longer socks and the fact that the foot needs to fit through the opening!
So for ankle socks, you certainly unlikely to see those sock marks you get with store bought!
I thought about making a smaller ankle compared to foot when designing my socks but decided to stick with the balance given the lower amount of horizontal stretch in crochet. Though I do actively try to pick stitch patterns with more stretch in this direction to help the sock ‘cling’ to your ankle.

Adjusting the length
When choosing your sock size, I recommend that you use the foot circumference measurement to guide you. You can also choose the option matching your shoe size but this is likely to be a less accurate.
Generally, assuming you’ve picked a circumference that fits your foot, adjustments will then involve changing the length.
It’s usually pretty easy to adjust the foot length by adding or removing rounds. But remember that your sock should have negative ease so should always be shorter than your foot. This is where the sock length measurement chart comes in handy.

Adjusting the width / circumference of a sock
One other area that you need to consider is the gusset. If you’re struggling to get your sock on, then you may want to add more stitches to the gusset. This is the increase area on the sock which allows for the extra space required around the instep area (again I’d refer you to this post for an explanation of the gusset).
If you’re working with a simple stitch multiple then this should be relatively straightforward; simply adding extra stitches around that area and then extra decreases as needed.
The exact method will change depending on the style of sock you’re working, but I find afterthought heel style socks the easiest to adjust without having to reconstruct the pattern!
The images throughout this post show a cuff to toe, afterthought heel construction, which I hope illustrates the point!

Write it down!
My final piece of advice about adjusting crochet socks is to write down any changes you make. You’re gonna need to repeat them on the other sock. You think you will remember, but you won’t!
On the flip side, very few of us have identical sized feet so maybe there’s an argument for winging it?
Whatever approach you take, the great thing about crocheting socks for yourself, is that, whether you make them toe-up, or cuff-down, you can try them on as you go.
That’s my kind of crochet!
I hope you find this information useful in your sock related efforts 🙂
Note that the ‘Cosy Toes’ crochet sock pattern, pictured here, will be out soon!
Happy Hooking
Dx
Copyright Dora Does Limited, Registered in England, Company Number 13992263. This pattern is for personal use only and may not be shared or reproduced in written, photo, video or any other form without prior written consent. All rights reserved. Terms of service.


Hello. I’am having a problem in finding a pattern in crocheting socks for a large calif women. I have looked every where. Can you please help me?
I think this may be a case of adjusting to fit. If you try a toe-up pattern then once you get to the ankle section you can add increases to get a custom fit on your calf. Also, look for something that has a lot of stretch in the fabric so it doesn’t just fall down!
Dear Dora. Thank-you for sharing your valuable sock making information with us. Do you use the ESC stitch in your sock patterns? (Extended single crochet). I’m very keen to purchase one of your sock patterns . Currently have 2 in my Etsy basket. Just need to decide which one now.
Kind regards
Lesley from South Africa
Hi there, I love the extended single crochet stitch, but haven’t used them in my existing sock patterns… maybe one to pop on the list! When choosing, maybe think about which construction method you might prefer to help you pick one!
Thanks
Dora