How to make an up-cycled Christmas Stocking with crochet top using left over yarn and an old plaid shirt

This year, more than ever, I have focused on the reuse, recycle repurpose mantra. Inspired by my year of not buying new clothes, I look at what I already have and see how it may be used in a new way.
This simple Christmas stocking project is a great way to get festive without more consumption. It’s a fun project to get all the family involved with and create something that will be used and cherished for years to come.
Here’s what you need to know before you start…
Skills needed
Sewing: Beginner with a little experience (if you can hem a pair of trousers, you’ll be fine!!)
Crochet (Optional): Beginner / Easy (you can replace the crochet topper with fabric for the cuff if you prefer that to crochet)
Materials
- Old clothing item, or fabric for your stocking (details below)
- Stocking template (See below for suggestions)
- Sewing machine (you could also hand sew this project)
- Strong thread to match fabric
- Pins and needle
- 3.5mm crochet hook (optional)
- About 100m of dk yarn, or yarn and hook to suit (optional)
- Yarn needle (optional)
- Iron
- Sharp scissors or rotary trimmer
What fabric should I use?
This project will work with a range of items. I used an old plaid (or checked Lumberjack shirt if you were me in the 90s!) flannel shirt for the outside and Plain white lighter cotton shirt for the lining. I wanted a contrasting lining, but you can use the same fabric for both the lining and the outer.
You could also use an old pillow case, table cloth, tartan skirt, old pyjamas, pair of jeans etc. – whatever you have hiding in the back of your wardrobe or linen closet.

Try something with a non-festive print for a contemporary effect.
I recommend that you choose a robust fabric with minimal stretch (e.g. flannel, cotton, denim, hemp or canvas), at least for the outer of the stocking. You could also get cosy and use an old fleece!
Where do I get a stocking template?
To create my template, I stuck two pieces of printer paper together landscape and drew around my old childhood stocking (making some freehand adjustments to the foot section). Alternatively, a quick google will help you find a free template on line.

What yarn will work?
This project is all about upcycling items you have in your home which aren’t currently being used, so have a dig in your stash and use what you’ve got. The pattern will allow you to adjust the crochet cuff to work with most yarns!
Note that if you don’t crochet, or prefer to work the cuff with fabric, you can follow the same construction instructions to add the topper.
DIY Stocking instructions
Prepare your fabric
Wash, dry and press your fabric. If it’s an item of clothing, cut it up along the seams to maximise the available fabric.

You might want to keep some of the features to add onto your stocking at the end (e.g. cuffs or small pockets).
Cut out your pattern pieces
With 2 pieces of the outer fabrics placed RS together, pin your pattern to the material and cut out leaving a 1.5-2.5cm seam allowance.

I also used chalk to mark the wrong side of the fabric and draw around the pattern. I am not a very experienced sewist, so this helped me with stitching pieces together.

Repeat the process with the lining.

Join the lining and outer at the stocking top
Lay the front and back pieces out with the right sides (RS) facing you, so the tops of the lining and outer align.

For each side of the stocking, fold the inner over (so the wrong side (WS) is now facing you) and sew the tops of the lining and outer pieces together

Trim the seam allowance and open the pieces back out so that the RS is facing once again.

Stitch the front and back together:
Place the front and back of the stocking RS together (WS facing you), pin around the edges.

Starting a few inches below the top on the back of the stocking, sew the two sides together around the whole stocking, stopping a few inches from the top (so you leave an opening at the back to turn it the right way out). Use the chalk outline as a guide as you sew.


Trim the seam allowance and cut a few notches around the toe to avoid extra bulk.
Turn the stocking the right side out
To do this, carefully pull the lining and outer through the whole you left at the top back.
Tuck the lining into the outer.

Hand sew the back seams of the lining and outer closed. This seam will mostly be hidden by the cuff so don’t worry too much if your sewing isn’t perfect!
Make a hanging loop
Cut a rectangle 23cm/9in by 6cm/3in from the fabric remnants.
Fold in the rectangle in half along the long side, with WS facing, press and sew together 2 sides, snip the corners of the seam allowance.

Turn the loop the right side out through the open short side. I use a chop stick or knitting needle to help me do this!
Press and fold to make a loop.
Set aside.
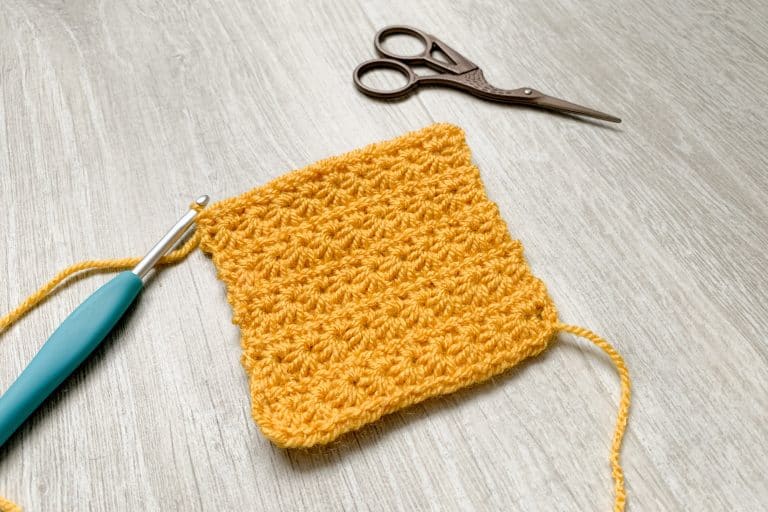
Crochet the cuff
The crochet instructions below use US terms
- BLO = back loop only
- ch = chain
- sc = single crochet (UK double)
- hdc = half double crochet (UK half treble)
- ss = slip stitch
- st(s) – stitch(es)
Note that the instructions below will make a cuff of around 9cm / 3.5in tall when attached to the stocking. You may need to adjust the number of hdc in each row to get a cuff height suitable for your template.

If you are using a thicker yarn than dk, you may not want to fold the cuff in two (as in the instructions below) so make your cuff half the height as instructed, working sc only at one end of the row.
Ch50
Row 1: Starting in second ch from hook, 1sc in 7 ch, 1hdc in next 35 ch, 1sc in last 7 ch, turn. 49 sts
Row 2: Ch2 (does not count as st), 1hdc in BLO of each st across, turn.
Row 3: Ch1 (does not count as st), 1sc in BLO of 7 sts, 1hdc in BLO of 35 sts, 1sc in BLO of last 7 sts, turn.
Repeat rows 2 and 3 until your piece reaches comfortably around the top of your stocking with 5cm / 2in to spare.
Finish on a Row 2 rep


Fold the cuff down the centre so that the row ends meet.
Ss the row ends together along the length of the cuff to form a double layer of fabric with vertical ribbing.

Fasten off.
Attaching your cuff to the stocking
These instructions should also work if you are using non-crocheted fabric for the cuff.
Turn your stocking the wrong way around and, starting from the back seam, pin the narrower, row end side of the cuff to the top of the stocking.

Stitch securely in place leaving the back seam open. I used two rows of stitching to attach the cuff, one close to the top of the stocking and the other further down by the row ends.
Take the loop you created earlier and stitch to the back seam.

Starting in the layer the furthest away from you and working towards you, slip stitch the first and last rows of the cuff together, working in the BLO of the row closest to you and the FLO of the other row.

Turn your stocking the right side around.

Fold the cuff down over the top of the stocking, hang and wait for Santa!

And there we have it! I hope you enjoy making this project!
If you found it useful, please do share with your friends, on facebook or Pinterest – it all helps me get seen and allows me to keep creating free projects like these!
I would love to see your finished projects so, if it’s your thing, please do share your finished projects with me via a tag on Instagram or Facebook!!
Happy Christmas and Happy Crafting!
Big Love
Dx
Note that this project was originally created by me for Crochet Now Magazine, Issue 47. This is an extended, full version of that tutorial.