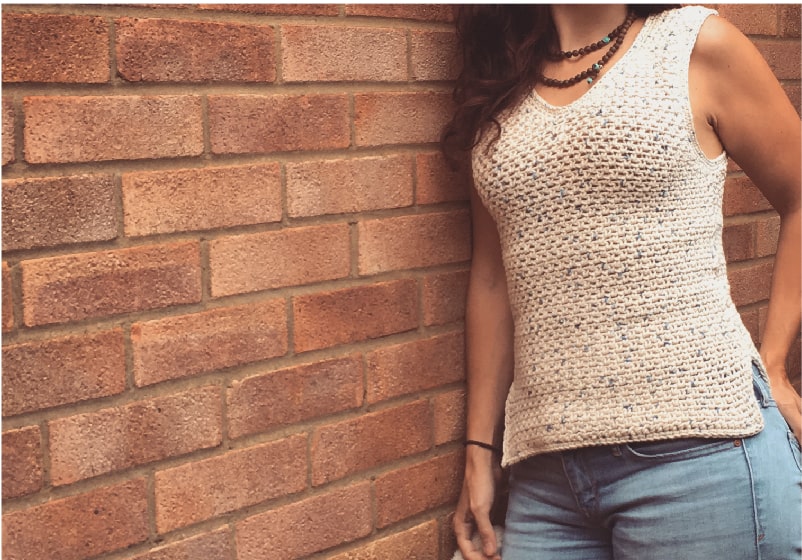
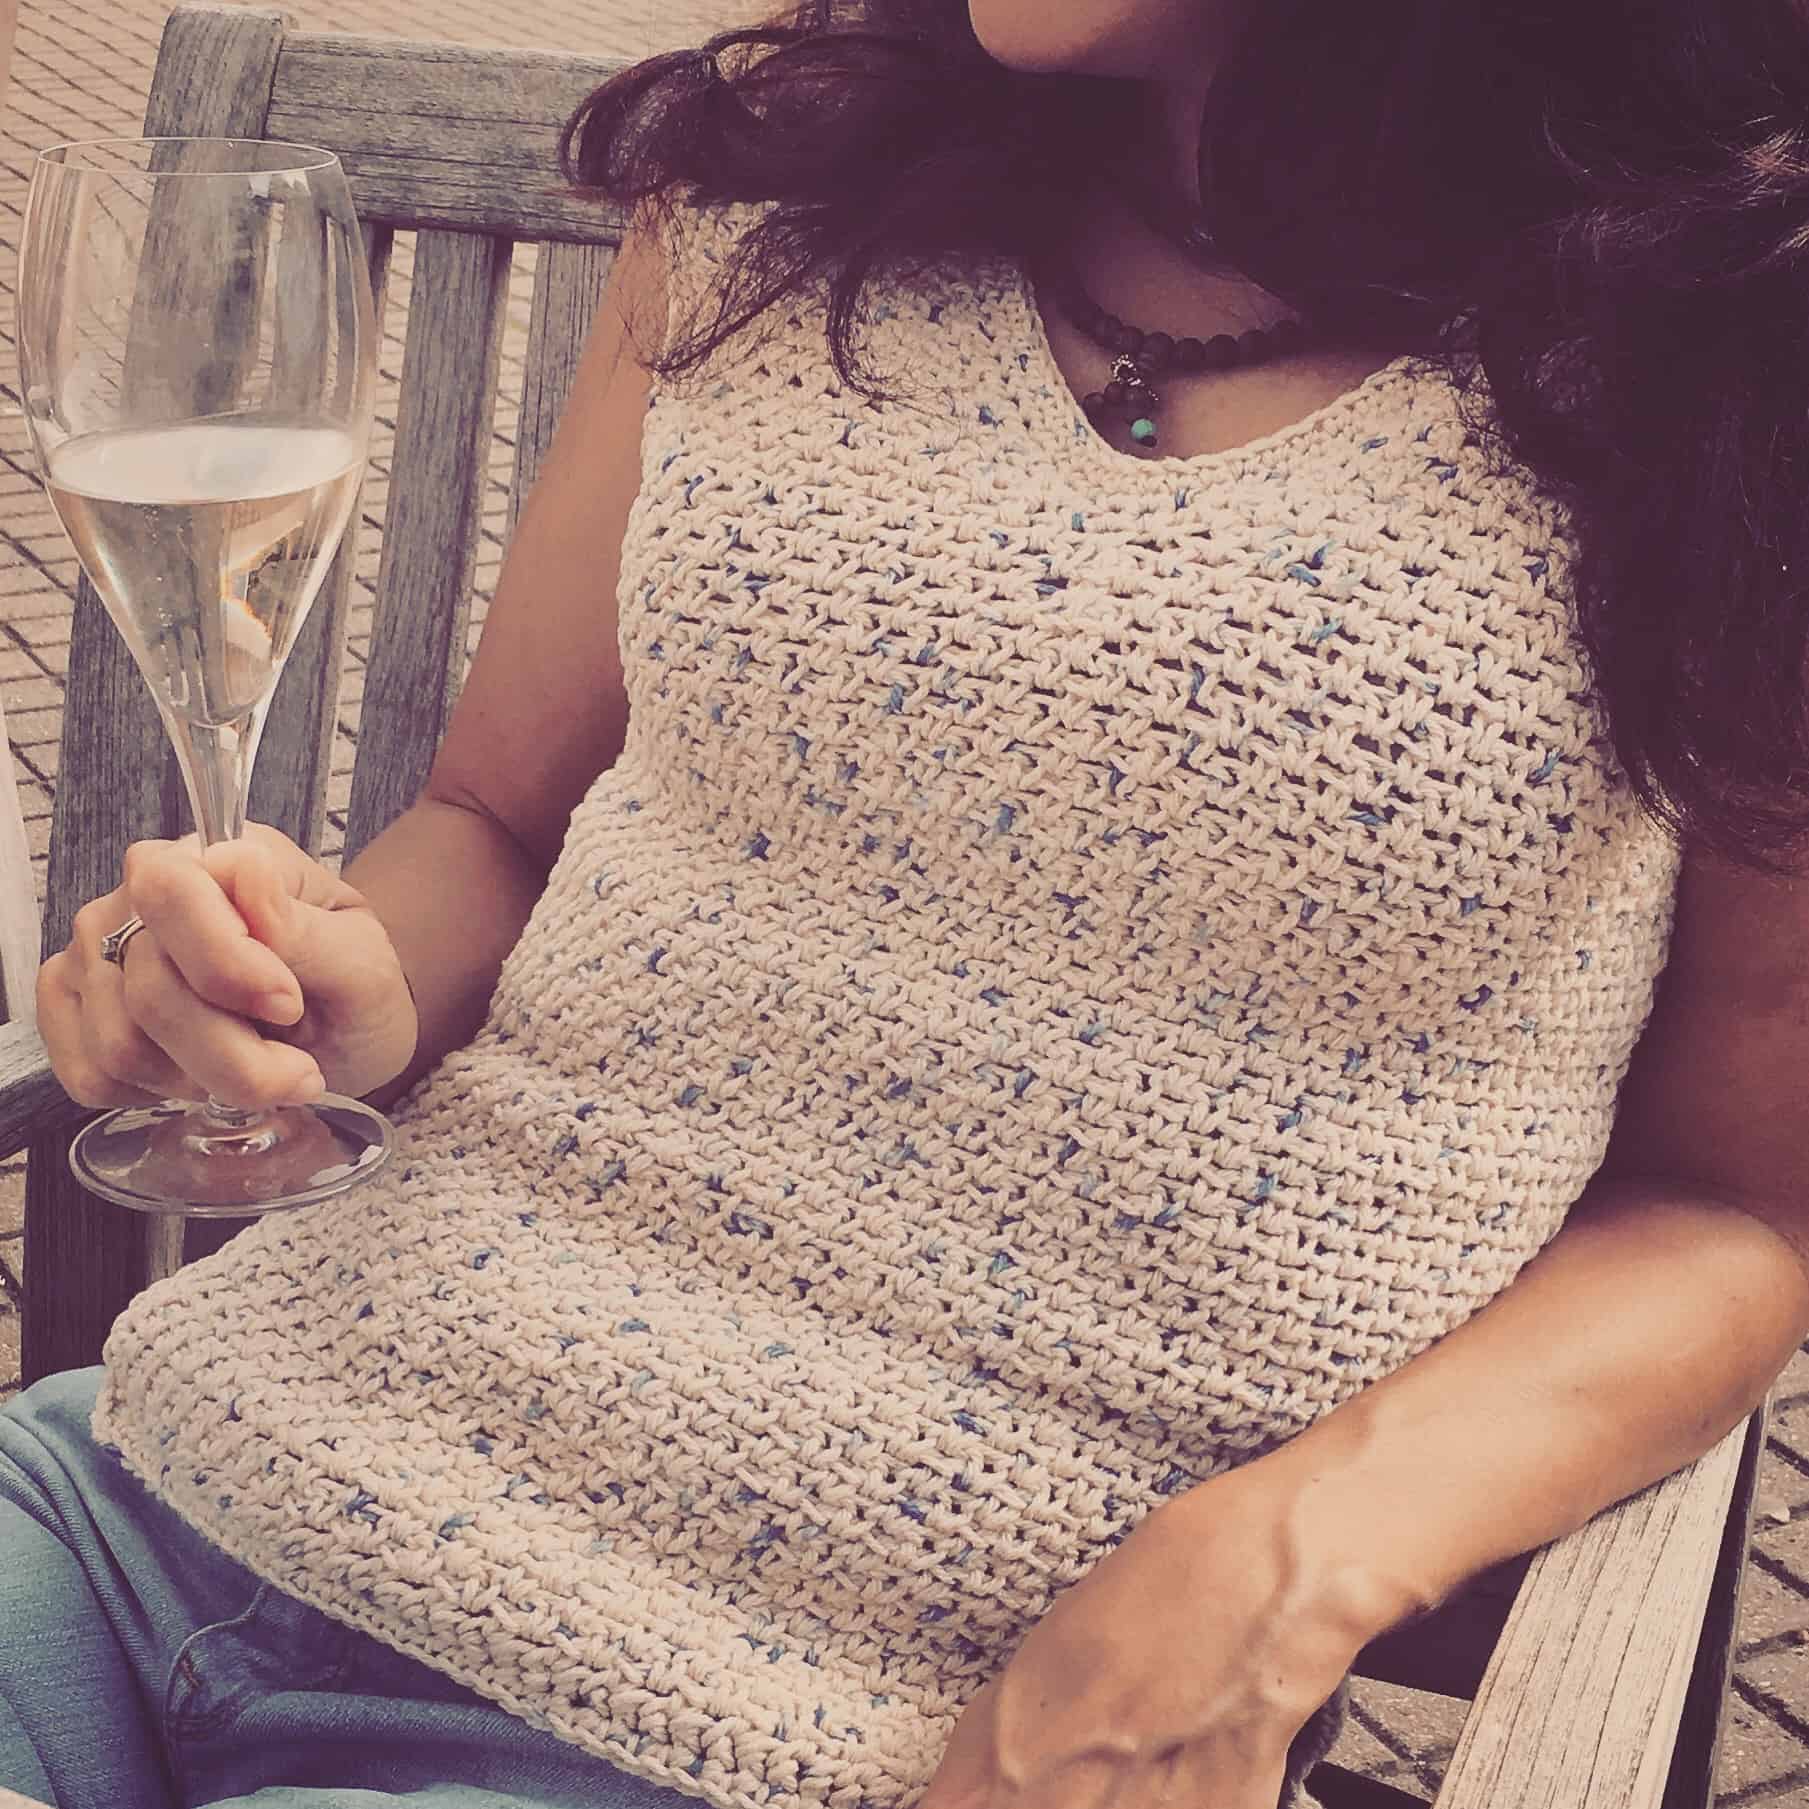
Dreaming of an Indian Summer – The Indian Summer Crochet Tank Pattern
So if you’re based in the UK you will know that the weather has been pretty half-hearted this summer… a nice week in July followed by one of the wettest Augusts on record… STANDARD!
I don’t know if it’s just me but I’m sure September seems to be getting nicer each year. I have wonderful memories of sitting on Southwold beach last September, after all the kids had gone back to school, thinking how lucky I was to still be enjoying temperatures in the 30s (that’s well into the 90s in American money!).
It is such a beautiful place and was one of those days that felt like the summer was going to go on forever.

This post contains affiliate links. This means if you click a link to a product and go on to make a purchase, I receive a small percentage of the sale at no extra cost to you. You can read my full affiliate disclosure here.
So, as August draws to a close, but before all the chunky knitwear is needed, I am launching the crochet pattern for my timely named, and quick make, The Indian Summer Tank.
Made from the Original Lily Sugar n Cream Cotton Prints (aff) in Denim Blue, it’s just right for that seasonal change, keeping you warm as the temperatures start to drop but staying cool when the sun is up!
This pattern works up super fast using moss stitch which is a personal favourite of mine because it’s so pleasing and relaxing to work. This is an ideal project for a beginner wanting to make their first garment or a more experienced crocheter wanting a quick and fun project.
An ad-free PDF version of the pattern is available to purchase on Ravelry, Etsy or Love Crafts which gives full detailed instructions for sizes S, M, L, X1 and X2. The free pattern provides instructions for size S only.
I hope you enjoy this project, and as always would love to hear your feedback and see pictures of any finished items! You can add a project in Ravelry, tag me on any of my socials or use #DoraDoes
If you have any questions, please feel free to leave a comment and I’ll do my best to answer them!
Happy Hooking!
Dx
Pattern Notes
- The free pattern provides instructions for the size small only.
- You can purchase the add free PDF version of this pattern on Ravelry, Etsy or Love Crafts which has detailed instructions for size S, M, L, X1 and X2.
- Numbers at the end of a row indicate the number of stitches in that row
- Ch2 counts as 1 single crochet and a ch1
- Ch1 spaces are included in the stitch count
Materials
Hook: 5.5mm (size I)
Yarn: ~ 250g, 480yds of any Medium Worsted Weight / Aran Cotton Yarn.
The piece in the pictures used just under 5 50g balls of Lily’s Original Sugar n Cream Prints in Denim Blue
Gauge
14 sts and 16 rows in 10cm of moss stitch pattern repeat using a 5.5mm crochet hook or size needed to obtain gauge.
Learn how to make and measure a gauge swatch here
Stitches & Abbreviations (US terms):
- ch = chain
- fsc = foundation single crochet – learn how to make foundation single crochet here
- st(s) = stitches
- sl st = slip stitch
- sc = single crochet
- sp = space
- sk = skip
- yo = yarn over
The Indian Summer Tank Top Pattern – Size Small
The back panel
Body
Row 1: Fsc 50. Ch2. Turn
Row 2: Sk first fsc, sc in next fsc *ch1, sk next fsc, sc in next fsc*. Repeat* across to the end. Ch2 (counts as sc, ch1 for next row). Turn (50)
Row 3: Sc in first ch1 sp from previous row. *ch1, sk next sc, sc in next ch1 sp*. Repeat across to the end working the final sc in the ch1 sp created by the ch2 at the start of the previous row. Ch2. Turn (50)
Rows 4-48: Repeat row 3 (50)
Decrease for arm holes
Row 49: Starting with the ch2 you made at the end of the last row, sk first ch1 sp, then sc in the 2nd ch1 sp. Continue to work the row 3 pattern across the piece, finishing in the ch1 sp second from the end. Sl st in the end ch1 sp. Ch2. Turn (46)
Row 50-53: Repeat row 3 (46)
Row 54: Repeat row 49 (42)
Row 55- 57: Repeat row 3 (42)
Row 58: Using the row 3 repeat work 20 stitches across using the same stitch pattern, sk 1sc and ch1 sp and work 20 stitches to the end (40)
Straps and shoulders
The Straps are worked the same way starting from the edge of the piece and working inwards. Because the work has no right side or wrong side at this point you can work from either side.
You can start working the first strap without fastening off and will need to join new yarn for the second strap.
Repeat the below instructions once on each side of the back piece
Row 59: Row 3 repeat across from the edge to the centre of the piece. Ch2. Turn (20)
Row 60: Repeat Row 3 (20)
Row 61: Row 3 repeat across finishing in the last but one ch1 sp, sl st in the last ch1 sp. Ch2. Turn (18).
Row 62: Starting in the first ch1 sp, complete a row 3 repeat across to the end. Ch 2. Turn (18)
Row 63: Row 3 repeat across finishing in the last but one ch1 sp, sl st in the last ch1 sp. Ch2. Turn (16)
Row 64: Starting in the first ch1 sp, complete a row 3 repeat across to the end. Ch 2. Turn (16)
Row 65: Row 3 repeat across finishing in the last but one ch1 sp, sl st in the last ch1 sp. Ch2. Turn (14)
Row 66: Starting in the first ch1 sp, complete a row 3 repeat across to the end. Ch 2. Turn (14)
Row 67: Row 3 repeat across finishing in the last but one ch1 sp, sl st in the last ch1 sp. Ch2. Turn (12)
Row 68: Starting in the first ch1 sp, complete a row 3 repeat across to the end. Ch 2. Turn (12)
Row 69: Row 3 repeat across finishing in the last but one ch1 sp. Ch2. Turn (10)
Row 70: Starting in the first ch1 sp, complete a row 3 repeat across to the end. Ch 2. Turn (10)
Row 71: Row 3 repeat across finishing in the last but one ch1 sp, sl st in the last ch1 sp. Ch2. Turn (8)
Row 72: Starting in the first ch1 sp, complete a row 3 repeat across to the end. Ch 2. Turn (8)
Row 73-82: Repeat Row 3 (8)
The Front Panel
Body
Row 1: Fsc 50. Ch2. Turn (50)
Row 2: Sk first fsc, sc in next fsc *ch1, sk next fsc, sc in next fsc*. Repeat* across to the end. Ch 2 (counts as sc, ch1 for next row). Turn (50)
Row 3: Sc in first ch1 sp from previous row. *ch1, sk next sc, sc in next ch1 sp*. Repeat across to the end working the final sc in the ch1 sp created by the ch2 at the start of the previous row. Ch2. Turn (50)
Rows 4-48: Repeat row 3 (50)
Decrease for arm holes
Row 49: Starting with the ch2 you made at the end of the last row, sk first ch1 sp and sc in the 2nd ch1 sp. Continue to work the pattern across the piece, finishing in the ch1 sp second from the end. Sl st in the end ch1 sp. Ch2. Turn (46)
Row 50-52: Repeat row 3 (46)
Row 53: Using the row 3 repeat, work 22 stitches across, sk 1sc and ch1 sp and work 22 stitches across (44).
Row 54: Repeat Row 49 (40)
Row 55- 56: Repeat Row 3 (40)
Straps & Shoulders
The Front straps start 2 rows lower than the back but are worked in a similar manner, starting from the edge of the piece and working inwards.
You can start the first strap by working without fastening off and will need to join new yarn for the second strap.
Repeat the below instructions twice – once on each side of the front piece
Row 57: Row 3 repeat across from the edge to the centre of the piece. Ch2. Turn (20)
Row 58: Repeat Row 3 (20)
Row 58: Row 3 repeat across finishing in the last but one ch1 sp, sl st in the last ch1 sp. Ch2. Turn (18)
Row 59: Starting in the first ch1 sp, complete a row 3 repeat across to the end. Ch 2. Turn (18)
Row 60: Row 3 repeat across finishing in the last but one ch1 sp, sl st in the last ch1 sp. Ch2. Turn (16)
Row 61: Starting in the first ch1 sp, complete a row 3 repeat across to the end. Ch 2. Turn (16)
Row 62: Row 3 repeat across finishing in the last but one ch1 sp, sl st in the last ch1 sp. Ch2. Turn (14)
Row 63: Starting in the first ch1 sp, complete a row 3 repeat across to the end. Ch 2. Turn (14)
Row 64: Row 3 repeat across finishing in the last but one ch1 sp, sl st in the last ch1 sp. Ch2. Turn (12)
Row 65: Starting in the first ch1 sp, complete a row 3 repeat across to the end. Ch 2. Turn (12)
Row 66: Row 3 repeat across finishing in the last but one ch1 sp. Ch2. Turn (10)
Row 67: Starting in the first ch1 sp, complete a row 3 repeat across to the end. Ch 2. Turn (10)
Row 68: Row 3 repeat across finishing in the last but one ch1 sp, sl st in the last ch1 sp. Ch2. Turn (8)
Row 69: Starting in the first ch1 sp, complete a row 3 repeat across to the end. Ch 2. Turn (8)
Row 70-80: Repeat Row 3 (8)
Joining
I would recommend blocking each piece before joining.
Lay and pin the two pieces together up the side seams and at the shoulders.
The Right Side will now be facing inwards.
Sides
Starting about 3 inches from the bottom, Mattress or whip stitch up each side to the beginning of the arm hole decrease (From Row 12 to Row 48). The slit at the sides this create allows the top to sit comfortably on the hips.
Shoulders
Shoulders
Sew together the top of the shoulders across the 8 st at the top working a mattress stitch.

Finishing
Turn the top the right way round.
Armholes
Work 3 rows of sc around the arm holes, fasten off and sew in ends. You can work more or less rows here if you want to change the width of the shoulders but i would recommend a minimum of 2 rows.
Neckline
Work 3 rows of sc around the neckline, fasten off and sew in ends. Again you can work more or fewer rows here but you will need a minimum of 1 row to smooth out the decreases.
Bottom Hem
Work a single row of sc along the bottom hem and up and round the 3in slits created by starting the side seams at row 12.
Enjoy your Indian Summer!!
Disclaimer: Whilst I endeavour to ensure all patterns are error free, occasional typos or errors may slip through. No liability is accepted for this or subsequent variation in finished projects. However, please do contact me if you think the pattern contains an error or you are unsure about interpreting the instructions.
Information in this crochet pattern is given for reference only. Any reliance on information given in this document and associated reference materials is at your own risk. This pattern falls under Dora Does Terms of Service
Copyright Dora Does 2018. This pattern is for personal use only and may not be shared or reporduced without written consent.


How long (wide) should the 50 foundation stitches be? If 7 stitches are 2 inches, the 50 stitches would be 14 inches wide. Is this correct?
That’s about right yes, though I find my foundation row is always a little longer and will tighten up as I go, so if it’s longer I wouldn’t worry too much. This is a fitted top with negative ease, so if your gauge is more relaxed it shouldn’t be too much of an issue. (Though if your gauge is tighter I would add stitches to ensure a comfortable fit.)
I really like this. I am going to try it!
Thank you! Let me know how you get on!! ?
Boy oh boy is that cute. Definitely have to have this and very reasonably priced too. Thank you for that and a wonderful pattern. I can’t get the suggested yarn near me and shipping to the UK is exorbitant. Do you have any suggestions for a UK yarn to make this with?
Hi, thank for the lovely comments! I’m based in the UK too and Hobbycraft stock the Sugar n Cream suggested yarn now! You can find it here http://www.hobbycraft.co.uk/lily-sugar-n-cream-denim-blue-prints-yarn-57-g/622339-1000
However if you don’t have one near you, Sirdar do a lovely Aran cotton that I’ve worked with before and I think would work with this pattern really well too.
Acrylic yarn would work just as well but the top would have much more stretch so just keep an eye that the gage is on track!!
Dx
Gorgeous!!
Thank you ?