Festive Crochet Friends: Christmas Decoration Pattern

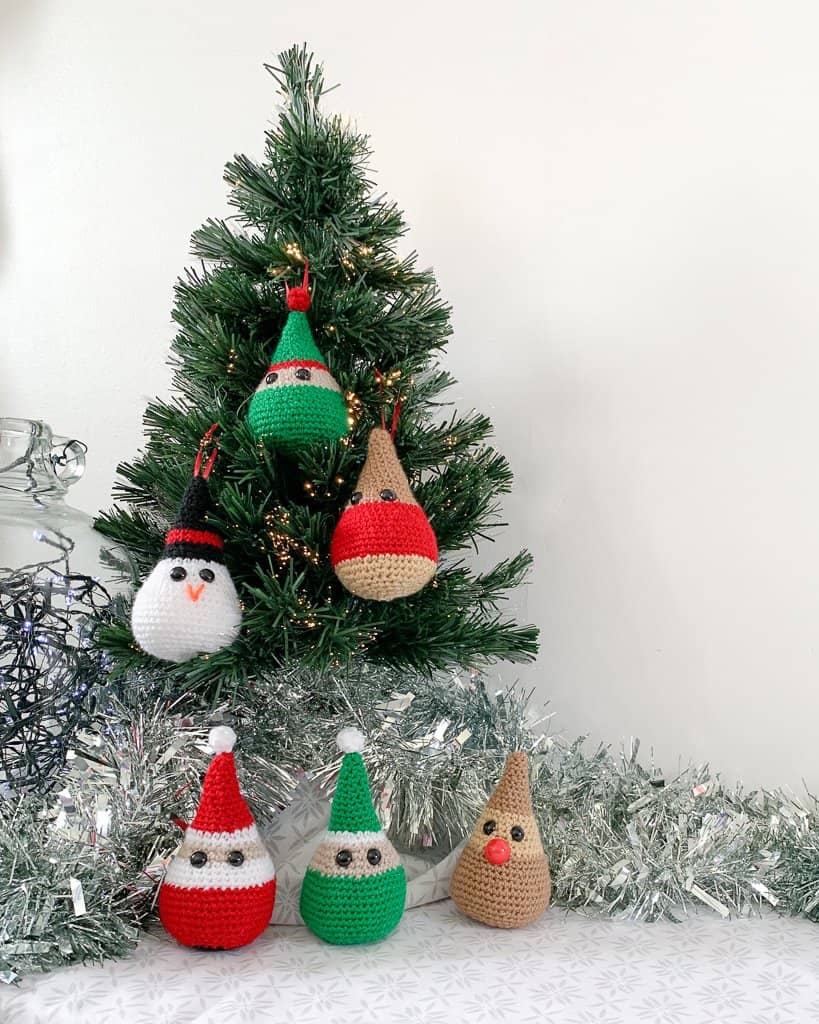
Introducing my Festive Friend Crochet Ornament collection. 5 simple characterful crochet Christmas decorations to bring some simple joy to your home this holiday season.
We are often so pushed for time around the festive season, so this year, I wanted to create some really easy, quick and modern xmas tree decoration patterns.

This post contains affiliate links. This means if you click a link to a product and go on to make a purchase, I receive a small percentage of the sale at no extra cost to you. You can read my full affiliate disclosure here. As an Amazon Associate I earn from qualifying purchases.
Safety Note: These crochet ornaments are intended for decorative purposes only. This design is not a toy and the ornaments should be kept away from babies, infants children and pets. Small parts, such as (but not limited to) the safety eyes or the ‘faux pom pom’ can be a choking hazard. Ensure all parts are securely and safely attached. See terms of service and disclaimer.

About the crochet ornament pattern
All of the ornaments are made using the same basic crochet pattern. The changes in yarn colour and finishing create the different characters. I love that a few simple bands of colour can create identifiable characters!
Below you’ll find the pattern for the basic shape, using the colour changes to create the Elf. This includes a photo guide.
The full PDF pattern includes the basic pattern along with a simple chart outlining the colour changes for each character. I have also written the pattern out for each character separately in order to accommodate the way different crocheters prefer to read patterns.
The PDF also includes a more extensive photo guide and a section giving tips for crocheting amigurumi.


How to purchase a Dora Does crochet pattern:
I sell my PDF crochet patterns in my Etsy, Ravelry and Love Crafts stores. You can purchase this pattern on any of these platforms, depending on your preference. Simply click the relevant links throughout this pattern page to be taken to the listing, or visit the store homepages in the links at the start of this paragraph.
Pattern Notes
General Notes
- Please read the pattern and associated notes through before starting your project
- This pattern uses standard US crochet terms (UK equivalents are given in brackets in the abbreviations list)
- Numbers at the end of a round indicate the number of stitches in that round and are only given where there is a change
- Unless otherwise indicated, stitches should be worked in consecutive stitches
- Instructions written after *asterisks should be repeated as indicated
- The characters created from this pattern are designed for decorative purposes only and not intended to be used as toys. Please exercise caution when using small parts around children, infants and pets

Construction
- The decorations are worked top down in continuous rounds (without joining or turning at the end of each round)
- Below you will find the instructions to create the Elf
Skills Used
- Knowledge of basic crochet stitches and terminology
- Working in continual rounds
- Simple increases and decreases
- Changing colours
You can find some additional useful tips for crocheting amigurumi in this post.

Materials
Crochet Hook: 3.5mm crochet hook
I used a Clover Amour Crochet Hook for this project – one of my favourites – learn more about different crochet hooks here.
Yarn Requirements: Each decoration requires around 10-12g / 30-40m of double knit (dk) yarn.
For the majority of the pattern I used Paintbox yarns Simply DK. I used beige yarn from my stash, which had long since lost the ball band, so in this case I have suggested alternatives.
Colours used for the Elf
I have used generic colour names in the pattern, but have outlined below what yarns and shades I used in the elf pictured here.
- Green: Paintbox yarns Simply DK in Grass Green (Shade 129) (Kelly green from Stylecraft is a great sub)
- Red: Paintbox yarns Simply DK in Pillar Red (Shade 114) or White: Paper White (Shade 100): these are interchangeable depending on whether you want a red or white trim to the hat! I use red in the photo tutorial
- Beige: This one was stash yarn. Stylecraft Special DK, King Cole Pricewise and Hayfield bonus DK (which I think is the one I used) all have good shade options
Substitution Options
This pattern can be worked with pretty much any yarn. Using a different yarn weight will change the size of the finished item and the amount of yarn required.
I recommend using a hook on the small size for your yarn to ensure you get a tight fabric.
You may find this post useful in choosing a substitute yarn.
Other
- Place marker to mark rounds (or scrap of contrasting yarn)
- Stuffing to fill your decoration. I used hollow fibre stuffing similar to this, but any safe stuffing will do. I think these would work well as mini bean bags too!
- Safety eyes: I used two plain black 10mm safety eyes for each decoration – WARNING: it is essential that items with small parts like this are kept away from babies, infants, toddlers, children and pets as they are a choking hazard. As an alternative you can embroider the eyes with thread.
- Optional: 6-8cm lengths of ribbon or yarn (per decoration) for hanging loop
- Yarn needle & scissors
Gauge
Gauge is not essential for this pattern. Using the materials stated, I achieved a tension as follows;
24 sts and 24 rows in 10cm / 4in of single crochet worked in continual rounds, using a 3.5mm crochet hook or size needed to obtain gauge.
Different tension will result in a different size finished item.
Measurements & Finished Size
Each decoration measures approximately 12cm / 5in tall and about 8cm / 3in wide.
The size will depend on how tightly you crochet. The tighter you crochet, the smaller your finished item. I am generally a relaxed crocheter so you may find yours are smaller!
The finished size will also depend on how full you stuff your decoration.
Stitches & Abbreviations: US terms
(UK Equivalent in Brackets)
- dc = double crochet (UK treble crochet) – used for ‘pom pom’ only
- MR = magic ring – see special stitches (modification offered)
- rep = repeat
- rs = right side
- sc = single crochet (UK double crochet)
- sc2tog = single crochet 2 together (UK double crochet 2 together) – see special stitches
- st(s) = stitch(es)
- yo = yarn over
Special Stitches
Magic Ring
You can find a photo and video tutorial on how to create a magic ring here. If you are not familiar with the magic ring for working in the round then you can ch2 and work the first round into the second chain from hook.
Single Crochet 2 Together (sc2tog)
You can find a tutorial for this stitch here
Insert hook, yo, pull up a loop (2 loops on hook), insert hook into next st, yo, pull up a loop (3 loops on hook), yo, pull through all 3 loops to complete the stitch.

All of the characters use the same basic pattern with colour changes made in different places.
The PDF version of the pattern includes details for all 5 characters and can be purchased from Etsy, Love Crafts or Ravelry.
The Festive Friend Elf Pattern
Below is the free pattern for the festive elf including photo guides as you go along.
Using your green yarn and a 3.5mm crochet hook, make a MR;
Round 1 (rs): Work 6sc in MR, do not join or turn. 6 sts

Round 2: Starting in the top of the first st from the previous round, 1sc in each st to end. 6 sts
Round 3: *1sc in next st, 2sc in next st; rep from * to end. 9 sts
Round 4: 1sc in each st to end

Round 5: *1sc in next 2 sts, 2sc in next st; rep from * to end. 12 sts
Round 6: As Round 4
Round 7: *1sc in next 3 sts, 2sc in next st; rep from * to end. 15 sts
Round 8: As Round 4

Round 9: *1sc in next 4 sts, 2sc in next st; rep from * to end. 18 sts
Round 10: As Round 4
Round 11: *1sc in next 5 sts, 2sc in next st; rep from * to end. 21 sts
Round 12: As Round 4
Fasten off green yarn and use the invisible join to weave in your ends. I recommend using this method with all colour changes moving forwards.

Join your Red yarn to create the brim of the hat. (If you want a white brim, join white yarn here

Round 13: *1sc in next 6 sts, 2sc in next st; rep from * to end. 24 sts
Round 14: As Round 4
Fasten off red yarn and join your beige yarn.
Round 15: *1sc in next 3 sts, 2sc in next st; rep from * to end. 30 sts
Round 16: As Round 4
Round 17: *1sc in next 4 sts, 2sc in next st; rep from * to end. 36 sts
Round 18: As Round 4
Fasten off your beige yarn and join green yarn
Rounds 19: *1sc in next 5 sts, 2sc in next st; rep from * to end. 42 sts
Round 20: As Round 4

Rounds 21: *1sc in next 6 sts, 2sc in next st; rep from * to end. 48 sts
Rounds 22 – 25: As Round 4
Round 26: *sc2tog, 1sc in next 6 sts; rep from * to end. 42 sts
Round 27: *sc2tog, 1sc in next 5 sts; rep from * to end. 36 sts
I suggest you add your safety eyes, leaving about 3 stitches clear between the two eyes, and partially stuff your decoration at this stage.
Reminder: This item is designed for decorative purposes only. It is not intended to be a toy. If babies, infants or children are likely to come into contact with the decorations, you may prefer to embroider the eyes. Safety eyes are a choking hazard so please use responsibly. For similar safety reasons, the decorations should also be kept away from pets or animals.

Round 28: *sc2tog, 1sc in next 4 sts; rep from * to end. 30 sts
Round 29: *sc2tog, 1sc in next 3 sts; rep from * to end. 24 sts
Round 30: *sc2tog, 1sc in next 2 sts; rep from * to end. 18 sts
Round 31: *sc2tog, 1sc in next st; rep from * to end. 12 sts
Finish stuffing the decoration
Round 32 (dec): sc2tog around. 6 sts

Fasten off and use tail to weave the final round closed
Faux pom pom
I created a ‘pom pom’ for the elf’s hat by making a single popcorn stitch, working with yarn held double stranded. As follows;
Using a 3.5mm hook and holding 2 strands of red yarn together;
Make a MR (if you’re not using the MR, ch3 and work into the 3rd ch from hook);
- Step 1: Work 5dc into the MR, pull the loop mostly closed but do not tighten
- Step 2: Remove hook from loop (ensuring you leave the loop open)
- Step 3: Insert the hook from back to front through both loops of the first dc
- Step 4: Catch the loop from the 5th dc and pull it tightly through both loops of the first
- Step 5: Slip stitch into the magic loop and pull it securely closed.

Fasten off, sew in the tails, using the last one to secure your bobble pom-pom to the hat.

Hanging loop
To add a hanging loop to your decoration so you can attach it to your tree, take a length or ribbon or yarn of about 8cm, using a crochet hook, thread one end through the tip of the decoration (behind the pom pom if you added one), tie both ends together and trim the excess.
If your ribbon or yarn is fine enough, you may choose to twist the loop so the knot is hidden inside.

Then repeat the process with different colours to create your case of friends!
Remember, you can purchase the full add-free printable PDF pattern with all the characters, from Ravelry, Etsy or Love Crafts. This includes a text only version of the pattern, a separate photo tutorial, a colour chart and separate written pattern for each of the 5 characters.
Sharing your finished makes
I love seeing your finished makes – it gives me all the happy feels, especially during the holidays!
So here’s how you can share them on social media, if that’s your cup of tea!
- On Instagram, you can use the hashtag #DoraDoes to share your finished projects or just tag me @doraexplored
- If you have the bug for creating garments, why not join my dedicated facebook group “My Crochet Wardrobe” and share them there?
- Sign up to the WiP Tip for weekly crochet chat, offers and exclusives straight to your inbox – click here to sign up
Happy Hooking
Dx
More Christmas crochet patterns
Copyright Dora Does Limited, Registered in England, Company Number 13992263. This pattern is for personal use only and may not be shared or reproduced in written, photo, video or any other form without prior written consent. All rights reserved. Terms of service.
Can use use these ornaments as chocolate orange covers?
Hi there,
They would be a bit small for a chocolate orange cover as is, but if you work with a thicker yarn weight or continue with the increases they could probably be adjusted to fit without too much fuss (depending on your experience level). You would need to keep the colour changes proportionate if you’re adding more rounds. I hope that helps.
Dora
Tireless, my dear – and very praiseworthy !
I read all your posts, regardless of the likelihood of my making {whatever}, because your enthusiasm is delightful.
And so are you, my soon-to-be-ever-so-chilly mate.
Down here, I’m happy not to be using the damned split system any more.
[grin]
Thank you as always 😊😊