Scandi Stashbuster Beanie Hat
The Scandi Stashbuster Beanie is a free, easy top-down crochet bobble hat pattern which can be made in a variety of colours and patterns to use up left over yarn.
About the Scandi Stashbuster Crochet Beanie
I love finding ways to use up last over yarn, so stash busting projects are a bit of a passion project. This one uses a simple moss stitch hat pattern which can be easily adjusted to work with any colour combination.
It also uses a finer yarn, making it a perfect way to show off mini skeins in 4ply or light dk yarn weights.
I don’t often see crochet hat patterns using lighter weight yarns, but I love making and wearing them because they are so cosy! Especially when worked with a solid crochet pattern like moss stitch which has few holes.
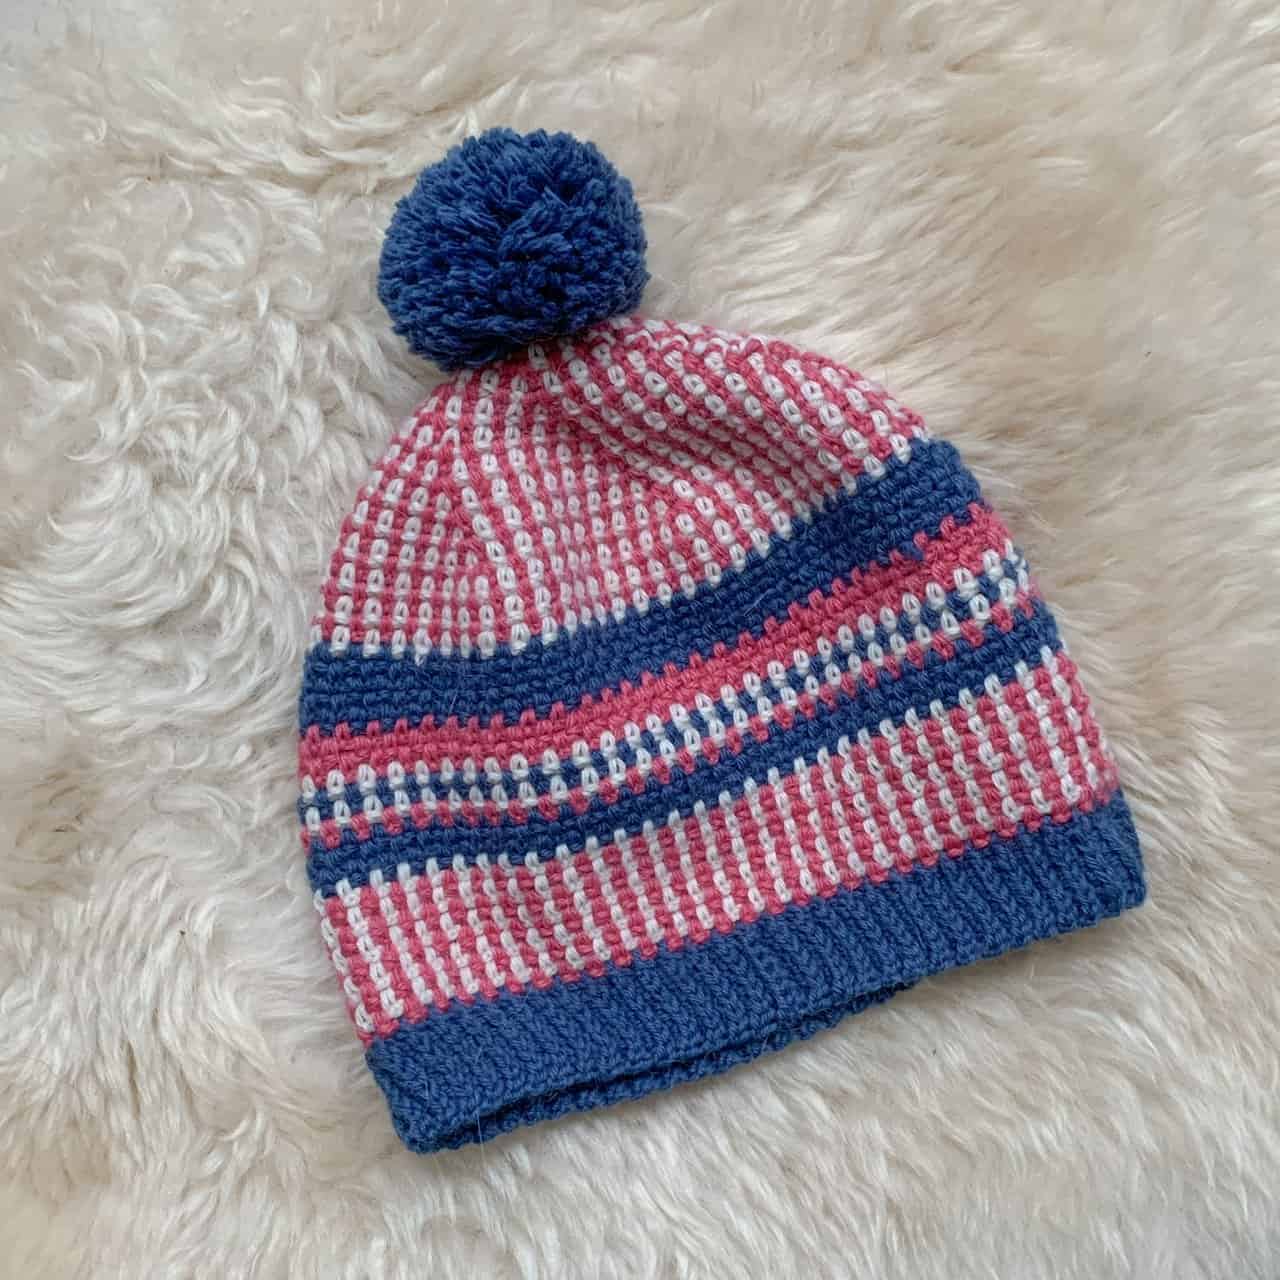
I designed this hat using the left over yarn I had from the making the Geometric Joy Shawl, made earlier this year in collaboration with UK alpaca.
I always adored the scandinavian folky vibe the colour combination created so was excited to realise I could make a hat from the left overs! I had about 90g left in a combination of the colours (about 45g of the blue and a 25g ish of each of the pink and cream).
You can purchase a printable PDF version of this pattern in 4 sizes from Ravelry, Love Crafts or Etsy

This post contains affiliate links. This means if you click a link to a product and go on to make a purchase, I receive a small percentage of the sale at no extra cost to you. You can read my full affiliate disclosure here. As an Amazon Associate I earn from qualifying purchases.

The hat was designed as a stash busting project, so you can use any colour combination that works for you, or work it in a single colour if you prefer. It’s one of those designs which will work in an endless variety of colour combinations.
Skills Used
This is a relatively simple pattern once you get used to the increases, which are a variation on the traditional even increase method of crocheting circles.
You’ll need knowledge of basic crochet stitches and terminology and to know how to change colours.
The pattern requires working in rounds, rows, chain spaces and back loops. You’ll also skip rows when working in the brim.


Materials
Crochet Hook
You will need a 4mm crochet hook, or size needed to obtain gauge
Yarn
You will need around 240m of fine dk, sport or 4ply yarn, which includes the pom pom, depending on the size you’re working (see measurement table for meterage by size)
The yarn I have used is described as fine DK but my experience of working with it is that it’s closer to a typical 4ply / fingering weight yarn.
UK Alpaca Superfine DK, 75% alpaca, 25% wool, 50g ball = 112m / 122 yds
Shades and quantities used in hat pictured:
Approx: 56m/50g x Midnight Blue, 30m/25g x Rose Pink, 30m/25g x Parchment (Cream)
Yarn Substitution Options
If you’re using a more traditional dk weight yarn, you may wish to reduce the number of increase rounds. Check your gauge and you can adjust your stitch count accordingly if you do not meet gauge. This hat sizing chart may help you.
This pattern will work in most fibres or fibre blends.
You may find this post useful in choosing a substitute yarn.
Other Materials & Notions
- Yarn needle, scissors and a tape measure
- Pom pom maker (optional)

Measurements & Finished Size
This free pattern gives instructions to make an adult hat which measures around 50cm in circumference and 24cm in height.
The hat is worked with around 2.5inches of negative ease so will stretch to fit.
You can change the length of the hat by adding round and change the circumference by working more or fewer increase rounds.

Pattern Notes
General Notes
Please read all the pattern notes before starting your project.
- This pattern uses standard US crochet terms (UK equivalents are given in brackets in the abbreviations list).
- Numbers at the end of a row / round indicate the number of stitches in that row / round and are only given at the start of a section or where there is a change.
- Chain 1 spaces are included in the stitch count, but chain 1 turning chains are not.
- Instructions written after *asterisks should be repeated as indicated.
- Instructions written between [square brackets] should be worked the specific number of times indicated.
- Instructions in (round brackets) should be worked in the same stitch.
Construction
- The hat is crocheted top down in rounds, joining and turning at the end of each round.
- The brim is worked directly into the last round of the hat in rows at right angles.
- There is no wrong or right side on the body of the hat, but I recommend allocating one yourself and using the wrong side to carry all your yarn when changing colours.
Colourwork
- I have described the colour changes I made in the hat pictured in the pattern, but you can change colours as and when suits.
- Colour change instructions are written in italics in the pattern
- I carried the yarn inside the hat rather than fastening off each round.

Stitches & Abbreviations: US terms
(UK Equivalent in Brackets)
- blo = back loop only
- ch = chain
- ch-sp = chain space
- rep = repeat
- RS = right side
- sc = single crochet (UK double crochet)
- sk = skip (UK miss)
- sp = space
- ss = slip stitch
- st(s) = stitch(es)
- WS = wrong side
Special Stitches
Magic Ring
You can find a photo and video tutorial on how to create a magic ring here. If you are not familiar with the magic ring for working in the round then you can ch2 and work the first round into the second chain from the hook.
Moss Stitch Pattern
This hat uses the moss stitch pattern. You can find a tutorial here if you want to understand how it works prior to starting the pattern (though it’s not essential).
In the pattern, I group the single crochet and chain 1 together in brackets (1sc, ch1), as if they are made in the same place. The ch1 isn’t actually worked into a stitch, rather it ‘floats’, but I wrote it this way to make the pattern easier to read. Particularly in the increase section.
The first stitch of each round should be worked into the last chain space of the previous round, unless otherwise indicated/
Gauge
24 sts and 24 rows in 10cm of moss stitch using a 4mm crochet hook or size needed to obtain gauge.
You may decide not to make a gauge swatch for this pattern. If this is the case, measure your gauge once you have worked several inches of the pattern to check you are on course.
This hat sizing chart will help you adjust your stitch count if you do not meet gauge.
Learn how to make and measure a gauge swatch here.
How to purchase a Dora Does crochet pattern:
I sell my PDF crochet patterns in my Etsy, Ravelry and Love Crafts stores. You can purchase this pattern on any of these platforms, depending on your preference. Simply click the relevant links throughout this pattern page to be taken to the listing, or visit the store homepages in the links at the start of this paragraph.
Disclaimer
Information given on this page, website and in associated crochet patterns and products is for reference only. Any reliance on information given on this page, website and associated reference materials is at your own risk. (see Terms of Service)
When making items, especially for babies, infants, toddlers and children, take extra care to ensure pieces are securely sewn together and be mindful of choking hazards and health and safety risks.
Pom pom safety warning:
Pom poms can be a choking hazard for infants and babis, especially if the small pieces of yarn come loose. I do not recommend adding pom poms to hats or other items intended for use by babies, infants, toddlers or children. Children, toddlers, infants and babies should never be left unattended with pom poms or whilst wearing crocheted hats. The safety of babies, infants, toddlers and children is paramount. Please be cautious and use your own judgement.

You can purchase the full PDF pattern which includes instructions in 4 sizes from child to large adult from Love Crafts, Ravelry or Etsy.
The Scandi Stashbuster Crochet Beanie Hat Pattern
The generic pattern is written below for multiple sizes. The colour changes suggested to achieve the look you see in the hat pictured are included in a table after the pattern. They are listed out size by size.
Remember, this is a stash busting design so you can really go your own way with colour changes.
Purchase the premium PDF pattern in 7 sizes from Etsy or Ravelry.
Hat Body
Start with Pink yarn and for Rounds 1 – 26 alternate between Pink and Cream each round, finishing on a round in Cream.
Make a magic ring
Round 1: Ch1 (turning ch does not count as st throughout), [1sc, ch1 into magic ring] three times, ss to top of first sc, turn. 6 sts
Round 2: Ch1, *(1sc, ch1) in next ch1-sp, (1sc, ch1) in next sc; rep from * to end, ss to top of first st, turn. 12 sts
Round 3: Ch1, *(1sc, ch1) in next ch1-sp, sk next sc; rep from * to end, ss to top of first st, turn
Round 4: As Round 2. 24 sts
Round 5: As Round 3
Round 6: Ch1, *[(1sc, ch1) in next ch1-sp] twice, (1sc, ch1) in next sc; rep from * to end, ss to top of first st, turn. 36 sts
Round 7: As Round 3
Round 8: Ch1, *[(1sc, ch1) in next ch1-sp] three times, (1sc, ch1) in next sc; rep from * to end, ss to top of first st, turn. 48 sts
Round 9: As Round 3
Round 10: Ch1, *[(1sc, ch1) in next ch1-sp] four times, (1sc, ch1) in next sc; rep from * to end, ss to top of first st, turn. 60 sts
Round 11: As Round 3
Round 12: Ch1, *[(1sc, ch1) in next ch1-sp] five times, (1sc, ch1) in next sc; rep from * to end, ss to top of first st, turn. 72 sts
Round 13: As Round 3
Round 14: Ch1, *[(1sc, ch1) in next ch1-sp] six times, (1sc, ch1) in next sc; rep from * to end, ss to top of first st, turn. 84 sts
Round 15: As Round 3
Round 16: Ch1, *[(1sc, ch1) in next ch1-sp] seven times, (1sc, ch1) in next sc; rep from * to end, ss to top of first st, turn. 96 sts
Round 17: As Round 3
Round 18: Ch1, *[(1sc, ch1) in next ch1-sp] eight times, (1sc, ch1) in next sc; rep from * to end, ss to top of first st, turn. 108 sts
Round 19: As Round 3
Round 20: Ch1, *[(1sc, ch1) in next ch1-sp] nine times, (1sc, ch1) in next sc; rep from * to end, ss to top of first st, turn. 120 sts
Rounds 21 – 26: As Round 3
Change to Blue
Rounds 27 – 31: As Round 3
Change to Pink
Rounds 32 – 34: As Round 3
Change to Cream
Round 35: As Round 3
Change to Blue
Round 36: As Round 3
Change to Cream
Round 37: As Round 3
Change to Pink
Round 38: As Round 3
Change to Blue
Rounds 39 – 41: As Round 3
Change to Cream and continue to alternate between Cream and Pink for the remainder of the hat body
Rounds 42 – 51: As Round 3
Change to Blue, continue to Brim

Brim
Working at right angles to the hat body
Row 1 (RS): Ch8, 1sc in second ch from hook and next 6 ch, ss into ch1-sp on last row of hat, turn. 7 sc, 1 ss
Row 2 (WS): Sk ss, 1ss into BLO of next 7 sts, turn. 7 ss
Row 3: Ch1, 1sc in each of the unworked back loops of the sc 2 rows below, ss into the next ch1-sp on the last round of the hat, turn. 7sc, 1 ss
Repeat Rows 2 and 3 around the hat finishing on a Row 2 rep.
To join ss through the back loop of the last row of sc and the corresponding st on the starting ch.
You may find that the ribbing leans a little as you work around, but this will straighten out with wear or with some gentle blocking.
Fasten off and weave in ends
Add a Pom Pom to finish if desired / appropriate.

Sharing your finished makes
I hope you enjoyed working this pattern and would love to see the colour combos you have been using.
Here’s how you can share them on social media, if that’s your cup of tea!
- On Instagram, you can use the hashtag #HookMeHappy or #ScandiStashbusterBeanie or just tag me @doradexplored
- You add your pics to my Facebook page
- If you have the bug for creating garments, why not join my dedicated facebook group “My Crochet Wardrobe” and share them there?
- If Pinterest is your happy place, you can add them there too – check out my Pinterest account for lots more crochet inspiration from makers across the web!
Happy Hooking
Dx
Copyright Dora Does Limited, Registered in England, Company Number 13992263. This pattern is for personal use only and may not be shared or reproduced in written, photo, video or any other form without prior written consent. All rights reserved. Terms of service.
Hi Dora, thanks for the pattern. I made it to the brim and well, I’m struggling. Because… 1) at the end of row 1 there’s an ss to be made – where should it go? 2) I suppose after that ss one should turn the work? 3) Then row 3 calls for sc’s worked in unworked back loops of sc’s 2 rows before. But the ss of row 2 were already worked in BLO so logically there’s no BL left to work in… I would love to finish this hat for Friday (it’s a gift…) but start sweating… please help!
Hi there, so first off, the slip stitches go into the next stitch on the last round of the hat (the chain works away from the hat and the second part of row 1 works back towards it), so you’ll finish that row back where you started it. With respect to the back loop. I will to back en recheck the pattern on this as soon as I have a mo, but if my memory serves, back loop is always relative to where you’re working. So when you were working in the back loop it was the front loop, but when you flip it it becomes the back loop. As I say, I’ll work up a sample to clarify this, but essentially, it’s the unworked loop you’re looking for. I hope that helps.
I really like this and am looking forward to trying the pattern. 🙂
Thanks – I hope you enjoy it!