
Flat out crochet make-up & drawstring toiletry bag: Free crochet pattern

The ‘flat out’ crochet toiletry bag pattern is a simple, clever crochet pattern for a circular make-up bag.
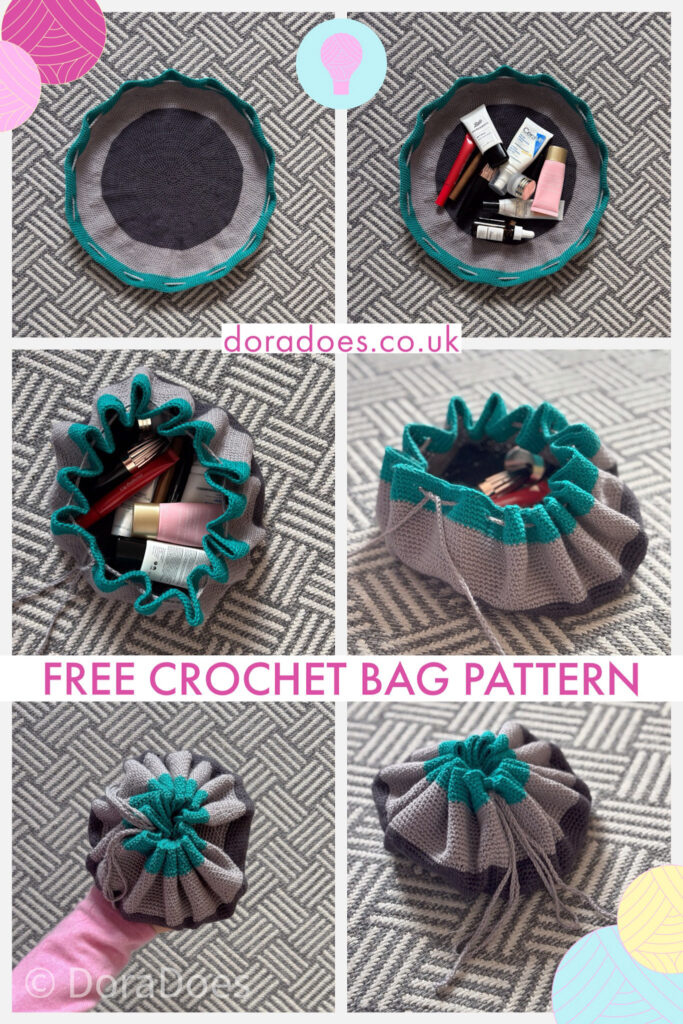
The flat circle drawstring design allows easy access to the contents and changes shape to accommodate the contents.
You can purchase an ad-free, printable PDF version of this crochet pattern from Etsy, Ravelry or Love Crafts for a small fee.
This post contains affiliate links. This means if you click a link to a product and go on to make a purchase, I receive a small percentage of the sale at no extra cost to you. You can read my full affiliate disclosure here.


About the flat out crochet bag design
A couple of months back I had a mini-getaway with a friend and she had what she called a flat-lay make up bag. It was a large circle with a drawstring around the outside.
She could just drop all her contents in the centre and pull the drawstring to close it. No awkward fiddling with zips or trying to jam that blusher brush in at just the right angle!
Such a simple idea, and such an effective way to carry all those odd shaped lotions and potions!

I’ve been thinking about it ever since and finally decided to create a crochet version.
I’ve never seen it done with crochet other than for small dice bags. Indeed, you could follow this crochet pattern and stop earlier to create a smaller circle which would make a great crochet dice bag. Or a marble bag or any other small trinkets.
It really is a super versatile pattern which had tons of uses and is all based on the simple concept of crocheting flat(ish) circles!
So let’s get to the pattern then…




Pattern Notes
General Notes
- Please read through the pattern and all associated notes before starting your project
- This pattern uses standard US crochet terminology (UK equivalents are given in brackets in the abbreviations list where applicable)
- Numbers at the end of a round indicate the number of stitches in that round
- Unless otherwise indicated, stitches should be worked in consecutive stitches
- Instructions written after an *asterisk should be repeated as indicated
Construction
- The pattern is crocheted in a circle, from the centre out, in continuous rounds
- I recommend using a stitch marker to mark the first stitch of each round
- The circle may not lie completely flat – this is intentional to create a little extra volume in the bag
- The edges of the circle will curl up when finished (see images at the end of the pattern)

Skills Used
- Knowledge of basic crochet stitches, techniques and terminology is assumed
- Working flat circles in continual rounds with simple increases
- Chaining and skipping stitches
- You may wish to use the invisible join when fastening off or changing colours

Materials
Crochet Hook
3.5mm crochet hook, or size needed to create a tight opaque fabric with your chosen yarn.
I used my clover amour hook.
Yarn
Approximately 100g or 300m/330yds of 4ply / fingering weight yarn in a cotton or cotton bamboo blend.
The item pictured uses Scheepjes Bamboo Soft, fingering weight, 50% Bamboo, 50% Cotton, 50g ball= 150m/165yds. Amounts and shades of each colour listed below;
- Approximately 40g (120m/132yds) of Colour A = Smoky Diamond (Shade 263)
- Approximately 40g (120m/132yds) of Colour B = Antique Silver (Shade 264)
- Approximately 20g (60m/66yds) of Colour C = Jade Lapis (Shade 258)
Yarn Substitution Options
I recommend a cotton, bamboo and cotton blend yarn because of its lack of stretch. This provides structure, helps the bag to keep its shape and makes it a little more hardy than the result I would expect from an acrylic or wool yarn.
Different fibres and yarns will produce a different finished result. You may find this post useful when choosing yarn.
Other Materials & Notions
- 1 Stitch marker to mark the first stitch of each round (this will help you to keep track of where the round starts and finishes to reduce the need for counting too high!)
- Yarn needle and scissors

Measurements & Finished Size
The finished bag is offered in one size. It has a diameter of 38cm when laid flat.
When filled and closed up, the circumference measures 55cm, the width from side to side is 18cm and the height is 9cm.
The size and shape of the bag will change depending on its contents, so these measurements are a rough guide only.
How to adjust the finished size
You can change the size of the bag by changing the number of rounds you work:
- For a larger bag, you can continue to increase in the established pattern until it reaches your desired size, then work the non increase rounds for the edges
- For a smaller bag stop increasing sooner, then work the non-increase rounds
- In both cases, ensure you finish with a multiple of 20 stitches before you work the non-increase rounds to accommodate the eyelet multiples
This post explains the theory behind working flat crochet circles and may help you understand better how to adjust the size.
You may also wish to experiment with different yarn weights as a way to create a different size bag. A heavier yarn weight with the same number of stitches as the pattern will create a larger bag. This post on yarn weights will explain why this is the case.
Because the size of the bag is relatively easy to adjust, gauge is not essential in this pattern. What matters is that you create a tight fabric with few/small holes to stop the contents poking through or getting caught.

How to purchase a Dora Does crochet pattern:
I sell my PDF crochet patterns in my Etsy, Ravelry and Love Crafts stores. You can purchase this pattern on any of these platforms, depending on your preference. Simply click the relevant links throughout this pattern page to be taken to the listing, or visit the store homepages in the links at the start of this paragraph.
Stitches & Abbreviations: US terms
(UK Equivalent in Brackets)
- ch = chain
- ch-sp = chain space
- MR = magic ring – see special stitches
- rep = repeat
- RS = right side
- sc = single crochet (UK double crochet)
- sk = skip (UK miss)
- sp = space
- st(s) = stitch(es)
- WS = wrong side
Special Stitches
Magic Ring (MR)
You can find a photo and video tutorial on how to create a magic ring here.
If you are not familiar with the magic ring for working in the round then you can ch2 and work the first round into the second chain from the hook

Purchase the ad-free printable PDF of this pattern from Ravelry, Etsy or Love Crafts.
Flat out crochet drawstring bag pattern
Flat out is a simple circular crochet bag with a drawstring closure. Great for makeup, toiletries, dice or other trinkets.
Note that as the pattern progresses and the circle gets larger, I have added instructions to work a specific number of single crochets after the end of the increase rounds. This makes each round start a little further on.
I have done this intentionally, calculating the numbers to ensure that the increases are staggered so you end up with a nice round circle rather than an octagon.
I placed these instructions on their own line, between the round instructions to avoid any confusion within each round, so I hope this is clear!
Using Colour A, make a MR;
Round 1 (RS): Make 8sc in MR, do not turn or join here or throughout. 8 sts
Round 2: 2sc in each st around. 16 sts
Round 3: *2sc in next st, 1sc in next st; rep from * to end. 24 sts
Round 4: *2sc in next st, 1sc in next 2 sts; rep from * to end. 32 sts
Round 5: *2sc in next st, 1sc in next 3 sts; rep from * to end. 40 sts
Round 6: 1sc in each st to end. 40 sts
From here on, place a stitch marker in the first stitch of each round and move it up as you work.
Round 7: *2sc in next st, 1sc in next 4 sts; rep from * to end. 48 sts
1sc in next 3 sts
Round 8: *2sc in next st, 1sc in next 5 sts; rep from * to end. 56 sts
1sc in next 2 sts
Round 9: *2sc in next st, 1sc in next 6 sts; rep from * to end. 64 sts
1sc in next 4 sts
Round 10: *2sc in next st, 1sc in next 7 sts; rep from * to end. 72 sts
1sc in next 3 sts
Round 11: *2sc in next st, 1sc in next 8 sts; rep from * to end. 80 sts
1sc in next 5 sts
Round 12: 1sc in each st to end. 80 sts
Round 13: *2sc in next st, 1sc in next 9 sts; rep from * to end. 88 sts
1sc in next 3 sts
Round 14: *2sc in next st, 1sc in next 10 sts; rep from * to end. 96 sts
1sc in next 6 sts
Round 15: *2sc in next st, 1sc in next 11 sts; rep from * to end. 104 sts
1sc in next 4 sts
Round 16: *2sc in next st, 1sc in next 12 sts; rep from * to end. 112 sts
1sc in next 7 sts
Round 17: *2sc in next st, 1sc in next 13 sts; rep from * to end. 120 sts
1sc in next 4 sts
Round 18: 1sc in each st to end. 120 sts
Round 19: *2sc in next st, 1sc in next 14 sts; rep from * to end. 128 sts
1sc in next 8 sts
Round 20: *2sc in next st, 1sc in next 15 sts; rep from * to end. 136 sts
1sc in next 5 sts
Round 21: *2sc in next st, 1sc in next 16 sts; rep from * to end. 144 sts
1sc in next 9 sts
Round 22: *2sc in next st, 1sc in next 17 sts; rep from * to end. 152 sts
1sc in next 5 sts
Round 23: *2sc in next st, 1sc in next 18 sts; rep from * to end. 160 sts
1sc in next 10 sts
Round 24: 1sc in each st to end. 160 sts
Round 25: *2sc in next st, 1sc in next 19 sts; rep from * to end. 168 sts
1sc in next 6 sts
Round 26: *2sc in next st, 1sc in next 20 sts; rep from * to end. 176 sts
1sc in next 11 sts
Round 27: *2sc in next st, 1sc in next 21 sts; rep from * to end. 184 sts
1sc in next 6 sts
Round 28: *2sc in next st, 1sc in next 22 sts; rep from * to end. 192 sts
1sc in next 12 sts
Round 29: *2sc in next st, 1sc in next 23 sts; rep from * to end. 200 sts
1sc in next 7 sts
Round 30: 1sc in each st to end. 200 sts
Change to colour B
Round 31: *2sc in next st, 1sc in next 24 sts; rep from * to end. 208 sts
1sc in next 13 sts
Round 32: *2sc in next st, 1sc in next 25 sts; rep from * to end. 216 sts
1sc in next 7 sts
Round 33: *2sc in next st, 1sc in next 26 sts; rep from * to end. 224 sts
1sc in next 14 sts
Round 34: *2sc in next st, 1sc in next 27 sts; rep from * to end. 232 sts
1sc in next 8 sts
Round 35: *2sc in next st, 1sc in next 28 sts; rep from * to end. 240 sts
1sc in next 15 sts
Round 36: 1sc in each st to end. 240 sts
Round 37: *2sc in next st, 1sc in next 29 sts; rep from * to end. 248 sts
1sc in next 8 sts
Round 38: *2sc in next st, 1sc in next 30 sts; rep from * to end. 256 sts
1sc in next 16 sts
Round 39: *2sc in next st, 1sc in next 31 sts; rep from * to end. 264 sts
1sc in next 9 sts
Round 40: *2sc in next st, 1sc in next 32 sts; rep from * to end. 272 sts
1sc in next 17 sts
Round 41: *2sc in next st, 1sc in next 33 sts; rep from * to end. 280 sts
1sc in next 9 sts
Round 42: 1sc in each st to end. 280 sts
Change to colour C
Rounds 43-45: 1sc in each st to end. 280 sts
Eyelets
Next you will create the eyelets for the drawstring to be woven through.
Round 46: *1sc in next 7 sts, ch3, sk 3 sts; rep from * to end. 280 sts
Round 47: 1sc in each st and ch, working 3sc in each ch3-sp, to end. 280 sts
Rounds 48-49: 1sc in each st to end. 280 sts
Fasten off, use the invisible join to weave in ends

Drawstring
If you like, you could use some ribbon or an alternative cord for the drawstring. I used a long chain made with Colour B. You can see a visual reference over the page.
Make a long chain about the same length as the circumference of your circle and weave in the ends. (I lost count of how many chains I made and just eyeballed it!)

With WS facing, weave the chain in and out of the eyelets until both ends meet in adjacent eyelets, coming out on the RS.
You may wish to add a knot in the end of your chain to discourage it from pulling back through the eyelet holes.


Place your contents in the centre of the circle; the dark grey part of the circle crocheted in Colour A gives you a ‘target’ for the centre of the bag, a bit like a bullseye.
The light grey area in Colour B will create the sides. The outer edge, worked in Colour C should naturally roll up and create the closure part.

To close the bag, gently pull both ends of the drawstring, holding onto the bag with your other hand until the bag closes up, with the contents inside.
To finish, tie a knot in the ends of the drawstring and make a bow, just like you would when tying your laces.

How to find me and share your finished makes
- On Instagram, you can use the hashtag #DoraDoes to share your finished projects or just tag me @doraexplored
- Sign up to the WiP Tip for weekly crochet chat, offers and exclusives straight to your inbox – click here to sign up.
- Check out my YouTube Channel for my biweekly ‘Crochet Studio Sessions’ podcast.
Happy Hooking
Dx
Copyright Dora Does Limited, Registered in England, Company Number 13992263. This pattern is for personal use only and may not be shared or reproduced in written, photo, video or any other form without prior written consent. All rights reserved. Terms of service.
I’m trying to view the pattern and when I scroll to it, the pop up to subscribe comes up but when I click sign me up, it brings me to something I cannot sign up with. I just get a page that says my Grow bookmarks but there’s nothing that I can click or add. I tried subscribing to the blog (successfully) but that didn’t seem to unlock the pattern either. Not sure what I’m doing wrong. Was hoping to make some of these bags for coworkers for Christmas this year.
Hi there,
I’m so sorry you’re having issues with the access. I will check the post to see if I can see any issues. What country are you based in as this can sometimes impact things? I also suggest you try deleting cookies as it might be a ‘cache’ issue.
I appreciate you letting me know.
Dora
I noticed that between rounds 15 and 16 it says DC in the next 4 st, and i know that these extra stitches are there so that the increases are staggered so that it is still a circle at the end instead of a Pentagon. But I was wondering if it was intentional that it says DC instead of SC when the rest of the pattern is worked in SC stitches. I tried doing them as DC stitches like it says but it looked really weird and lopsided when all the other stitches are SC
Hi, Thanks so much for raising this. It was indeed a typo and should have read sc. I’m not sure how that snuck in there but I have corrected it now.
Thanks
Dora.
Hi there. Between round 15 and 16 you mention 1 DC 8n next 4 stitches. Is this intentional as it’s it only DC throughout the pattern 👌
Hi there, This is intentional. It is so that your increases aren’t all stacked each round. It keeps the shape round rather than angular. I hope that helps.
Dora
This is an excellent pattern, thank you for sharing it. I’m just planning a slightly smaller bag, would it be possible to confirm which rounds are the ‘non-increase rounds’? Many Thanks, Mickey 🧶☺️🧶
Hi Mickey, The non increase rounds are where you just work single crochet all the way around.
I hope that helps!
Dora.
Hi there! Not sure if this was intentional but I noticed that the stitches in between rounds seem to be 1 off after Round 13.
Hi there, this is intentional. I use the technique to stagger the increases so that you get a nice round shape rather than a polygon. I hope that helps! Dora
Hi I’m crocheting lovely drawstring bag and can’t get myvhear round the stitches mentioned between rows Eg. Sc 1. Sc 2 etc
This is a technique used to stagger the increases so that you get a nice round shape rather than a polygon. Trust the process 🙂