
The Summer Solstice Crochet T-shirt

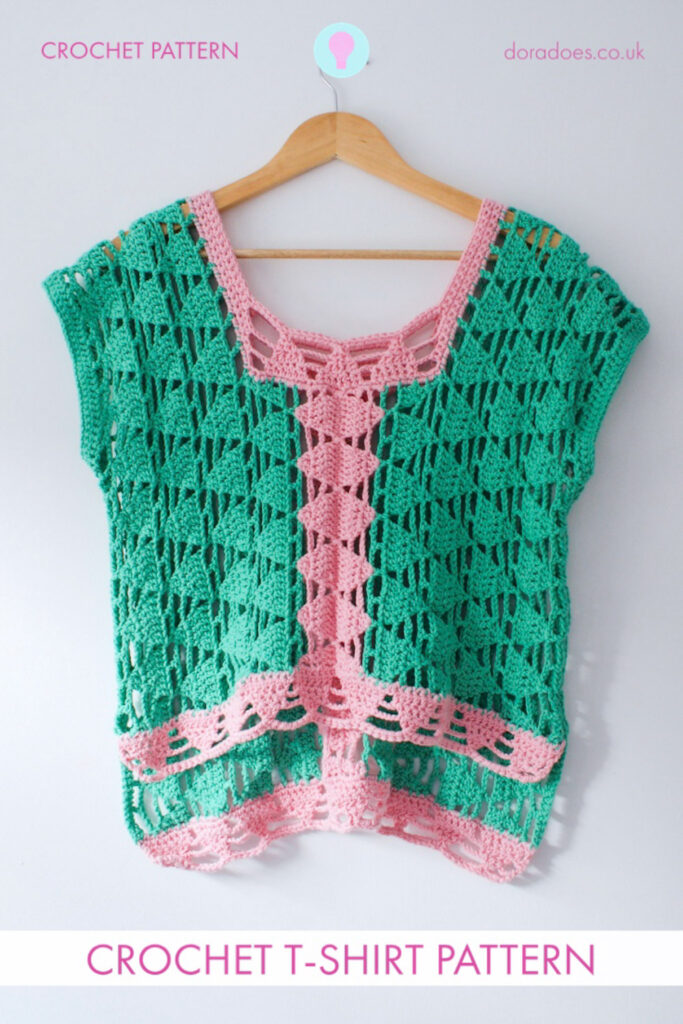
The Summer Solstice top is a lightweight cotton geometric summer top which can be worn two ways – with the long side at the front or back.
Wear it over a bikini on the beach or pair it with a pair of light trousers, shorts or a summer skirt to enjoy the hazy lazy days of mid-summer!
The summer solstice crochet pattern can be read in all sizes on this page or is available to purchase as an ad-free print optimised PDF.
Get the pattern from Etsy, Ravelry or Love Crafts.
This post contains affiliate links. This means if you click a link to a product and go on to make a purchase, I receive a small percentage of the sale at no extra cost to you. You can read my full affiliate disclosure here.

But first… here’s a little history behind it!
Last winter I brought out a Free Crochet Dress Pattern called the Winter Solstice Dress. It’s worked from side-to-side using aran weight yarn and was my first experiment in dress design.
It seemed only fitting that I bought out a contrasting pattern to oppose the Winter Solstice Dress.
I decided that I would work with the same yarn weight and ensure the design was worked side to side so that there was at least some commonality between the two!
The Summer Solstice Top you see here was the result! I worked with cotton yarn instead of wool and went with a top instead of a dress.




As with all my patterns, I like them to be as flexible as possible so that everyone can get the most out of them. For this reason, I made the top longer on one side than the other and the shape is reversible.
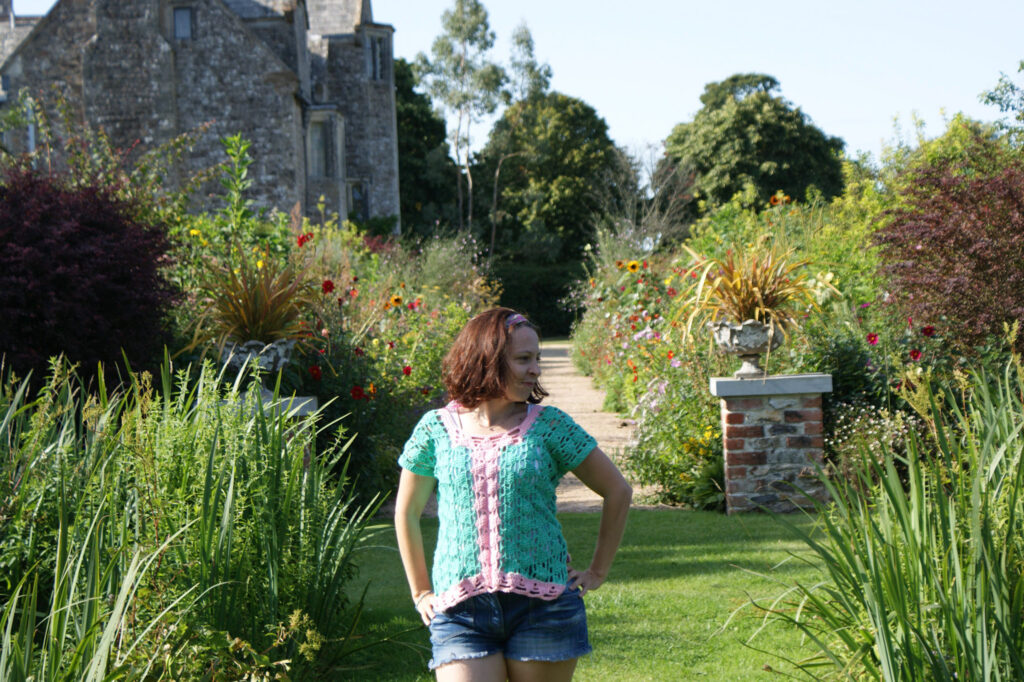
There are some days when I want to hide my bum without hiding my waist, so I can wear this long side at the back. This would be great as a beach cover or paired with some denim shorts.
Other days I want more cover at the front than the back so can flip it around. Again, this is a great way to show off your waist but still get that oversized, comfy feel in a top – without feeling like you’re wearing a sack!
I’ll be honest, just like with the Dress, I wasn’t quite sure if this construction method and design style was going to work out. But after a few revisions, I’m super happy with it!
You can continue reading for the free version of the pattern, or purchase the ad free printable PDF from from Love Crafts, Ravelry or Etsy.
Pattern Notes
General Notes
- Please read through the pattern and all associated notes before starting your project
- This pattern uses standard US crochet terminology (UK equivalents are given in brackets in the abbreviations list where applicable)
- Numbers in brackets at the end of a row / round indicate the number of stitches in that row / round and are only given at the start of a section or where there is a change
- Chain 3 turning chains count as 1 double crochet (UK treble) unless specified otherwise
- Chain 1 turning chains do not count as stitches
- Instructions written after *asterisks should be repeated as indicated
- Instructions written between [square brackets] should be repeated the precise number of times specified
- Unless otherwise indicated stitches should be worked in consecutive stitches
- Top is longer on one side than other and can be worn either way round. Because it’s reversible, I have referred to the long and short side throughout the pattern
- Left and right and right and wrong sides are nominal until you join the pieces, so no adjustments are needed for left / right handers
Construction
- The pattern is worked in two pieces. Each are worked in vertical rows (side to side) from the outside (shoulder) in towards the centre.
- The two pieces will be mirror images of each other. They are folded asymmetrically (to create a long side and a short side), seamed up the sides and joined in the centre
- The neckline and hem details are added to finish
- A photo tutorial and schematics for the construction are included as well as a schematic showing finished measurements in all sizes.

Skills Used
- Knowledge of basic crochet stitches, techniques and terminology is assumed
- Simple increases and decreases
- Working in rows, working in rounds
- Using slip stitches to seam
This is a fairly easy pattern, once you get your head around the construction. It mostly using double crochet (UK treble) and chain stitches with simple increases and decreases.
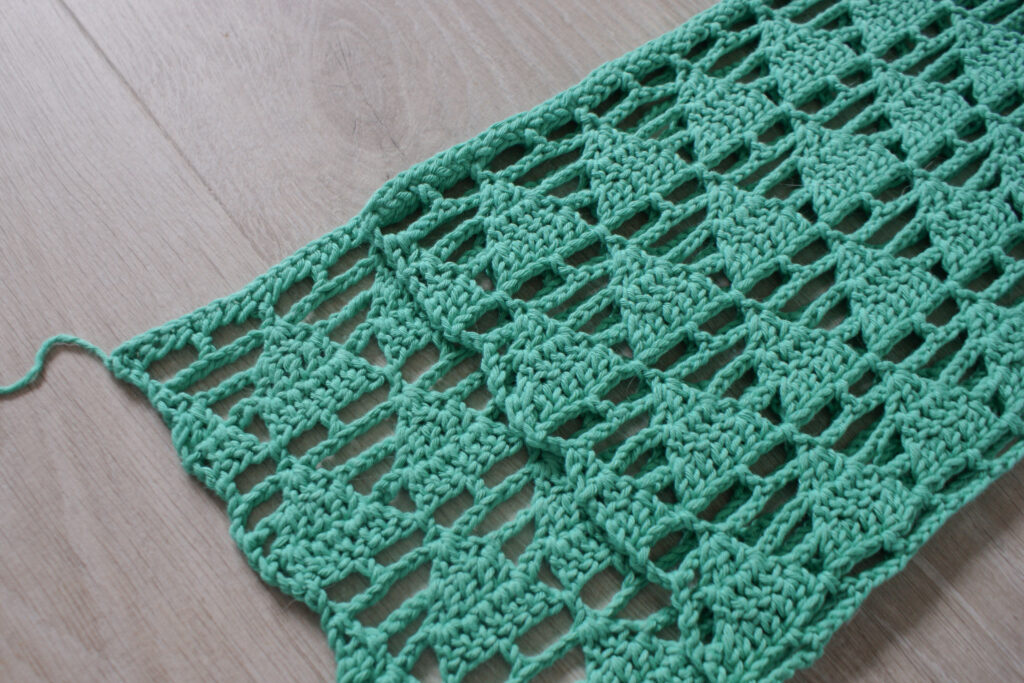
The design uses a simple pattern repeat which is charted in addition to the written instructions.
If you’re a wanting to make a simple, quick summer garment pattern then this could be what you’re looking for!

Materials
Yarn
I have used Drops Paris in Opal Green and Light Pink for the version you see pictured. This is an aran weight cotton yarn.
The item pictured uses Drops Paris, 100% cotton, 50g ball, 75m/82 yds
Main Colour (MC) Shade 11 Opal Green 6 (6, 8, 8, 9, 9, 10) balls / 420(440, 550, 660, 660, 770)m
Contrast Colour (CC) Shade 20 Light Pink 2 (2, 3, 3, 3, 3, 4) balls / 150(150, 170, 200, 210, 230)m
Any similar aran / worsted yarn which meets gauge can be substituted (e.g. Paintbox Cotton Aran). Different fibres and yarns will produce a different finished result.
You may find this post useful when choosing yarn.
Crochet Hook
You will need a 5mm crochet hook, or size needed to match gauge. My preference for hooks is clover amour but I know this is a really personal choice.
How to purchase a Dora Does crochet pattern:
I sell my PDF crochet patterns in my Etsy, Ravelry and Love Crafts stores. You can purchase this pattern on any of these platforms, depending on your preference. Simply click the relevant links throughout this pattern page to be taken to the listing, or visit the store homepages in the links at the start of this paragraph.

Measurements and Finished Size
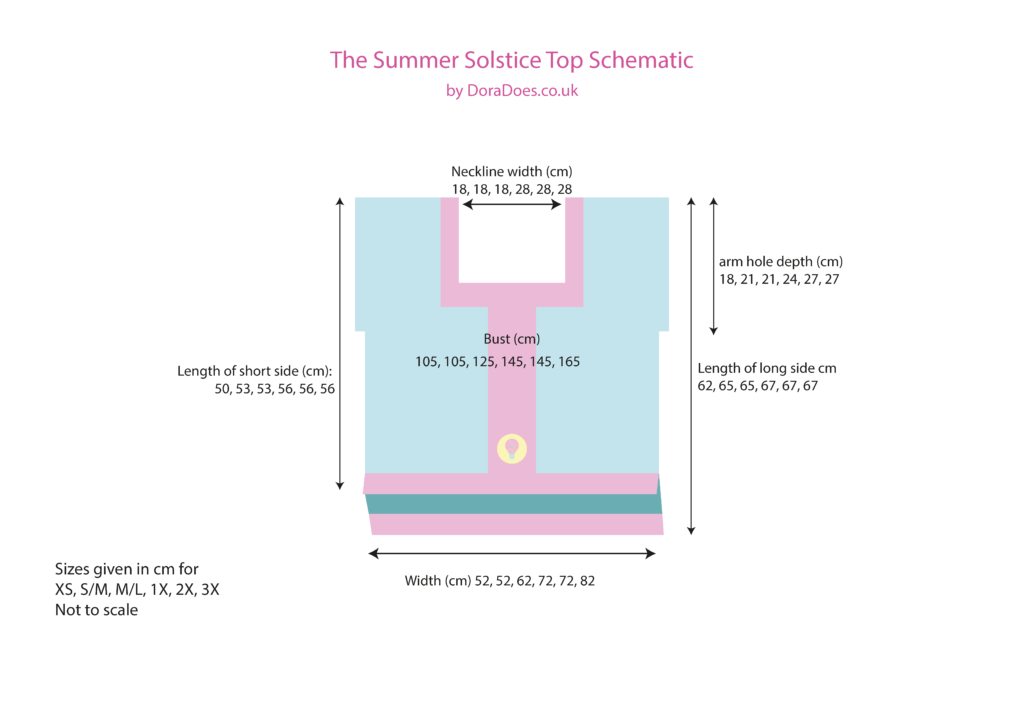
- The top is designed to be oversized with asymmetric length on the front and back
- Approximate measurements of the finished garment are given in the table to help you in choosing a suitable size
- Additional measurements are given in the schematics at the end of the pattern
- The pattern is designed for adults and offered in 7 women’s sizes
- Instructions for different sizes are written in increasing order, with the smallest size first and larger sizes following in brackets, i.e. XS (S/M, M/L, 1X, 2X, 3X) sts / rows
- The body shaping is written out separately for different sizes, so be sure to follow the instructions for the size you’ve chosen
- Where you see a ‘-‘ for your size, you do not need to work that instruction
- If only one size instruction is given, it will apply to all sizes
- If you are working from a hard copy of the pattern, you may want to go through and highlight or circle the relevant colour for your size
- The item you see pictured is a size S worn by me, UK size 8-10 (US 4-6), 5ft 1in.
Below is a schematic outlining the approximate finished measurements of each size:
Stitches & Abbreviations: US terms
(UK Equivalent in Brackets)
- ch = chain
- ch-sp = chain space (e.g. ch5-sp = chain 5 space)
- CC = contrast colour
- dc = double crochet (UK treble)
- dc2tog = double crochet 2 together (UK treble 2 together) – see special stitches
- dc3tog = double crochet 3 together (UD treble 3 together) – see special stitches
- fsc = foundation single crochet (UK foundation double) – tutorial here
- MC = main colour
- rep = repeat
- rs = right side
- sc = single crochet (UK double crochet)
- sk = skip (UK miss)
- sp = space
- ss = slip stitch
- st(s) = stitch(es)
- t-ch = turning chain
- ws = Wrong side
- yo = yarn over
Special Stitches
Double Crochet 2 Together (dc2tog)
Yo, insert hook into first st, yo, pull up a loop (3 loops on hook), yo, pull through 2 loops (2 loops on hook), yo, insert hook into next st, yo, pull up a loop (4 loops on hook), yo, pull through 2 loops (3 loops on hook), yo, pull through all 3 loops.
Double Crochet 3 Together (dc3tog)
Yo, insert hook into first st, yo, pull up a loop (3 loops on hook), yo, pull through 2 loops (2 loops on hook), [yo, insert hook into next st, yo, pull up a loop, yo, pull through 2 loops] twice (4 loops on hook), yo, pull through all 4 loops.
Gauge
15 sts and 8 rows in 10cm of double crochet (UK treble crochet) using a 5mm crochet hook or size needed to obtain gauge.
Learn how to make and measure a gauge swatch here

Pattern Repeat & Chart
The pattern repeat for each triangle is a 4 row repeat, with the next repeat being offset, giving an 8 row pattern repeat in total. Each triangle requires an 8 stitch repeat. The foundation chain should be a multiple of 8+1.

Download the Summer Solstice Pattern now from Love Crafts, Ravelry or Etsy
The Pattern
Body Section
You will make 2 of these, one for the right side and one for the left. In each case you will be working from the shoulder side towards the centre of the body.
Make the complete left side, then the complete right side.
If you are left handed, follow the instructions as written and your sides will be reversed (i.e. right will be left and vice versa).
Using MC and a 5mm hook
Row 1(rs): Make 153 (161, 161, 169, 169, 169)fsc, turn
Row 2: Ch6 (counts as 1dc, ch3), sk 3 sts, 1dc, *ch3, sk 3 sts, 1dc in next st; rep from * to end, turn(153, 161, 161, 169, 169, 169 sts)
Row 3: Ch3 (counts as 1dc throughout), 1dc in same st as t-ch, ch5, sk 7 sts, *3dc in next st, ch5, sk 7 sts; rep from * to end, 2dc in 3rd ch of ch 6, turn
Row 4: Ch3, 2dc in second st, ch3, sk ch5-sp, *2dc in next st, 1dc in next st, 2dc in next st, ch3, sk ch5-sp; rep from * to last 2 sts, 2dc in next st, 1dc in last st, turn
Row 5: Ch3, 1dc in second st, 2dc in next st, ch1, sk ch3-sp, *2dc in next st, 1dc in next 3 sts, 2dc in next st, ch1, sk ch3-sp; rep from * to last 3 sts, 2dc in next st, 1dc in next 2 sts, turn
Row 6: Ch6, sk 3 sts, 1dc in next st, *ch3, sk 3 sts, 1dc in next st; rep from * to end, turn (note you will alternate between working into the ch1-sp and the centre st of the 7dc group).
Row 7: Ch5 (counts as 1dc, ch2), sk ch3-sp, 3dc in next st, *ch5, sk 7 sts, 3dc in next st; rep from * to last 4 sts, ch2, sk ch3-sp, 1dc in 3rd ch of ch6, turn
Row 8: Ch4 (counts as 1dc, ch1), sk ch2-sp, 2dc in next st, 1dc in next st, 2dc in next st, *ch3, sk ch5-sp, 2dc in next st, 1dc in next st, 2dc in next st; rep from * to last 3 sts, ch1, sk 2 sts, 1dc in 3rd ch of ch5, turn
Row 9: Ch3, sk ch1-sp, 2dc in next st, 1dc in next 3 sts, 2dc in next st, *ch1, sk ch3-sp, 2dc in next st, 1dc in next 3 sts, 2dc in next st; rep from * to last 2 sts, sk ch1-sp, 1dc in 3rd ch of ch4, turn
Row 10: Ch6, sk 3 sts, 1dc in next st, *ch3, sk 3 sts, 1dc in next st; rep from * to end, turn
Rows 11 – 14 (14, 18, 18, 18, 22): Continue pattern repeat (rows 3-10) and finish on a row 6 (6, 10, 10, 10, 6) rep. You should have 3 (3, 4, 4, 4, 5) rows of triangles.
Continue to Body Shaping for your chosen size
Body Shaping – Right Side for Sizes XS & S/M
Continue to work the pattern repeat where you left off (without fastening off) and work the short side. You will stop the next row after 5.5 triangle repeats and continue the pattern repeat from there.
Short Side
Using MC
Row 1 (rs): Ch5 (counts as 1dc, ch2), sk 3 sts, 3dc in next dc, [ch5, sk 7 sts, 3dc in next dc] 5 (5,-,-,-,-)times, ch5, 2dc in next st, turn (45, 45, -, -, -, – sts)
Row 2: Ch3, 2dc in second st, *ch3, sk ch5-sp, 2dc in next st, 1dc in next st, 2dc in next st; rep from * to last 3 sts, ch1, sk 2 sts, 1dc in 3rd ch of ch5, turn
Row 3: Ch3, sk ch1-sp, *2dc in next st, 1dc in next 3 sts, 2dc in next st, ch1, sk ch3-sp; rep from * to last ch3-sp, 2dc in next st, 1dc in next 2 sts, turn
Row 4: Ch6, sk 3 sts, 1dc in next st, *ch3, sk 3 sts, 1dc in next st; rep from * to end, turn
Change to CC
Row 5: Ch3, 1dc in same st, *ch5, sk 7 sts, 3dc in next st; rep from * to last 4 sts, ch2, sk 3 sts, 1dc in 3rd ch of ch 6, turn
Row 6: Ch4, sk ch2-sp, *2dc in next dc, 1dc in next dc, 2dc in next dc, ch3, sk ch5-sp; rep from * to last 2 sts, 2dc in next st, 1dc in last st, turn
Row 7: Ch3, 1dc in second st, 2dc in next st, *ch1, sk ch3-sp, 2dc in next st, 1dc in next 3 sts, 2dc in next st; rep from * to last 2 sts, sk1 st, 1dc in 3rd ch of ch4 , turn
Fasten off
Long side
Now you will work the long side of the neck shaping.
Working along from the first row of the short side shaping, with rs facing, skip 47 (55, -, -, -, -) sts and join MC into a dc 61 (61, -, -, -, -) sts from the unworked end.
Using MC
Row 1(rs): Ch3, 1dc in same st, *ch5, sk 7 sts, 3dc in next st; rep from * to last 4 sts, ch2, sk 3 sts 1dc in 3rd ch of ch6, turn (61, 61, -, -, -, -, – sts)
Row 2: Ch4, sk ch2-sp, *2dc in next st, 1dc in next st, 2dc in next st, ch3, sk ch5-sp; rep from * to last 2 sts, 2dc in next st, 1dc in last st, turn
Row 3: Ch3, 1dc in second st, 2dc in next st, *ch1, sk ch3-sp, 2dc in next st, 1dc in next 3 sts, 2dc in next st; rep from * to last 2 sts, sk 1 st, 1dc in 3rd ch of ch4 , turn
Row 4: Ch6, sk 3 sts, 1dc in next st, *ch3, sk 3 sts, 1dc in next st; rep from * to end, turn
Change to CC
Row 5: Ch5, sk 3 sts, *3dc in next st, ch5, sk 7 sts; rep from * to end. 2dc in 3rd ch of ch6, turn
Row 6: Ch3, 2dc in second st, *ch3, sk ch5-sp, 2dc in next st, 1dc in next st, 2dc in next st; rep from * to last 3 sts, ch1, sk 2 sts, 1dc in 3rd ch of ch5, turn
Row 7: Ch3, sk ch1-sp, *2dc in next st, 1dc in next 3 sts, 2dc in next st, ch1, sk ch3-sp; rep from * to last ch3-sp, 2dc in next st, 1dc in next 2 sts, turn
Fasten off, continue to Left Side
Body Shaping – Left Side for Sizes XS & S/M
You will now work a mirror image of the right side, working the first 14 (14, -, -, -, -) rows of the body section, then continue to work the long side first and short side second.
Continue to work the pattern repeat where you left off (without fastening off) and work the long side. You will stop the next row after 7.5 triangle repeats and continue the pattern repeat from there:
Long Side
Using MC
Row 1 (rs): Ch5 (counts as 1dc, ch2), sk 3 sts, 3dc in next dc, [ch5, sk 7 sts, 3dc in next dc] 7 (7, -, -, -, -) times, ch5, 2dc in next st, turn (61, 61, -, -, -, – sts)
Row 2: Ch3, 2dc in second st, *ch3, sk ch5-sp, 2dc in next st, 1dc in next st, 2dc in next st; rep from * to last 3 sts, ch1, sk 2 sts, 1dc in 3rd ch of ch5, turn
Row 3: Ch3, sk ch1-sp, *2dc in next st, 1dc in next 3 sts, 2dc in next st, ch1, sk ch3-sp; rep from * to last ch3-sp, 2dc in next st, 1dc in next 2 sts, turn
Row 4: Ch6, sk 3 sts, 1dc in next st, *ch3, sk 3 sts, 1dc in next st; rep from * to end, turn
Change to CC
Row 5: Ch3, 1dc in same st, *ch5, sk 7 sts, 3dc in next st; rep from * to last 4 sts, ch2, sk 3 sts, 1dc in 3rd ch of ch6, turn
Row 6: Ch4, sk ch2-sp, *2dc in next dc, 1dc in next dc, 2dc in next dc, ch3, sk ch5-sp; rep from * to last 2 sts, 2dc in next st, 1dc in last st, turn
Row 7: Ch3, 1dc in second st, 2dc in next st, *ch1, sk ch3-sp, 2dc in next st, 1dc in next 3 sts, 2dc in next st; rep from * to last 2 sts, sk1 st, 1dc in 3rd ch of ch4 , turn
Fasten off
Short side
Now you will work the short side of the neck shaping
Working along from the first row of the long side shaping, with rs facing, skip 47 (55, -, -, -, -) sts and join MC into a dc 45 (45, -, -, -, -) sts from the unworked end.
Using MC
Row 1 (rs): Ch3, 1dc in same st, *ch5, sk 7 sts, 3dc in next st; rep from * to last 4 sts, ch2, sk 3 sts 1dc in 3rd ch of ch6, turn (45, 45, -, -, -, -, – sts)
Row 2: Ch4, sk ch2-sp, *2dc in next st, 1dc in next st, 2dc in next st, ch3, sk ch5-sp; rep from * to last 2 sts, 2dc in next st, 1dc in last st, turn
Row 3: Ch3, 1dc in second st, 2dc in next st, *ch1, sk ch3-sp, 2dc in next st, 1dc in next 3 sts, 2dc in next st; rep from * to last 2 sts, sk 1 st, 1dc in 3rd ch of ch4 , turn
Row 4: Ch6, sk 3 sts, 1dc in next st, *ch3, sk 3 sts, 1dc in next st; rep from * to end, turn
Change to CC
Row 5: Ch5, sk 3 sts, *3dc in next st, ch5, sk 7 sts; rep from * to end. 2dc in 3rd ch of ch6, turn
Row 6: Ch3, 2dc in second st, *ch3, sk ch5-sp, 2dc in next st, 1dc in next st, 2dc in next st; rep from * to last 3 sts, ch1, sk 2 sts, 1dc in 3rd ch of ch5, turn
Row 7: Ch3, sk ch1-sp, *2dc in next st, 1dc in next 3 sts, 2dc in next st, ch1, sk ch3-sp; rep from * to last ch3-sp, 2dc in next st, 1dc in next 2 sts, turn
Continue to Construction

Body Shaping – Right Side for Size M/L
Continue to work the pattern repeat where you left off (without fastening off) and work the short side. You will stop the next row after 5.5 triangle repeats and continue the pattern repeat from there:
Short Side
Using MC
Row 1 (rs): Ch3, 1dc in same st, [ch5, sk 7 sts, 3dc in next st,] 5 times, ch2, sk 3 sts 1dc in next st, turn (-, -, 45, -, -, – sts)
Row 2: Ch4, sk ch2-sp, *2dc in next st, 1dc in next st, 2dc in next stc, ch3, sk ch5-sp; rep from * to last 2 sts, 2dc in next st, 1dc in last st, turn
Row 3: Ch3, 1dc in second st, 2dc in next st, *ch1, sk ch3-sp, 2dc in next st, 1dc in next 3 sts, 2dc in next st; rep from * to last 2 sts, sk 1 st, 1dc in 3rd ch of ch4 , turn
Row 4: Ch6, sk 3 sts, 1dc in next st, *ch3, sk 3 sts, 1dc in next st; rep from * to end, turn
Change to CC
Row 5: Ch5, sk 3 sts, *3dc in next st, ch5, sk 7 sts; rep from * to end, 2dc in 3rd ch of ch6, turn
Row 6: Ch3, 2dc in second st, *ch3, sk ch5-sp, 2dc in next st, 1dc in next st, 2dc in next st; rep from * to last 3 sts, ch1, sk 2 sts, 1dc in 3rd ch of ch5, turn
Row 7: Ch3, sk ch1-sp, *2dc in next st, 1dc in next 3 sts, 2dc in next st, ch1, sk ch3-sp; rep from * to last ch3-sp, 2dc in next st, 1dc in next 2 sts, turn
Fasten off
Long Side
Now you will work the long side of the neck shaping
Working along from the first row of the short side shaping, with rs facing, skip – (-, 55, -, -, -) sts and join MC into a dc – (-, 61, -, -, -) sts from the unworked end.
Using MC
Row 1 (rs): Ch5, sk 3 sts, *3dc in next st, ch5, sk 7 sts; rep from * to end. 2dc in 3rd ch of ch6, turn (-, -, 61, -, -, – sts)
Row 2: Ch3, 2dc in second st, *ch3, sk ch5-sp, 2dc in next st, 1dc in next st, 2dc in next st; rep from * to last 3 sts, ch1, sk 2 sts, 1dc in 3rd ch of ch5, turn
Row 3: Ch3, sk ch1-sp, *2dc in next st, 1dc in next 3 sts, 2dc in next st, ch1, sk ch3-sp; rep from * to last ch3-sp, 2dc in next st, 1dc in next 2 sts, turn
Row 4: Ch6, sk 3 sts, 1dc in next st, *ch3, sk 3 sts, 1dc in next st; rep from * to end, turn
Change to CC
Row 5: Ch3, 1dc in same st, *ch5, sk 7 sts, 3dc in next st; rep from * to last 4 sts, ch2, sk 3 sts, 1dc in 3rd ch of ch 6, turn
Row 6: Ch4, sk ch2-sp, *2dc in next st, 1dc in next st, 2dc in next dc, ch3, sk ch5-sp; rep from * to last 2 sts, 2dc in next st, 1dc in last st, turn
Row 7: Ch3, 1dc in second st, 2dc in next st, *ch1, sk ch3-sp, 2dc in next st, 1dc in next 3 sts, 2dc in next st; rep from * to last 2 sts, sk 1 st, 1dc in 3rd ch of ch4 , turn
Fasten off, continue to Left Side
Body Shaping – Left Side for Size M/L
You will now work a mirror image of the right side, working the first – (-, 18, -, -, -) rows of the body section, then continue to work the long side first and short side second.
Continue to work the pattern repeat where you left off (without fastening off) and work the long side. You will stop the next row after 7.5 triangle repeats and continue the pattern repeat from there:
Long Side
Using MC
Row 1 (rs): Ch3, 1dc in same st, [ch5, sk 7 sts, 3dc in next st,] 7 times, ch2, sk 3 sts 1dc in next st, turn (-, -, 61, -, -, – sts)
Row 2: Ch4, sk ch2-sp, *2dc in next st, 1dc in next st, 2dc in next stc, ch3, sk ch5-sp; rep from * to last 2 sts, 2dc in next st, 1dc in last st, turn
Row 3: Ch3, 1dc in second st, 2dc in next st, *ch1, sk ch3-sp, 2dc in next st, 1dc in next 3 sts, 2dc in next st; rep from * to last 2 sts, sk 1 st, 1dc in 3rd ch of ch4 , turn
Row 4: Ch6, sk 3 sts, 1dc in next st, *ch3, sk 3 sts, 1dc in next st; rep from * to end, turn
Change to CC
Row 5: Ch5, sk 3 sts, *3dc in next st, ch5, sk 7 sts; rep from * to end, 2dc in 3rd ch of ch6, turn
Row 6: Ch3, 2dc in second st, *ch3, sk ch5 sp, 2dc in next st, 1dc in next st, 2dc in next st; rep from * to last 3 sts, ch1, sk 2 sts, 1dc in 3rd ch of ch5, turn
Row 7: Ch3, sk ch1-sp, *2dc in next st, 1dc in next 3 sts, 2dc in next st, ch1, sk ch3-sp; rep from * to last ch3-sp, 2dc in next st, 1dc in next 2 sts, turn
Fasten off
Short Side
Now you will work the short side of the neck shaping
Working along from the first row of the long side shaping, with rs facing, skip – (-, 55, -, -, -) sts and join MC into a dc – (-, 45, -, -, -) sts from the unworked end.
Using MC
Row 1 (rs): Ch5, sk 3 sts, 3dc in next dc, *ch5, sk 7 sts, 3dc in next dc; rep from * to end. 2dc in 3rd ch of ch6, turn (-, -, 45, -, -, – sts)
Row 2: Ch3, 2dc in second st, *ch3, sk ch5-sp, 2dc in next st, 1dc in next st, 2dc in next st; rep from * to last 3 sts, ch1, sk 2 sts, 1dc in 3rd ch of ch5, turn
Row 3: Ch3, sk ch1-sp, *2dc in next st, 1dc in next 3 sts, 2dc in next st, ch1, sk ch3-sp; rep from * to last ch3-sp, 2dc in next st, 1dc in next 2 sts, turn
Row 4: Ch6, sk 3 sts, 1dc in next st, *ch3, sk 3 sts, 1dc in next st; rep from * to end, turn
Change to CC
Row 5: Ch3, 1dc in same st, *ch5, sk 7 sts, 3dc in next st; rep from * to last 4 sts, ch2, sk 3 sts, 1dc in 3rd ch of ch 6, turn
Row 6: Ch4, sk ch2-sp, *2dc in next st, 1dc in next st, 2dc in next dc, ch3, sk ch5-sp; rep from * to last 2 sts, 2dc in next st, 1dc in last st, turn
Row 7: Ch3, 1dc in second st, 2dc in next st, *ch1, sk ch3-sp, 2dc in next st, 1dc in next 3 sts, 2dc in next st; rep from * to last 2 sts, sk 1 st, 1dc in 3rd ch of ch4 , turn
Continue to Construction

Body Shaping – Right Side for Sizes 1X, 2X
Continue to work the pattern repeat where you left off (without fastening off) and work the short side. You will stop the next row after 6.5 triangle repeats and continue the pattern repeat from there:
Short Side
Using MC
Row 1 (rs): Ch3, 1dc in same st, [ch5, sk 7 sts, 3dc in next st,] -(-, -, 6, 6, -) times, ch2, sk 3 sts 1dc in next st, turn (-, -, -, 53, 53, – sts)
Row 2: Ch4, sk ch2-sp, *2dc in next st, 1dc in next st, 2dc in next stc, ch3, sk ch5-sp; rep from * to last 2 sts, 2dc in next st, 1dc in last st, turn
Row 3: Ch3, 1dc in second st, 2dc in next st, *ch1, sk ch3-sp, 2dc in next st, 1dc in next 3 sts, 2dc in next st; rep from * to last 2 sts, sk 1 st, 1dc in 3rd ch of ch4 , turn
Row 4: Ch6, sk 3 sts, 1dc in next st, *ch3, sk 3 sts, 1dc in next st; rep from * to end, turn
Row 5: Ch5, sk 3 sts, *3dc in next st, ch5, sk 7 sts; rep from * to end, 2dc in 3rd ch of ch6, turn
Row 6: Ch3, 2dc in second st, *ch3, sk ch5-sp, 2dc in next st, 1dc in next st, 2dc in next st; rep from * to last 3 sts, ch1, sk 2 sts, 1dc in 3rd ch of ch5, turn
Row 7: Ch3, sk ch1-sp, *2dc in next st, 1dc in next 3 sts, 2dc in next st, ch1, sk ch3-sp; rep from * to last ch3-sp, 2dc in next st, 1dc in next 2 sts, turn
Row 8: Ch6, sk 3 sts, 1dc in next st, *ch3, sk 3 sts, 1dc in next st; rep from * to end, turn
Change to CC
Row 9: Ch3, 1dc in same st, *ch5, sk 7 sts, *3dc in next st; rep from * to last 4 sts, ch2, sk 3 sts, 1dc in 3rd ch of ch 6, turn
Row 10: Ch4, sk ch2-sp, *2dc in next st, 1dc in next st, 2dc in next st, ch3, sk ch5-sp; rep from * to last 2 sts, 2dc in next st, 1dc in last st, turn
Row 11: Ch3, 1dc in second st, 2dc in next st, *ch1, sk ch3-sp, 2dc in next st, 1dc in next 3 sts, 2dc in next st; rep from * to last 2 sts, sk 1 st, 1dc in 3rd ch of ch4 , turn
Fasten off
Long side
Now you will work the long side of the neck shaping.
Working along from the first row of the short side shaping, with rs facing, skip – (-, -, 47, 47, -) sts and join MC into a dc – (-, -, 61, 61, -) sts from the unworked end.
Using MC
Row 1 (rs): Ch5, sk 3 sts, *3dc in next st, ch5, sk 7 sts; rep from * to end. 2dc in 3rd ch of ch6, turn (-, -, -, 61, 61, – sts)
Row 2: Ch3, 2dc in second st, *ch3, sk ch5-sp, 2dc in next st, 1dc in next st, 2dc in next st; rep from * to last 3 sts, ch1, sk 2 sts, 1dc in 3rd ch of ch5, turn
Row 3: Ch3, sk ch1-sp, *2dc in next st, 1dc in next 3 sts, 2dc in next st, ch1, sk ch3-sp; rep from * to last ch3-sp, 2dc in next st, 1dc in next 2 sts, turn
Row 4: Ch6, sk 3 sts, 1dc in next st, *ch3, sk 3 sts, 1dc in next st; rep from * to end, turn
Row 5: Ch3, 1dc in same st, *ch5, sk 7 sts, 3dc in next st; rep from * to last 4 sts, ch2, sk 3 sts, 1dc in 3rd ch of ch 6, turn
Row 6: Ch4, sk ch2-sp, *2dc in next st, 1dc in next st, 2dc in next dc, ch3, sk ch5-sp; rep from * to last 2 sts, 2dc in next st, 1dc in last st, turn
Row 7: Ch3, 1dc in second st, 2dc in next st, *ch1, sk ch3-sp, 2dc in next st, 1dc in next 3 sts, 2dc in next st; rep from * to last 2 sts, sk 1 st, 1dc in 3rd ch of ch4 , turn
Row 8: Ch6, sk 3 sts, 1dc in next st, *ch3, sk 3 sts, 1dc in next st; rep from * to end, turn
Change to CC
Row 9: Ch5, sk 3 sts, *3dc in next dc, ch5, sk 7 sts; rep from * to end, 2dc in 3rd ch of ch6, turn
Row 10: Ch3, 2dc in second st,*ch3, sk ch5-sp, 2dc in next st, 1dc in next st, 2dc in next st; rep from * to last 3 sts, ch1, sk 2 sts, 1dc in 3rd ch of ch5, turn
Row 11: Ch3, sk ch1-sp, *2dc in next st, 1dc in next 3 sts, 2dc in next st, ch1, sk ch3-sp; rep from * to last ch3-sp, 2dc in next st, 1dc in next 2 sts, turn
Fasten off, continue to Left Side
Body Shaping – Left Side for Sizes 1X, 2X
You will now work a mirror image of the right side, working the first – (-, -, 18, 18, -) rows of the body section, then continue to work the long side first and short side second.
Continue to work the pattern repeat where you left off (without fastening off) and work the long side. You will stop the next row after 8.5 triangle repeats and continue the pattern repeat from there:
Long Side
Using MC
Row 1 (rs): Ch3, 1dc in same st, [ch5, sk 7 sts, 3dc in next st,] -(-, -, 8, 8, -) times, ch2, sk 3 sts 1dc in next st, turn (-, -, -, 69, 69, – sts)
Row 2: Ch4, sk ch2-sp, *2dc in next st, 1dc in next st, 2dc in next st, ch3, sk ch5-sp; rep from * to last 2 sts, 2dc in next st, 1dc in last st, turn
Row 3: Ch3, 1dc in second st, 2dc in next st, *ch1, sk ch3-sp, 2dc in next st, 1dc in next 3 sts, 2dc in next st; rep from * to last 2 sts, sk 1 st, 1dc in 3rd ch of ch4 , turn
Row 4: Ch6, sk 3 sts, 1dc in next st, *ch3, sk 3 sts, 1dc in next st; rep from * to end, turn
Row 5: Ch5, sk 3 sts, *3dc in next st, ch5, sk 7 sts; rep from * to end, 2dc in 3rd ch of ch6, turn
Row 6: Ch3, 2dc in second st, *ch3, sk ch5-sp, 2dc in next st, 1dc in next st, 2dc in next st; rep from * to last 3 sts, ch1, sk 2 sts, 1dc in 3rd ch of ch5, turn
Row 7: Ch3, sk ch1-sp, *2dc in next st, 1dc in next 3 sts, 2dc in next st, ch1, sk ch3-sp; rep from * to last ch3-sp, 2dc in next st, 1dc in next 2 sts, turn
Row 8: Ch6, sk 3 sts, 1dc in next st, *ch3, sk 3 sts, 1dc in next st; rep from * to end, turn
Change to CC
Row 9: Ch3, 1dc in same st, *ch5, sk 7 sts, *3dc in next st; rep from * to last 4 sts, ch2, sk 3 sts, 1dc in 3rd ch of ch 6, turn
Row 10: Ch4, sk ch2-sp, *2dc in next st, 1dc in next st, 2dc in next st, ch3, sk ch5-sp; rep from * to last 2 sts, 2dc in next st, 1dc in last st, turn
Row 11: Ch3, 1dc in second st, 2dc in next st, *ch1, sk ch3-sp, 2dc in next st, 1dc in next 3 sts, 2dc in next st; rep from * to last 2 sts, sk 1 st, 1dc in 3rd ch of ch4 , turn
Fasten off
Short side
Now you will work the short side of the neck shaping.
Working along from the first row of the long side shaping, with rs facing, skip – (-, -, 47, 47, -) sts and join MC into a dc – (-, -, 53, 53, -) sts from the unworked end.
Using MC
Row 1 (rs): Ch5, sk 3 sts, 3dc in next dc, *ch5, sk 7 sts, 3dc in next dc; rep from * to end. 2dc in 3rd ch of ch6, turn (-, -, -, 53, 53, – sts)
Row 2: Ch3, 2dc in second st, *ch3, sk ch5-sp, 2dc in next st, 1dc in next st, 2dc in next st; rep from * to last 3 sts, ch1, sk 2 sts, 1dc in 3rd ch of ch5, turn
Row 3: Ch3, sk ch1-sp, *2dc in next st, 1dc in next 3 sts, 2dc in next st, ch1, sk ch3-sp; rep from * to last ch3-sp, 2dc in next st, 1dc in next 2 sts, turn
Row 4: Ch6, sk 3 sts, 1dc in next st, *ch3, sk 3 sts, 1dc in next st; rep from * to end, turn
Row 5: Ch3, 1dc in same st, *ch5, sk 7 sts, 3dc in next st; rep from * to last 4 sts, ch2, sk 3 sts, 1dc in 3rd ch of ch 6, turn
Row 6: Ch4, sk ch2-sp, *2dc in next st, 1dc in next st, 2dc in next dc, ch3, sk ch5-sp; rep from * to last 2 sts, 2dc in next st, 1dc in last st, turn
Row 7: Ch3, 1dc in second st, 2dc in next st, *ch1, sk ch3-sp, 2dc in next st, 1dc in next 3 sts, 2dc in next st; rep from * to last 2 sts, sk 1 st, 1dc in 3rd ch of ch4 , turn
Row 8: Ch6, sk 3 sts, 1dc in next st, *ch3, sk 3 sts, 1dc in next st; rep from * to end, turn
Change to CC
Row 9: Ch5, sk 3 sts, *3dc in next dc, ch5, sk 7 sts; rep from * to end, 2dc in 3rd ch of ch6, turn
Row 10: Ch3, 2dc in second st,*ch3, sk ch5-sp, 2dc in next st, 1dc in next st, 2dc in next st; rep from * to last 3 sts, ch1, sk 2 sts, 1dc in 3rd ch of ch5, turn
Row 11: Ch3, sk ch1-sp, *2dc in next st, 1dc in next 3 sts, 2dc in next st, ch1, sk ch3-sp; rep from * to last ch3-sp, 2dc in next st, 1dc in next 2 sts, turn
Continue to Construction

Body Shaping – Right Side for Size 3X
Continue to work the pattern repeat where you left off (without fastening off) and work the short side. You will stop the next row after 6.5 triangle repeats and continue the pattern repeat from there:
Short Side
Using MC
Row 1 (rs): Ch5 (counts as 1dc, ch2), sk 3 sts, 3dc in next dc, [ch5, sk 7 sts, 3dc in next dc] -(-, -, -, -, 6) times, ch5, 2dc in next st, turn (-, -, -, -, -, 53 sts)
Row 2: Ch3, 2dc in second st, *ch3, sk ch5-sp, 2dc in next st, 1dc in next st, 2dc in next st; rep from * to last 3 sts, ch1, sk 2 sts, 1dc in 3rd ch of ch5, turn
Row 3: Ch3, sk ch1-sp, *2dc in next st, 1dc in next 3 sts, 2dc in next st, ch1, sk ch3-sp; rep from * to last ch3-sp, 2dc in next st, 1dc in next 2 sts, turn
Row 4: Ch6, sk 3 sts, 1dc in next st, *ch3, sk 3 sts, 1dc in next st; rep from * to end, turn
Row 5: Ch3, 1dc in same st, *ch5, sk 7 sts, 3dc in next st; rep from * to last 4 sts, ch2, sk ch3-sp, 1dc in last st (3rd ch of ch 6), turn
Row 6: Ch4, sk ch2-sp, *2dc in next dc, 1dc in next dc, 2dc in next dc, ch3, sk ch5-sp; rep from * to last 2 sts, 2dc in next st, 1dc in last st, turn
Row 7: Ch3, 1dc in second st, 2dc in next st, *ch1, sk ch3-sp, 2dc in next st, 1dc in next 3 sts, 2dc in next st; rep from * to last 2 sts, sk1 st, 1dc in 3rd ch of ch4 , turn
Row 8: Ch6, sk 3 sts, 1dc in next st, *ch3, sk 3 sts, 1dc in next st; rep from * to end, turn
Change to CC
Row 9: Ch5, sk 3 sts, *3dc in next dc, ch5, sk 7 sts; rep from * to end, 2dc in 3rd ch of ch6, turn
Row 10: Ch3, 2dc in second st,*ch3, sk ch5-sp, 2dc in next st, 1dc in next st, 2dc in next st; rep from * to last 3 sts, ch1, sk 2 sts, 1dc in 3rd ch of ch5, turn
Row 11: Ch3, sk ch1-sp, *2dc in next st, 1dc in next 3 sts, 2dc in next st, ch1, sk ch3-sp; rep from * to last ch3-sp, 2dc in next st, 1dc in next 2 sts, turn
Fasten off
Long side
Now you will work the long side of the neck shaping.
Working along from the first row of the short side shaping, with rs facing, skip – (-, -, -, -, 47) sts and join MC into a dc – (-, -, -, -, -, 69) sts from the unworked end.
Using MC
Row 1 (rs): Ch3, 1dc in same st, *ch5, sk 7 sts, 3dc in next st; rep from * to last 4 sts, ch2, sk 3 sts 1dc in 3rd ch of ch6, turn (-, -, -, -, -, 69 sts)
Row 2: Ch4, sk ch2-sp, *2dc in next st, 1dc in next st, 2dc in next st, ch3, sk ch5-sp; rep from * to last 2 sts, 2dc in next st, 1dc in last st, turn
Row 3: Ch3, 1dc in second st, 2dc in next st, *ch1, sk ch3-sp, 2dc in next st, 1dc in next 3 sts, 2dc in next st; rep from * to last 2 sts, sk 1 st, 1dc in 3rd ch of ch4 , turn
Row 4: Ch6, sk 3 sts, 1dc in next st, *ch3, sk 3 sts, 1dc in next st; rep from * to end, turn
Row 5: Ch5, sk 3 sts, *3dc in next st, ch5, sk 7 sts; rep from * to end. 2dc in 3rd ch of ch6, turn
Row 6: Ch3, 2dc in second st, *ch3, sk ch5-sp, 2dc in next st, 1dc in next st, 2dc in next st; rep from * to last 3 sts, ch1, 1dc in 3rd ch of ch5, turn
Row 7: Ch3, sk ch1-sp, *2dc in next st, 1dc in next 3 sts, 2dc in next st, ch1, sk ch3-sp; rep from * to last ch3-sp, 2dc in next st, 1dc in next 2 sts, turn
Change to CC
Row 9: Ch3, 1dc in same st, *ch5, sk 7 sts, *3dc in next st; rep from * to last 4 sts, ch2, sk 3 sts, 1dc in 3rd ch of ch 6, turn
Row 10: Ch4, sk ch2-sp, *2dc in next st, 1dc in next st, 2dc in next st, ch3, sk ch5-sp; rep from * to last 2 sts, 2dc in next st, 1dc in last st, turn
Row 11: Ch3, 1dc in second st, 2dc in next st, *ch1, sk ch3-sp, 2dc in next st, 1dc in next 3 sts, 2dc in next st; rep from * to last 2 sts, sk 1 st, 1dc in 3rd ch of ch4 , turn
Fasten off, continue to Left Side
Body Shaping – Left Side for Size 3X
You will now work a mirror image of the right side, working the first – (-, -, -, -, -, 22) rows of the body section, then continue to work the long side first and short side second.
Continue to work the pattern repeat where you left off (without fastening off) and work the long side. You will stop the next row after 8.5 triangle repeats and continue the pattern repeat from there:
Long Side
Using MC
Row 1 (rs): Ch5 (counts as 1dc, ch2), sk 3 sts, 3dc in next dc, [ch5, sk 7 sts, 3dc in next dc] -( -, -, -, -, 6) times, ch5, 2dc in next st, turn (-, -, -, -, -, 69 sts)
Row 2: Ch3, 2dc in second st, *ch3, sk ch5-sp, 2dc in next st, 1dc in next st, 2dc in next st; rep from * to last 3 sts, ch1, sk 2 sts, 1dc in 3rd ch of ch5, turn
Row 3: Ch3, sk ch1-sp, *2dc in next st, 1dc in next 3 sts, 2dc in next st, ch1, sk ch3-sp; rep from * to last ch3-sp, 2dc in next st, 1dc in next 2 sts, turn
Row 4: Ch6, sk 3 sts, 1dc in next st, *ch3, sk 3 sts, 1dc in next st; rep from * to end, turn
Row 5: Ch3, 1dc in same st, *ch5, sk 7 sts, 3dc in next st; rep from * to last 4 sts, ch2, sk ch3-sp, 1dc in last st (3rd ch of ch 6), turn
Row 6: Ch4, sk ch2-sp, *2dc in next dc, 1dc in next dc, 2dc in next dc, ch3, sk ch5-sp; rep from * to last 2 sts, 2dc in next st, 1dc in last st, turn
Row 7: Ch3, 1dc in second st, 2dc in next st, *ch1, sk ch3-sp, 2dc in next st, 1dc in next 3 sts, 2dc in next st; rep from * to last 2 sts, sk1 st, 1dc in 3rd ch of ch4 , turn
Row 8: Ch6, sk 3 sts, 1dc in next st, *ch3, sk 3 sts, 1dc in next st; rep from * to end, turn
Change to CC
Row 9: Ch5, sk 3 sts, *3dc in next dc, ch5, sk 7 sts; rep from * to end, 2dc in 3rd ch of ch6, turn
Row 10: Ch3, 2dc in second st,*ch3, sk ch5-sp, 2dc in next st, 1dc in next st, 2dc in next st; rep from * to last 3 sts, ch1, sk 2 sts, 1dc in 3rd ch of ch5, turn
Row 11: Ch3, sk ch1-sp, *2dc in next st, 1dc in next 3 sts, 2dc in next st, ch1, sk ch3-sp; rep from * to last ch3-sp, 2dc in next st, 1dc in next 2 sts, turn
Fasten off
Short side
Now you will work the short side of the neck shaping.
Working along from the first row of the long side shaping, with rs facing, skip – (-, -, -, -, 47) sts and join MC into a dc – (-, -, -, -, 69) sts from the unworked end.
Using MC
Row 1 (rs): Ch3, 1dc in same st, *ch5, sk 7 sts, 3dc in next st; rep from * to last 4 sts, ch2, sk 3 sts 1dc in 3rd ch of ch6, turn (-, -, -, -, -, 69 sts)
Row 2: Ch4, sk ch2-sp, *2dc in next st, 1dc in next st, 2dc in next st, ch3, sk ch5-sp; rep from * to last 2 sts, 2dc in next st, 1dc in last st, turn
Row 3: Ch3, 1dc in second st, 2dc in next st, *ch1, sk ch3-sp, 2dc in next st, 1dc in next 3 sts, 2dc in next st; rep from * to last 2 sts, sk 1 st, 1dc in 3rd ch of ch4, turn
Row 4: Ch6, sk 3 sts, 1dc in next st, *ch3, sk 3 sts, 1dc in next st; rep from * to end, turn
Row 5: Ch5, sk 3 sts, *3dc in next st, ch5, sk 7 sts; rep from * to end. 2dc in 3rd ch of ch6, turn
Row 6: Ch3, 2dc in second st, *ch3, sk ch5-sp, 2dc in next st, 1dc in next st, 2dc in next st; rep from * to last 3 sts, ch1, 1dc in 3rd ch of ch5, turn
Row 7: Ch3, sk ch1-sp, *2dc in next st, 1dc in next 3 sts, 2dc in next st, ch1, sk ch3-sp; rep from * to last ch3-sp, 2dc in next st, 1dc in next 2 sts, turn
Change to CC
Row 9: Ch3, 1dc in same st, *ch5, sk 7 sts, *3dc in next st; rep from * to last 4 sts, ch2, sk 3 sts, 1dc in 3rd ch of ch 6, turn
Row 10: Ch4, sk ch2-sp, *2dc in next st, 1dc in next st, 2dc in next st, ch3, sk ch5-sp; rep from * to last 2 sts, 2dc in next st, 1dc in last st, turn
Row 11: Ch3, 1dc in second st, 2dc in next st, *ch1, sk ch3-sp, 2dc in next st, 1dc in next 3 sts, 2dc in next st; rep from * to last 2 sts, sk 1 st, 1dc in 3rd ch of ch4, turn
Continue to Construction
You will now have your finished left and right sides ready to join.
Construction
You may wish to block the left and right sides to shape and to neaten the pattern out before construction.
The construction schematic below gives you and idea of how the garment is constructed.
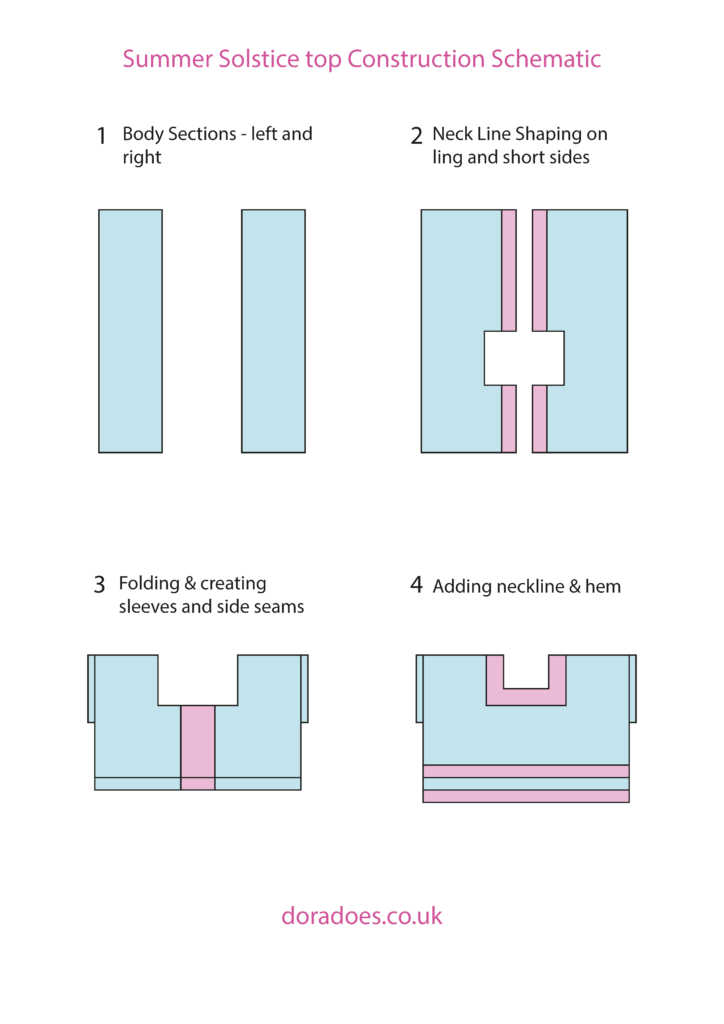
Side Seams
Repeat on left and right side.
With rs facing you, fold the side over asymmetrically so that the long side is 2 triangle lengths longer than the short side. The ws will now be facing you.
To slip stitch the seam, join your yarn at the bottom of the side where the foundation row of the sides meet. Ss through the back loop of the stitch in the row closest to you and the front loop of the stitch in the row row behind it to create the seam. Note that you can sew the seams together if that’s your preference.
Using MC, ss together 40 (40, 40, 40, 36, 36) sts, leaving the remainder unjoined for the arm holes.
Do not fasten off
Arm Holes
Round 1 (ws): Ch1 (does not count as st throughout), 1sc into each st around the armhole (the outside of the foundation row) to the end, join to top of first st with a ss, turn (56, 64, 64, 72, 80, 80 sts)
Round 2: Ch1, 1sc into each st to end, join to top of the first st with a ss
Fasten off
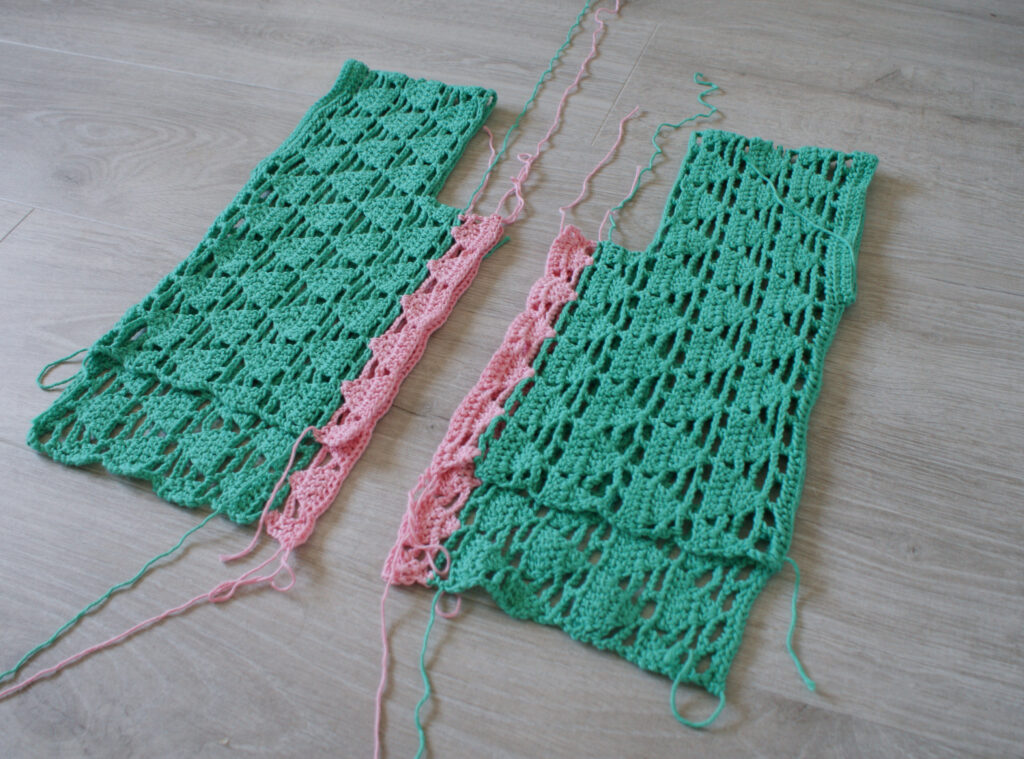
Joining the Left and Right Sides
Work with ws facing
Joining the short sides
Place the two short sides together and, joining CC at the base of the garment, ss the pieces together, working through the back loop of the row closest to you and the front loop of the row behind that.
Fasten off when you reach the neckline
Joining the Long Sides
Align the two long sides and, working from the bottom, use CC to ss through both sides as before matching stitch to stitch up towards the neckline.
Do not fasten off, continue to neckline
Neckline
You will work the neckline in rounds, starting in the middle of the long side (where you joined the two pieces), work along the top, over one shoulder, across the top of the short side, over the other shoulder and back to the middle of the long side.
You will turn at the end of each round.
Continuing from joining the long side with ws facing
Neckline For Sizes XS, S/M, M/L
Using CC
Round 1 (ws): Ch1, 1sc into the seam you just created, work 14sc across the row ends of the neckline shaping (working approximately 2sc into each row end), then work 3sc into each of the ch3-sp over the shoulders (skipping the dc) to the neckline on the short side. Evenly work 29sc across the short side neckline (2 in each row end and one in the seam where you joined the sides), continue over the other shoulder working 3sc into each ch3-sp (skipping the dc) back to the neckline on the long side. Work 14sc along the row ends of the neck shaping and join to top of the first st with a ss, turn
Round 2: Ch3 (counts as 1dc), 1dc in next st, dc2tog, ch3, sk 1 st, dc2tog, 1dc in next 3 sts, dc2tog, ch3, sk 4 sts, (sk the last 3 sts on the neckline and the first st on the shoulder section you worked into the ch3-sp on the previous round), 1sc into the next st and each st on the shoulder section to the penultimate st, ch3, sk 4 sts (the last st of the shoulder section and the first 3 sts of the short side neckline, [dc2tog, 1dc in the next 3 sts, dc2tog, ch3, sk 1 st] 3 times, sk the last sts on the neckline and first on the shoulder section, 1sc into the next st and each st over the shoulder until the penultimate st, ch3, sk4 sts (the last st of the shoulder and the first 3 of the long side neckline), dc2tog, 1dc in the next 3 sts, dc2tog, ch3, sk 1 st, dc2tog, 1dc in next st, join to top of ch3 with a ss, turn
Round 3: Ch3, dc2tog, ch5, sk ch3-sp, dc2tog, 1dc, dc2tog, ch5, sk ch3-sp and first st on the shoulder section, 1sc into the next st and each st over the shoulder to the penultimate st, ch5, sk next sc and ch3-sp, [dc2tog, 1dc, dc2tog, ch5, sk ch3-sp] 3 times, sk first st on shoulder section, 1sc into the next st and each st over the shoulder to the penultimate st, ch5, sk next sc and ch3-sp, dc2tog, 1dc, dc2tog, ch5, sk ch3-sp, dc2tog, ss to top of ch3, ss into next st, turn
Round 4: Ch2 (does not count as st), dc3tog, ch7, sk ch5-sp, dc3tog, ch7, sk ch5-sp and first st on shoulder section, 1sc into the next st and each st over the shoulder to the penultimate st, ch7, sk next sc and ch5-sp, [dc3tog, ch7, sk ch5-sp] 3 times, sk first st on shoulder section, 1sc into the next st and each st over the shoulder to the penultimate st, ch7, sk next sc and ch5-sp, dc3tog, ch7, sk ch5-sp, ss to top of first st, turn
Round 5: Ch1 (does not count as st), 7sc into each of next 2 ch7-sp (sk the dc3tog), 1sc into each st over shoulder panel, 7sc into each of the next 4 ch7-sp (sk the dc3tog), 1sc into each st over shoulder, 7sc into each of next 2 ch7-sp (sk the dc3tog), join to top of first st with a ss
Fasten off
Neckline For Sizes 1X, 2X & 3X
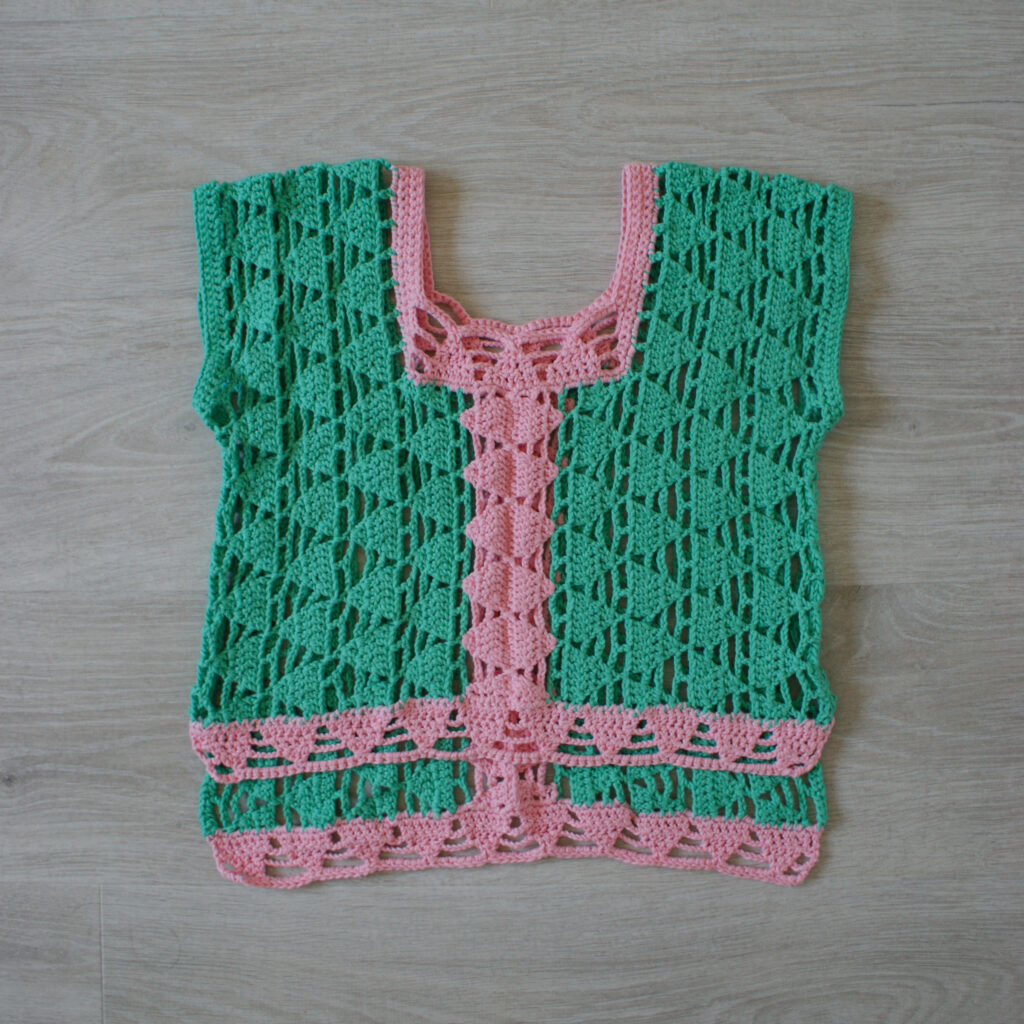
Using CC
Round 1 (ws): Ch1, 1sc into the seam you just created, work 23sc across the row ends of the neckline shaping (working approximately 2sc into each row end), then work 3sc into each of the ch3-sp over the shoulders (skipping the dc) to the neckline on the short side. Evenly work 45sc across the short side neckline (2 in each row end and one in the seam), continue over the other shoulder working 3sc into each ch3-sp back to the neckline on the long side. Work 23sc along the row ends of the neck shaping and join to top of the first st with a ss, turn
Round 2: Ch3 (counts as st), 1dc in next st, dc2tog, [ch3, sk 1 st, dc2tog, 1dc in next 3 sts, dc2tog] twice, ch3, sk 5 sts, (you will sk the last 4 sts on the neckline and the first st on the shoulder section you worked into the ch3-sp on the previous round), 1sc into the next st and each st on the shoulder section to the penultimate st, ch3, sk 5 sts (the last st of the shoulder section and the first 4 sts of the short side neckline), [dc2tog, 1dc in the next 3 sts, dc2tog, ch3, sk 3 st] 4 times, dc2tog, 1dc in the next 3 sts, dc2tog, ch3, sk 5 sts (4 sts on the bottom of the long side neckline and the first st on the shoulder section, 1sc into the next st and each st over the shoulder until the penultimate st, ch3, sk5 sts (the last st of the shoulder and the first 4 of the long side neck line, [dc2tog, 1dc in the next 3 sts, dc2tog, ch3, sk 1 st] twice, dc2tog, 1dc in next st, join to top of ch3 with a ss, turn
Round 3: Ch3, dc2tog, ch5, sk ch3-sp, [dc2tog, 1dc, dc2tog, ch5, sk ch3-sp[ twice, sk first st on the shoulder section, 1sc into the next st and each st over the shoulder to the penultimate st, ch5, sk next sc and ch3-sp, [dc2tog, 1dc, dc2tog, ch5, sk ch3-sp] 5 times, sk first st on shoulder section, 1sc into the next st and each st over the shoulder to the penultimate st, ch5, sk next sc and ch3-sp, [dc2tog, 1dc, dc2tog, ch5, sk ch3-sp] twice, dc2tog, ss to top of ch3, ss into next st, turn
Round 4: Ch2 (does not count as st), dc3tog, ch7, sk ch5-sp, [dc3tog, ch7, sk ch5-sp] twice, sk first st on shoulder section, 1sc into the next st and each st over the shoulder to the penultimate st, ch7, sk next sc and ch5-sp, [dc3tog, ch7, sk ch5-sp] 5 times, sk first st on shoulder section, 1sc into the next st and each st over the shoulder to the penultimate st, ch7, sk next sc and ch5-sp, [dc3tog, ch7, sk ch5-sp] twice, ss to top of first st, turn
Round 5: Ch1 (does not count as st), 7sc into each of next 3 ch7-sp (sk the dc3tog), 1sc into each st over shoulder panel, 7sc into each of the next 6 ch7-sp (sk the dc3tog), 1sc into each st over shoulder, 7sc into each of next 3 ch7-sp (sk the dc3tog), join to top of first st with a ss
Fasten off
Hem

Repeat across the bottom of the long side and short side
With WS facing, join CC to the bottom edge of the sweater
Row 1 (ws): Evenly work 81 (81, 97, 113, 113, 129) sc into the row ends (working approximately 2 sts per row end), turn
Row 2: Ch4 (counts as 1dc, ch1), dc2tog, 1dc in next 3 sts, dc2tog, *ch3, sk 1 st, dc2tog, 1dc in next 3 sts, dc2tog; rep from * to penultimate st, ch1, 1dc in last st, turn
Row 3: Ch5 (counts as 1dc, ch2), sk ch1-sp, dc2tog, 1dc, dc2tog, *ch5, sk ch3-sp, dc2tog, 1dc, dc2tog; rep from * to last 2 sts, ch2, sk ch1-sp, 1dc in last st, turn
Row 4: Ch6 (counts as 1dc, ch3), sk ch2-sp, dc3tog, *ch7, sk ch5-sp, dc3tog; rep from * to last 3 sts, ch3, sk ch2-sp, 1dc in last st, turn
Row 5: Ch1, 7sc in each ch7-sp (sk dc3tog) to end
Fasten off, further block / pin to shape if needed, Sew in ends
Happy Solstice!
How to find me and share your finished makes
I hope you enjoyed this make. If you want to share your finished projects, here’s how:
- On Instagram, you can use the hashtag #DoraDoes to share your finished projects or just tag me @doraexplored
- If you have the bug for creating garments, why not join my dedicated facebook group “My Crochet Wardrobe” and share them there?
- Sign up to the WiP Tip for weekly crochet chat, offers and exclusives straight to your inbox – click here to sign up
Happy Hooking
Dx
Copyright Dora Does Limited, Registered in England, Company Number 13992263. This pattern is for personal use only and may not be shared or reproduced in written, photo, video or any other form without prior written consent. All rights reserved. Terms of service.
This is absolutely gorgeous!
The pattern is mesmerizing and together with the chosen palette – it is mindblowing beautiful!
Wow – thank you for your lovely words! I’m so glad you like the pattern! 🙂