Granny Weave Free Blanket Pattern
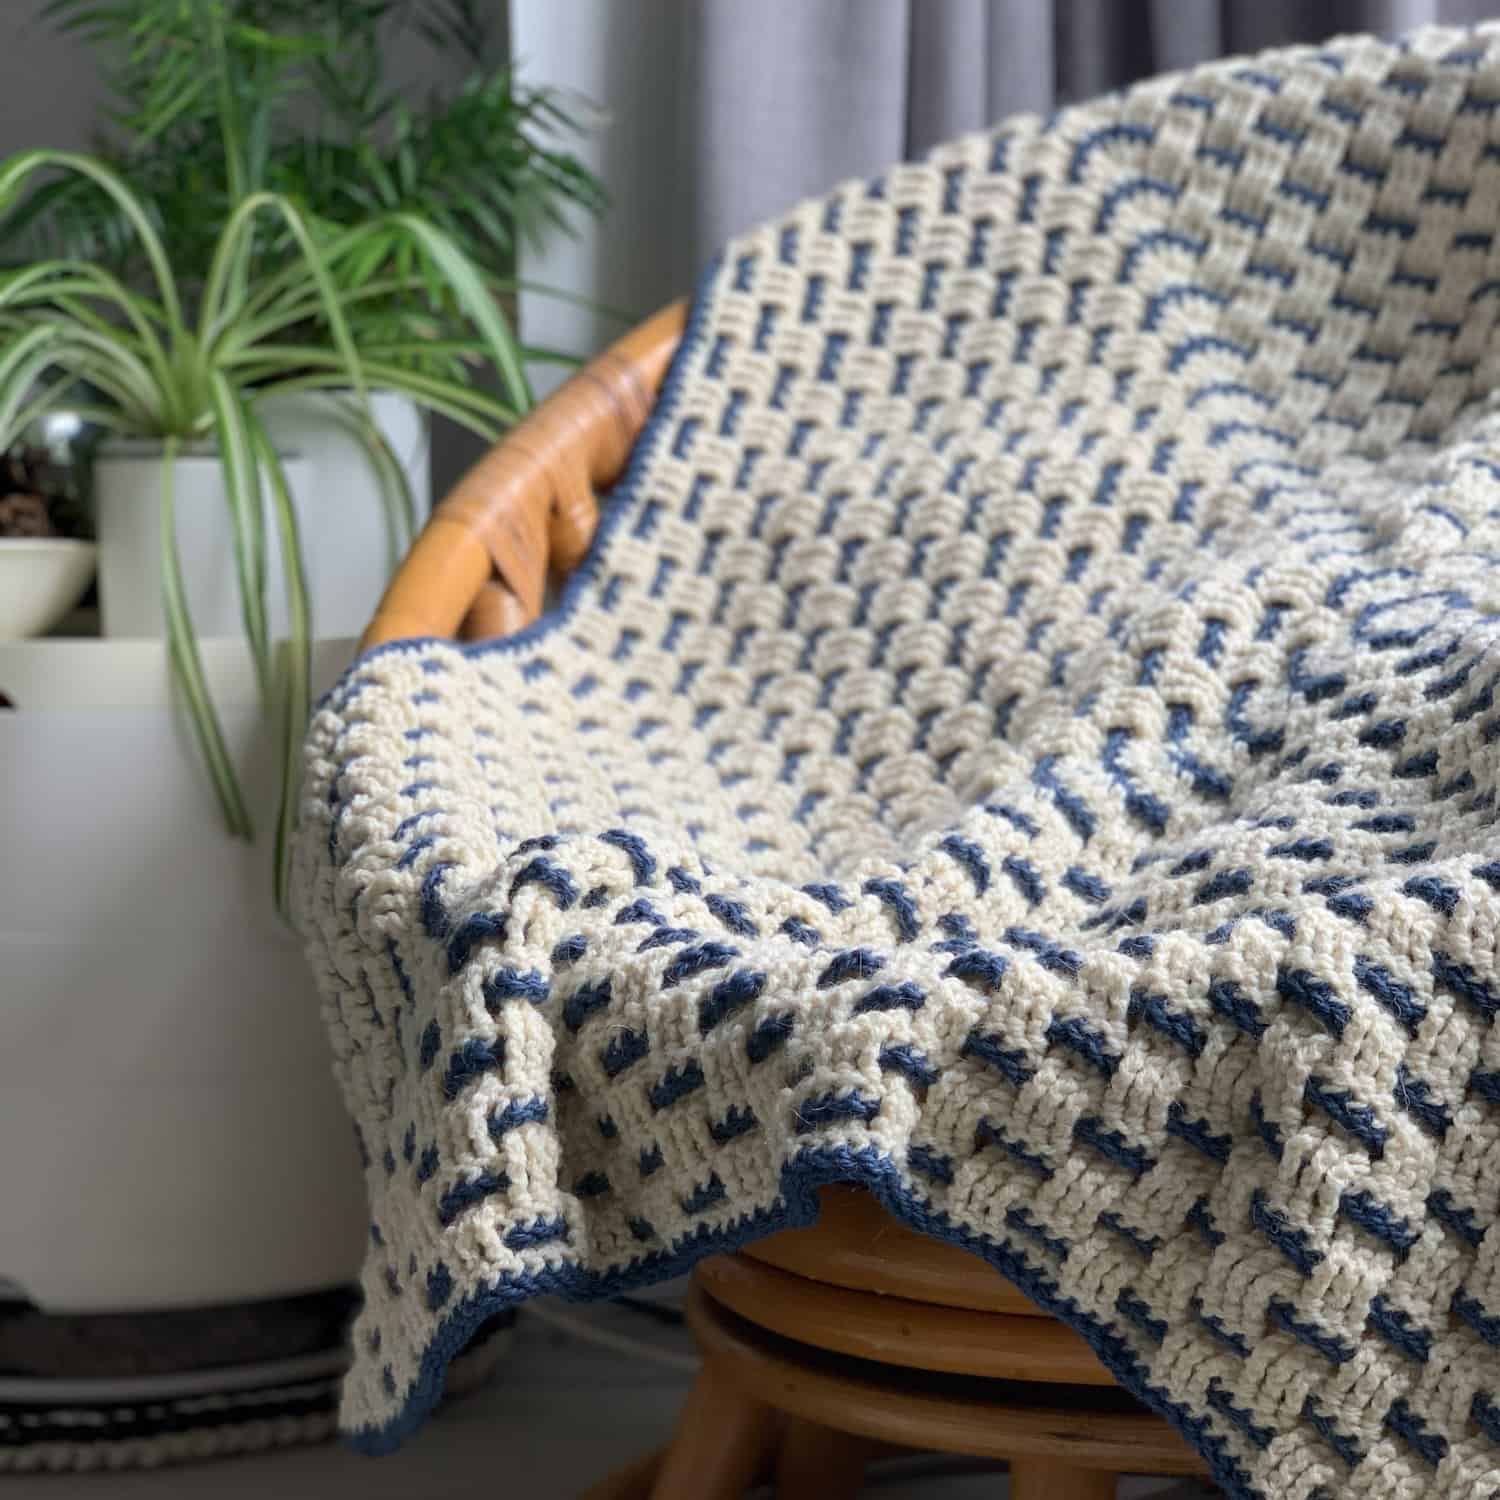
The Granny Weave blanket is a two colour, geometric crochet throw pattern which combines the classic solid granny square with the basket weave stitch.
Just like a typical granny square, you can make it as a large blanket, square cushion or make multiple smaller motifs which can be joined for all kinds of crochet projects.
The granny weave pattern creates a nice thick fabric making it a super cosy blanket. The tall crochet post stitches also give it a lovely drape.

This post contains affiliate links. This means if you click a link to a product and go on to make a purchase, I receive a small percentage of the sale at no extra cost to you. You can read my full affiliate disclosure here.

The pattern below includes a photo guide so that you can see what each round looks like.
The Printable ad-free PDF crochet pattern is available to purchase from Ravelry, Etsy or Love Crafts.
The premium version of the pattern includes both the written pattern alone (for easy printing) and the pattern with the photo guide as below.


Skills Used
- Knowledge of basic crochet stitches and terminology
- This is an intermediate level pattern
- You will be working tall front and back post extended double treble crochet stitches (see special stitches below) into stitches 2 rows below
- If you’re familiar with working granny squares, the pattern should become quite intuitive after a few rounds. If you have a preferred way to work a granny square, this pattern can be adapted to use that (I trust you know what you’re doing!)
- If you are new to granny squares, the photo guide which follows the written pattern and shows you what each finished round looks like may also be helpful
- A left and right handed video tutorial is available for the pattern – links in the pattern notes below

Materials
Hook: 5.5mm crochet hook. I used my clover amour hook
Yarn: Approximately1300g / 2100m Aran or Worsted weight yarn
I used British Aran wool from Wooly Knit
Main colour (MC): 2 x 500g hanks of natural aran weight wool, 500g = 770m
Contrast Colour (CC): 1 x 400g cone denim, 400g = 616m (I used 300g / 460m of CC)
Other: Yarn needle & scissors
Yarn Substitution Options:
You can work this pattern in pretty much any yarn weight and suitable size hook.
Using a different yarn will change the finished size and the yarn requirements of the finished blanket.
Using different fibres will also create a different finished look.
You may find this post useful in choosing a substitute yarn.
How to purchase a Dora Does crochet pattern:
I sell my PDF crochet patterns in my Etsy, Ravelry and Love Crafts stores. You can purchase this pattern on any of these platforms, depending on your preference. Simply click the relevant links throughout this pattern page to be taken to the listing, or visit the store homepages in the links at the start of this paragraph.

Measurements & Finished Size
The finished blanket you see measures around 115cm square (after blocking).
You can work your blanket until it reaches your desired size.
This pattern is not intended for use as a baby or toddler blanket and is not suitable for use in prams, cots / cribs.
Pattern Notes
General Notes
- Please read all the pattern notes before starting your project
- This pattern uses standard US crochet terms (UK equivalents are given in brackets in the abbreviations list)
- Numbers at the end of a round indicate the number of stitches in that round
- Turning chains do not count as stitches
- Instructions written after *asterisks should be repeated as indicated
- Instructions written between [square brackets] should be worked the specific number of times instructed
- Instructions in (round brackets) should be worked in the same stitch
- I recommend blocking the finished blanket
- Wrong and right sides are nominal – you can choose to display the side you prefer
- You can find a right handed video tutorial for this pattern below, and a left handed tutorial here and a photo guide after the written pattern
- This pattern is not suitable for use as a baby or toddler blanket and should not be used in cots / cribs or prams.
- This blanket is not intended to be used as a baby blanket. Babies, infants and children should not be left unattended with this blanket
Construction
- This pattern is a modification of a solid granny square
- The blanket is made centre out starting with a magic ring
- It combines the classic solid granny with a basket weave stitch and throws in an alternating round of single crochet, worked in a contrasting colour to create the graphic colourwork
- The blanket is made with alternating rounds of back and front extended double trebles, working extended double crochet in the corners (see special stitches), and rounds of single crochet
Colourwork
- In this pattern you change colour each round
- I chose to carry up yarn in the starting chain but you can fasten off after each round or use your own technique for changing colours
- The video tutorial (above) demonstrates how I change colours

Stitches & Abbreviations: US terms
(UK Equivalent in Brackets)
- ch = chain
- ch-sp = chain space
- edc = extended double crochet (UK extended treble crochet) – see special stitches
- fp-edtr = front post extended double treble – see special stitches
- bp-edtr = back post extended double treble – see special stitches
- MR = magic ring – find a magic ring tutorial here
- rep = repeat
- RS = right side
- rss = reverse slip stitch (used for the border) – see special stitches
- sc = single crochet (UK double crochet)
- ss = slip stitch
- st(s) = stitch(es)
- WS = wrong side
- yo = yarn over


Special Stitches
Extended double crochet (edc)
Yo, insert hook, yo, pull up a loop (3 loops on hook), yo, pull through 1 loop (3 loops on hook), yo, pull through 2 loops (2 loops on hook), yo, pull through 2 loops to complete the stitch.
This is used in the corner sts of odd numbered rounds. This written and video tutorial shows you how to work the extended double crochet.
Front post extended double treble crochet (fp-edtr)
Yarn over 3 times, insert hook from front to back to front under the post of the stitch 2 rows below (so that the post of the stitch is in front of the hook), yarn over pull up a loop (5 loops on hook), yarn over pull through 1 loop (5 loops on hook), [yo, pull through 2 loops) 4 times to complete the stitch
Note that I kind of made this (and the next) stitch up so haven’t given a UK equivalent!
Back post extended double treble crochet (bp-edtr)
Yarn over 3 times, working from the back of the work, insert hook from back to front to back front to back around the post of the stitch 2 rows below (so that the post of the stitch is behind the hook), yarn over pull up a loop (5 loops on hook), yarn over pull through 1 loop (5 loops on hook), [yo, pull through 2 loops) 4 times to complete the stitch
Reverse slip stitch (rss) for the border
I used the reverse slip stitch on the last round of the border. It takes a little getting used to if you’re not familiar with it, but is easy once you get going.
Insert hook into previous stitch, yo, pull through stitch and loop on hook
The video tutorial also demonstrates this technique.

Gauge
Gauge is not essential for this project as you can just work until you reach your desired size.
However, it is important that your work does not pucker or ruffle as it grows.
If you wish to mimic the blanket pattern pictured, you can measure your square after the first 8 rounds. After 8 rounds my square measured 20cm square.

Purchase an ad-free printable PDF version of the pattern from Etsy, Love Crafts or Ravelry
The Granny Weave Blanket Pattern
Disclaimer: Whilst I endeavour to ensure all patterns are error free, occasional typos or errors may slip through. No liability is accepted for this or subsequent variation in finished projects. However, please do contact me if you think the pattern contains an error or you are unsure about interpreting the instructions.
Information in this crochet pattern is given for reference only. Any reliance on information given in this document and associated reference materials is at your own risk. This pattern falls under Dora Does Terms of Service.
Using MC, make a MR;
Round 1 (WS): Ch2 (does not count as st throughout), work 3edc into MR, ch1 (this ch1 will make a corner space), continuing to work into MR, [3edc, ch1] three times, ss to top of first st, turn. 3edc on each side, 4 ch1-sp corners

Join CC
Round 2 (RS): Ss into ch1-sp, ch1 (does not count as a stitch throughout), [1sc in same ch1-sp corner, 1sc in each st to next ch1-sp, (1sc, ch1) in ch1-sp corner] four times, ss to top of first sc, turn. 5sc on each side, 4 ch1-sp corners

Change to MC
Round 3: Ss into ch1-sp, ch2, [2edc in same ch1-sp, 1edc into the first sc, 1fp-edtr around each of next 3 edc from Round 1, 1edc in last sc before corner, (2edc, ch1) in corner ch1-sp] four times, ss to top of first edc, turn. 9 sts on each side, 4 ch1-sp corners

Change to CC
Round 4: As Round 2. 11 sc on each side, 4 ch1-sp corners

Change to MC
Round 5: Ss into ch1-sp, ch2, [2edc in same ch1-sp corner, 1edc into the first sc, 1fp-edtr around each of next 3 edc from 2 rounds below, 1bp-edtr around each of next 3 fp-edtr from 2 rounds below, 1fp-edtr around each of next 3 edc from 2 rounds below, 1edc in last sc before corner, (2edc, ch1) in corner ch1-sp] four times, ss to top of first edc, turn. 15 sts on each side, 4 ch1-sp corners

Change to CC
Round 6: As Round 2. 17 sc on each side, 1 ch1-sp corners

Change to MC
Round 7: Ss into ch1-sp, ch2, [2edc in same ch1-sp corner, 1edc into the first sc, 1fp-edtr around each of next 3 edc from 2 rounds below, *1bp-edtr around each of next 3 sts from 2 rounds below, 1fp-edtr around each of next 3 sts from 2 rounds below; rep from * to the next corner ch1-sp, 1edc in last sc before corner, (2edc, ch1) in corner ch1-sp] four times, ss to top of first edc, turn. 21 sts on each side, 4 ch1-sp corners

Change to CC
Round 8: As Round 2. 23 sc on each side, 4 ch1-sp corners

Repeat Rounds 7 and 8 for pattern until your blanket reaches the desired size, alternating colours each round and finishing on a Round 8 (single crochet) repeat
Border
I would refer you to the video tutorial for assistance with the reverse slip stitch border.
Below is a close up showing the reverse slip stitch border on the main blanket.

Do not turn at the end of the final Round 8 repeat;
Starting in the ch1-corner sp, work 1rss (see special stitches / video tutorial) in each st and ch1-sp around the blanket, fastening off after the last rss and using a yarn needle to sew in the end to the top of the first rss.
Gently block if needed and sew in ends
As a final note, I wanted to explain that I have used very different colours and fibre yarn for the photo guide and video tutorial (acrylic dk with a 4mm hook). This is because I wanted to give you an idea of how versatile this pattern can be with different yarn weights and colours.

Sharing your finished makes
I love seeing your finished makes – it gives me all the happy feels!
Here’s how you can share them on social media, if that’s your cup of tea!
- On Instagram, you can use the hashtag #HookMeHappy or #GrannyWeaveCrochet or just tag me @doradexplored
- You can share your photos on my Facebook page
- If Pinterest is your happy place, you can add them there too – check out my Pinterest account for lots more crochet inspiration from makers across the web!
More crochet blanket patterns from Dora Does

Copyright Dora Does Limited, Registered in England, Company Number 13992263. This pattern is for personal use only and may not be shared or reproduced in written, photo, video or any other form without prior written consent. All rights reserved. Terms of service.
A very pretty pattern. However, the start of the tutorial cannot be followed clearly as your camera is not centered and it is distracting as you go on. Please fix this problem to avoid the follower from getting discouraged and exiting watching your lovely tutorial!! Thank you! I am watching on a S22+ Cell phone. Look forward to your response.
Hi Jennifer,
I am sorry you had trouble following the tutorial. I know there are parts of it that go off centre (and I freely acknowledge this in the description but thought putting it out there was better than not!) but hope it largely shows the gist. It was intended to the support the written pattern rather than a stand alone tutorial so I hope the two together and photo guide will see you through. Whilst it is on my list to recreate at some stage, video tutorials are incredibly time consuming to create so it may be a while before I get to this.
Thanks for your feedback.
Dora
you mention crocheting into the MR. Is that a magic ring?You didn’t mention making a magic ring
Hi there, thanks so much for bringing this to my attention. It looks like I missed MR from the abbreviations! I’ve corrected this now. Thanks, Dora
Absolutely brilliant!
Thank you most kindly for this magnificent pattern idea!
You are quite a master at creating beautiful new fabrics!
I so enjoy your work!
I will be purchasing your patterns in support of my appreciation for you work as often as I can!
Regards,
Nelly
Thank you so much for your kind words. That is so considerate! I am so glad you enjoyed the pattern!
Wish you didn’t go off screen when showing how to start this granny square blanket.
There are just a couple of the moments in the video when my hands wander out of shot and I do own and apologise for this in the description. I’m not perfect at keeping my hands in the narrow range of the camera and focusing on the crochet and talking at the same time. It’s a work in progress! However, there should be enough repeats in the video and the step by step photos to make the pattern instructions clear. If there’s a particular part that you’re stuck on, please do let me know and I’ll endeavour to help you further with this free crochet pattern 🙂
Oh, thank you so much for this pattern. I’ve been eyeing it since you first posted a teaser/glimpse of it. I love the simplicity of the pattern and it looks gorgeous when it’s finished!
Regards from South Africa, Engela
You’re welcome! I’m glad you like it – I hope you enjoy giving it a try!